Pages

Friday, January 27

Amazing Resin Pendant


My mom enjoys making jewelry and several years ago she talked me into taking a jewelry making class with her.  Since then I have enjoyed making a few pieces here and there, but now that I have found the fabulous Amazing Crafting Products I have even more fun making jewelry.  This is a quick pendant I made in just a few hours. 

I started by making the mold using equal amount of Amazing Mold Putty and a child's wood block.  I found the blocks at a local dollar store during the holidays and they work great for making square molds, round molds, triangle molds, etc. 

After I had the mold created I mixed some White Amazing Casting Resin and mixed a little Black Dye in and poured it into the mold. 

I allowed it to sit according to the casting resin directions and popped it out of the mold and here is what it looked like.  What fun! 


 For the design, I used one of my favorite company's rub-ons.  Would you believe that is a rub-on that is normally used on scrapbook pages and cards?  I, also, drilled a hole in the top and added a jump ring.  After that I added the gems with my heat tool made for attaching stones to jewelry pieces  I finished it off by adding it to some lame' roping with a few extra beads I had from other projects and just like that I had a new necklace to enjoy and what is even more fun is that I created it from scratch with the help of Amazing Mold Putty and Amazing Casting Resin!


Wednesday, January 25

Portrait of a Lady Pendant with Jingle

Hello, AMP fans! Today I am sharing a fairly simple project created with the fabulous Amazing Clear Cast resin! Instead of creating my own mold for this one, I used one made by Sculpey to create the woman's face.

Molded lady face


Next, I layered the cast piece over a sheet of patterned paper with a girl's face printed on it. This allowed the colors to show through the clear resin. Very fun technique!

Cast piece with paper
Cast piece over paper face


Next, I glittered a pendant frame from Coffee Break Designs and layered a background paper in the frame. I attached the face with the paper backing and added some color with Prismacolor markers. Finally, I added a simple jump ring and a satin cord (May Arts) to finish off the piece!

Portrait of a Lady Pendant


Have a fabulous day!!! To see more of my work visit me at Just Jingle! Thanks!

Monday, January 23

Make a Lace Pendant Necklace... by Niki Meiners

Last November my family and I went on a road trip to Raleigh to see Sean Casey and his TIV2. For those of you who have no clue what a TIV is... well it is the Tornado Intercept Vehicle driven on Storm Chasers. My son loves the show. On our journey home we needed to make a stop. While we were looking for a suitable stop we cam across and amazing junk store. I could have purchase so many items. However I did not. I purchase these items.


These were all molded in Amazing Mold Putty within an hour of my return home. The first piece I made was from the lace. I cut the large flower and the small one off of the piece not knowing what I would eventually make.


Once I cast the pieces with Amazing Casting Resin I knew immediately what the small one would become, a necklace.


After painting the cast piece I decided it needed a tiny bit more. So in the very center I placed a Swarovski Crystal. 

~ Niki

Sunday, January 22

Sweet Valentine's Treats using Amazing Mold Putty

Happy New Year!!! Hello...Susan here with a new "AMAZING" adventure with Amazing Mold Putty. Today I am a little sticky, and having so much fun making some fun Valentine's Day treats.

DID YOU KNOW????
Amazing Mold Putty is FOOD SAFE!!! YES - I said food safe. You can use it for candy molds, jello, cupcakes...and more. JUST as long as you don't put any RESIN in it first. When you make an Amazing Mold Putty mold for food purposes...it can only be used for food/edible products. To mix up Amazing Mold Putty, I followed the simple illustrated instructions on the packaging. If you want a more in depth how-to of mixing Amazing Mold Putty please click here.

Today's project I am casting some fun Valentine's shapes in Amazing Mold Putty. I couldn't resist when I found this at my local favorite Dollar Tree! A lollypop with some fun cartoony lips on the front. I must make a candy/food mold for Valentine's Day goodies.


Please see accompanying image number(s) to go along with written instruction/description.


Photo 1: Mix equal parts of part A and Part B of Amazing Mold Putty and blend evenly. Then place plastic lips into putty and let cure. Photo 2: Completed heart shape removed from cured mold. Photo 3: The base of lip mold was a thin in three places {where three red spots are}. This was repaired by creating another small ball of putty and molding it to the bottom of existing cured mold. Photo 4: I had some chocolate mint peppermint bark in my fridge, so I decided to melt this down to pour in my NEW candy molds. I broke up the chocolate into a small pyrex bowl that I placed into a pot of simmering water {a double boiler]. This is a slow melting process. The candy melted fine, but the peppermint candy in the chocolate altered the consistency of the chocolate. Photo 5: Melted chocolate poured into molds. I put these in refrigerator to harden. When hardened, I removed from mold - but they did not look good...they resembled soggy brownies. So now to the Godiva White Chocolate.


Please see accompanying image number(s) to go along with written instruction/description.

Photo 6: I broke up the white Godiva chocolate into small pieces and placed in my makeshift double boiler. I added several drops of red food coloring and stirred into the melted chocolate. Photos 7: Close-up of lip mold filled with tinted white chocolate. Photo 8: I poured melted chocolate into the heart shape mold and into another mold I have prepared for another project - but not yet utilized. Photos 9, 10 and 11: Completed chocolate after hardening in the refrigerator. The result is a little soft and melts to the touch very easily. So I do recommend getting proper melting chocolates from the craft store. I was just using what I had on hand at home.


Amazing Mold Putty will withstand temperatures up to 395 degrees. So this is perfect for cake batter and cookies which bake at 325-350 degrees. So I also tried some ready made sugar cookie dough nuggets {these are pre-measured discs for perfect shape cookies}. I let the dough get to room temperature then pressed into the molds. PLEASE NOTE: these cookies were twice as tall during baking. I removed half of the dough midway through the baking process since they were about a 1/2" out of the molds. I used a knife and gently lifted of the top of each. I will have to experiment more with the cookie dough, so that I won't get an overdone cookie with the crunch of a dog biscuit. But they do look tasty! I topped each with red gel icing....Mmmmmm-mmmmmmm!!!!

The icing on the cake is the J-E-L-L-O lips! I poured cherry gelatin mix prepared following instructions for molding gelatin on package. I did pour into the other heart molds, except that because my fridge underwent a power outage during the day - then reset itself to default settings...all of the gelatin came out frozen. The lips survived - and they are luscious!!!


I hope you enjoyed today's project. I encourage you to stroll around through the many AMAZING projects from the other Amazing Mold Putty Design Team members for some great tips and ideas!

It's only one week until CHA!!! Projects by the Amazing Mold Putty Design Team will be on display in Booth #2252. If you will be at CHA - please drop by and see our creations in person. I will be there Sunday and Monday - if you want to meetup - please message me on Facebook {CLICK HERE to go to my profile}.

If you have any questions, please leave a comment, select receive e-mail follow ups on comments and I will respond. If you would like to see more of my creations, please visit my blog sbartist : painting in the dark by clicking here.

I hope you all have a wonderful Sunday and have fun making your own tasty Valentine's treats! : )

Saturday, January 21

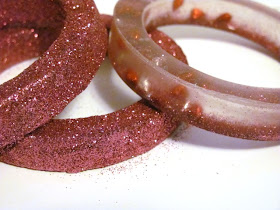
special project posting | Glitterific Bangles

I just wanted to pop over here today to share with you a project I made using Amazing Casting Resin and Amazing Clear Cast for Gill's Glitter and Bling Blog Hop that I"m a part of.
Drop by my blog to see how I made these and feel free to hop along and see some other fun glittery and blingy projects!
 Thank you for looking! I hope you enjoyed these fun bangles!!
~leslierahye

Friday, January 20

CHA Bound!

As part of the AMP team we get the chance to show off our best molded pieces @ CHA!! Here is one of the cards I sent! I wanted to embrace the scrapbookers, cardmakers, altered artists and paper crafters in general.. so I molded a piece of jewelry and turned it into an embellishment!!


After the card base is complete.. cut inked and assembled.. I worked on my molded piece!

1st - I cast my owl in the 2 part molding putty by mixing equal parts of A and B, then pressing my piece into the putty and allowing it to cure.

2nd - I mixed my quick cast resin (equal parts A and B) until clear

3rd - I added a very minute amount (SO SO Small.. about the size of a diamond in an earring or a grain of sand) of Alumilite's Brown Dye - then mixed it into the clear resin, poured into the mold and allowed it to cure

4th - After it was set I peeled my piece out and dry brushed the little fella with white acrylic and then "stained" him with Rusty Hinge distress stain!

Thanks All!! -DeeDee

Monday, January 16

The House Rules with Amazing Casting Resin

Happy New Year! Yes, the new year began over 2 weeks ago but this is my first post of 2012 and that sentiment is pertinent to today's post! I have been admiring co-crafters' work lately and have found that several have created these signs for decor in their homes...a words to live by kind of thing. I think they're terrific and I have been mulling over in my mind for a while how I planned to do this! When I saw Nikki's digi on the MelonHeadzIllustration Blog. I knew I wanted to incorporate that some way into my sign. It was not until I found this broken piece of pottery from my friends' house that the entire project developed in my mind...so, for the New Year, I bring you 
The House Rules--A Wall Hanging
This Wall Hanging was built on a 12"×12" black foam core base.

I began by making my mold of the decoration on the pottery shard
The mold came out a bit dirty so I molded a very thin piece to
throw away to pick up all the dirt from the casting.
I then added Alumilite Metallic Powder in Bronze
to the mold and poured Amazing Casting Resin --white--
into the mold. Rather than pour the mold quickly, I
took my time so that I could control the flow and not
over-flow the bounds of my mold too quickly.
This is a gratuitous photo of the resin quickening--it always
amazes me how cool it looks when it does this!
I left the resin in the mold until it easily pulled away from the
mold, about 30 minutes. I pulled it off to this dullish bronze cast.
I dry-brushed over the cured cast with more bronze powder
and then highlighted it with Terri Sproul's Mixers in Red Satin.
Those colors together match the painting I do in a later step.
I also molded for this project a piece of crochet that I had done,
and cast it with the  Creative Paperclay® product DelightTM  . The
Delight casting was then brushed with Sakura Hobby Crafts
3D Crystal Lacquer mixed with the Alumilite Bronze Powder.
The flower was then dusted with some Terri Sproul's Mixers in
Red Satin to match the project.
The MelonHeadzIllustration Digital Stamp was enlarged
to 8"×7½" and printed on a piece of Basic Grey Card Stock.
It was then edged with Black ink and painted in using
Sakura 3D Crystal Lacquer, Bronze Powder from Alumilite 

and Terri Sproul's Mixers & Colored Crystal Lacquer. 

The edges of the black foam core were brushed with
Sakura 3D Crystal Lacquer mixed with Alumilite Bronze
Metallic Powder
. The premade brown butterfly received the
same treatment to help him match the elements in the
project. The large casting was adhered to the foam
board with E6000--as was the lace leaves, Delight flower
and Butterfly. 
Thank you for looking! I hope you enjoyed my project!


Friday, January 13

Reproduction Jewelry from a Special Keepsake


Hello crafters! Carole here today to share a special project. This pin is one of my favorites. It belonged to my mother. Her brother (my uncle) brought to her as a gift when he was in the Navy during World War II. I've always enjoyed wearing this piece of jewelry as a pin, but with Amazing Mold Putty I can now wear a reproduction as a necklace!

I made a mold of the original pin mixing equal parts of "A" and "B" of Amazing Mold Putty, and kneaded them together until I had a uniform yellow color with no streaks. I rolled the putty into a smooth ball and slightly flattened the ball before pressing the pin face down into the putty. In about 10 minutes the mold was set. Here I have a white casting that I can treat in a variety of ways – gilding foil, paints, markers. I just haven't decided exactly how I want to treat this one.


For my finished pieces I used Alumilite Gold and Silver Metallic Powders and different colored mica powders to achieve different looks for the reproductions. I brushed the powders into the mold before pouring in the Amazing Casting Resin. The resin is easy to mix – equal parts "A" and "B", stir together until there are no streaks, and pour into the mold.


I also use pearlized Ultra-Thick Embossing Enamel and mica powders for two castings – one is a full reproduction and one is only the face.


The neatest thing is that now I can share a piece of mother's jewelry with my sisters.

There is so much you can do with Amazing Mold Putty and Amazing Casting Resin! Check out my Create & Craft blog for more project ideas.   ~ Carole

Wednesday, January 11

Amazing Mold Putty® and a Victorian Picture Frame


Wow is it just me or has it been hard for anyone else to get into the swing of a New Year? I am however rather proud of the cute little picture frame that I made using Amazing Mold Putty® and also Amazing Casting Resin®. Let me tell you something about these products, there are other brands out there but from my experience I would go for these products every time. These products are just so easy to use!! To begin with I assembled the product I planned on using:

AMP MOLD PUTTY VLVS PAPERCLAY 003 All that you have to do is knead equal amounts of Part A and Part B together  and flatten it a bit and press your $1.00 bargain picture frame into the putty.

AMP MOLD PUTTY VLVS PAPERCLAY 004 I know you’re thinking that couldn’t really do anything special and when it’s set and you pull the frame out, it looks like this:mold putty picture frame 002 Which is even more unappealing. Once the mold was made I mixed up equal parts of the resin along with some black dye, poured it into the mold and let it set up. It was a fun process and once it was finished I used some rub and buff to burnish the edges. I then inserted a Victorian picture that I had and covered it with Crystal Lacquer. I used some Petaloo flowers to embellish along with a ribbon for a hanger. I really like the way it turned out, what about you?

mold putty picture frame 005

Aren’t these ladies beautiful? Do you see all the details that the Amazing Mold Putty® picked up when the picture frame was pushed into it? This stuff really is amazing and they weren’t bragging on themselves when they picked that name! lol Let me know what you think of the project please and ask any questions that you might have about it. You can find these products at Michaels stores and also Hobby Lobby.

Barbara

Tuesday, January 10

Clear Cast Resin and Embossing Powder = Necklace

Hello Mold Putty fans!  I'm always trying new things with Alumilite products. I made this necklace by pressing clear stamp label frames into Mold Putty.  After pouring the Clear Cast into the mold, I sprinkled on some embossing powders.  One it set, they were the colors of the embossing powder.  I high lighted the edges of the frame and applied more embossing powder so the design would stand out.  What's so cool about this is when the resin is set and you heat emboss, areas of white start to show up :)