Pages

Monday, December 31

Altered Altoid Tin


This was my first try at an altered Altoids Tin, so don't mock it too badly - lol.  I really like how it came out!

The tin itself was not difficult and there are a lot of tutorials out there (just google) so I won't go into that other than to say - don't cover it all with paper until you research - I did and mine wouldn't close so I had to make a loop closure for it. 

In looking at samples others had created, I noted quite a few with frames on the front.  And, since, eventually, I would like to make a class out of this (once I get it right), I knew I needed more than one of whatever I choose to use on top!  So, I chose some frames that I purchased in a kit a couple of years ago at a warehouse store.  I know that I can't possibly find them again, so I had to be able to make more.  And . . . in steps my  Amazing Mold Putty:

I mixed my Amazing Mold Putty mixing a 1:1 ratio of "A" and "B" (click on the link at the end of this post to go to their website for a tutorial).


Next I made a mold of each of my frames and then mixed my  Casting Resin (use the link above for detailed instructions) - equal parts A and B. As soon as parts A and B are thoroughly mixed you can begin pouring into your mold (It will turn an opaque milky white when it is completely hardened unless you are using clear or unless you added some dye to it like I did!  I mixed one drop of the African American dye  (Alumilite Dyes ) to side "A" before mixing the resin.  Check out my step-by-step pictures below.  You can see that the frames have a bit of color even before I play with them.


I choose the very last frame in the bottom right pictures to use for my tin.  I then painted it black (I only needed on coat because it was not the white resin).  After it dried I rubbed a bit of silver on it and it was ready to adhere to my altered tin.  If you look closely, you can see a key I made and showed in an earlier blog post. . .  couldn't alter the tin with just one molded item!
 
 
I really like the way it turned out.  Next time I think I will go back and dry brush a bit of the black back on it to "dirty" it up a bit (like the key).  Let me know what you think.


Thanks for checking out my project!  The  Amazing Mold Putty and Casting Resin are so easy to use and as I've said in the past, you really can recreate any embellishment you want to use more than once.  Head over to the Amazing Mold Putty website and check out all of their products.  Be sure to comment and ask questions if you have any.
 
~ Make Today Count
Wendy


Thursday, December 27

Cupcake Topper


Hi hope everyone had a Merry Christmas.  I know I did.  This idea came to me because it seems everyone is into cupcakes these days, so now you can make your own toppers so easily with Amazing Mold Putty.  Above are parts 1 and 2 plus blue dye for the clear cast resin.


 Here I am adding blue dye to parts 1 and 2 which has been mixed according to package directions.  


The dye has been added, try to be sparing with the dye as it is intense.  I will stir this until evenly mixed.

 As you can see the mixture is uniform in color and ready to pour.


This is the mold and antique glass fixture will be what I use for the topper.


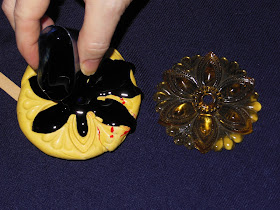
Here I am pouring the Clear Cast Resin into the Amazing Mold Putty mold.


As you can see I have accidentally overfilled.  Not to worry, when it's dried you can trim off the excess.  The  casted item will pop right out.


The two cupcakes are ready for their toppers.


Cupcakes!!!!  Silver edible glitter on this one, plus a sprig of flowers.


Another mold, red this time for the season.


Second cupcake complete, ready to eat.  Have a great New Year, see you next month.

Monday, December 24

There's No Place Like Home Elixir Bottle


I just love all things Steampunk and with a Gothic decay look, so I had to make a little elixir bottle.

I also love cairn terriers (I have 4), so with a little terrier statue in hand I decided to include the terrier head (I would cast) on the elixir bottle.

Who is the most famous cairn terrier? Toto, of course. So I decided to call my Gothic decayed elixir bottle "There's no place like home elixir". I had already made molds of a key, lock cover, compass and a globe, so I would cast those to include.


Supplies:
Amazing Mold Putty
Amazing Casting Resin
Black Dyes
Stir stick
Small paper cup
Bottle
Tissue paper
White glue
e600 glue
Acrylic Paint- black, burnt umber, burnt sienna and metallic copper
Label maker
Embellishments- key, gear charms
string or ribbon


Directions:
Make a mold of the dog. This dog was from the dollar store and painted ugly.


Make casts of dog and other embellishments. I had already made molds of a key, lock cover, compass and a globe, so I cast those too.


Mix according to directions.

I added dye to the mixture, if you do that make sure to add the dye to part A before you mix the two together.


The resin mold waiting to cure.


These are my resin pieces that I will use on the bottle.

The one center bottom came out rather cool. There was not enough resin to fill the mold and it came out all broken looking. I really liked this look.


You will also need your tissue paper, white glue and a brush. I ended up using a much smaller brush than the one pictured.


Take your bottle, it can be glass, ceramic or whatever and begin gluing wrinkled up tissue paper on the surface.
I used white glue and a medium sized paint brush.


When you finish gluing the tissue paper all over the surface, let it dry completely.

The next step is painting and you want that on dry tissue paper.

You can even glue a single layer over the top of the bottle and then punch in the middle and glue the edges of the tissue paper inside the lid. Do it in a single layer, too think and the cork won't fit.

The tissue paper gives a nice surface for the paint to be applied. If we paint directly on the glass, the paint may flake off and we can't have that!


Next decided on the layout of your embellishments ( your resin pieces)  and glue those down suing E6000.

Also use your label make and punch out any text you want to include. Glue that down at this stage too.


You are going to use 4 colors of paint next; black, burnt umber, burnt sienna and metallic copper. The copper is last and done after everything dries so I didn't squirt any out (it would dry up before I would get a chance to use it).

You will paint from darkest to lightest.
Start with Black and paint everything.

Try not to add too much water to the paint because you are painting over tissue paper and too much water can cause it to tear.


One layer of black


Paint over your embellishments. I know this is hard, but the black will be the shadows. I don't have to get it in every nook and cranny since I cast this piece with some black dye in the resin.


After the black dries you will go back over it with the burnt umber and then burnt sienna. Use a dry brush technique- no water. Even dab off extra paint in a paper towel. You want to just lightly brush the surface with the paint. Don't try to get into the deep areas at all. This is the first and second layer of highlights. If you paint it too much, you can always back up a step and put more black, wait for it to dry and then try again. Acrylic paint dries very quick so this go quickly. I made this whole project in just a few hours.

Make sure to let each layer dry completely, if not your colors will get muddy and blend all together. That is not the look we want. We want to see each separate color.


Label maker saying with the paint.


Another side.


These have the first 3 layers of paint on.


Last stage, add a dry brush of the metallic copper to highlight special areas.


This makes the lettering really pop and anything you want to emphasis.


The finished piece. The photos do not serve it justice. This piece rocks... now what else can I do this effect to? Hmmm.


I tied a string around the top and added some
key charms. 


Wednesday, December 19

Clay Dolphin and Resin

I love mixing products together. I was watching a Documentary on Dolphins and it gave me an idea to try with clay and resin. First thing I did was make a piece with polymer clay (you can also use Creative Paperclay®) and used a wire to attach the dolphin as if he was jumping out if the water. Once that was done, I baked it according to the clay instructions and got ready for the next step!


Next I mixed the Amazing Clear Cast Resin (according to the directions) and poured it into my "water" part in my piece. Here is my finished piece. 


I have been in love with making items like this lately as I also made a Snowman family on ice to sit around the house at the holiday time.


Always think outside of the box with these Resin and Amazing Mold Putty products. They are so awesome and can make some really great Art to sit around the house!