Pages

Friday, October 31

A Pumpkin and Her #Cre8time Ghoulish Grin...
by Tracy Alden


Happy Halloween! Tracy here with another Amazing Crafting Products tutorial! For my family, the daylight hours of Halloween means getting all of the decos and food ready for all the ghost and goblins later! Carving and decorating pumpkins is a major part of this frightfully fun time! While I carve real pumpkins for the porch, I often get a new foam pumpkin each year to be part of our ever growing pumpkin patch yard haunt. This year I wanted to try a very different look by making resin teeth for a grinning pumpkin!

Supplies: 
  • Amazing Mold Putty
  • Amazing Casting Resin
  • Acrylic Paint 
  • Paint or Foam Brush 
  • Craft Knife 
  • Polymer clay 
  • Hot Glue Gun and Glue Sticks 
  • Craft Pumpkin – Foam or Paper Maché 
  • Emery Board 
  • Clear Stamp Acrylic Blocks 


I started with a basic medium sized craft foam pumpkin, cleaned the surface well and sketched out a face lightly in pencil.


Using craft pumpkin carving tools, I carefully carved the pumpkin. I went over all of the carved edges with an emery board to remove any jagged and uneven edges.


For the teeth I cut polymer clay into thick triangles with a thin stem, basically an arrow shape. The point is what will become the teeth and the shaft of the arrow is cut thinner than the teeth so it will fit into the mouth of the pumpkin. I added a little bit of texture by dragging a toothpick over the teeth and then baked them on a ceramic tile. 


After I baked the polymer clay, I lightly sanded and trimmed the edges of the pieces with a craft knife and an emery board. As you can see in this photo the tooth is twice the width of the stem portion.


I placed the polymer clay originals flat side down on Clear Stamp Acrylic Blocks and mixed up some Amazing Mold Putty {CLICK HERE to view mixing/preparation}. I place the originals on Acrylic Blocks to see if the molding putty is plumb to the piece and to make sure there is no creases forming when placing the molding putty on the piece. 


Once the molds were fully cured I mixed up a batch of Amazing Casting Resin and poured it into the tooth molds {CLICK HERE to view mixing/preparation}.


Once the resin pieces were fully cured, I lightly sanded and trimmed the edges of the pieces with a craft knife and an emery board. I then used a sponge to apply orange acrylic paint to the resin teeth.


Using a damp paper towel I applied black paint to the foam pumpkin's eyes, ears and mouth openings, giving it a spooky appearance.


Carefully I glued the teeth into the mouth of the pumpkin, putting glue only on the stem of each tooth and pressed firmly against the inside of the pumpkin, making sure the triangle portion of the teeth were sitting on the lip of the mouth. 


Using a paint brush I applied black acrylic paint to the teeth and the edge of the smile, to make the teeth blend better with the pumpkin.


With the addition of fellow pumpkins, leaves and lights, I now have a wonderful new spooky addition to the haunted pumpkin patch! 

What AMAZING arts and crafts can you create?


Visit my blog Art Resurrected for more craft tutorials!

Until next time, safe travels! ~ Tracy

• • • • • • • • • • • • • • • • •

Don't forget to subscribe to our blog on the right side bar:
Twitter at AmazingCrafting | Facebook at AmazingMoldPutty | YouTube at AmazingMoldPutty

Thursday, October 30

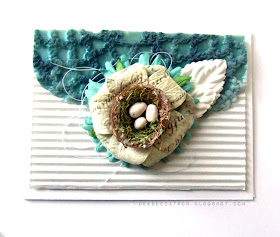
AMAZING Faux Texture with DeeDee Catron

Hioh! DeeDee here and I hope all is well in your crafty world :)

Today I want to share with you a way to create faux textures like the Amazing Casting Resin doily on this card.


I really adore adding in fabrics, metals, woods and other pieces of texture and materials into my work, and generally I'm a big fan of using them like they are... BUT sometimes I like getting the look of something in completely unexpected ways. 


So join me today on a little video and photo tutorial slash experiment
and be inspired to use your products in new ways:


If you are having trouble viewing video, please CLICK HERE to view.

Amazing Crafting Products Supplies:


TIP >> Use Mold Release

Other Supplies:

  • Corrugated cardboard in white
  • Dimensional Adhesive
  • Rolling pin, thread, flowers and nest

Any ideas for textures you'll be recreating?

Thanks for stopping by today - DeeDee

• • • • • • • • • • • • • • • • •

Don't forget to subscribe to our blog on the right side bar:
Twitter at AmazingCrafting | Facebook at AmazingMoldPutty | YouTube at AmazingMoldPutty

Wednesday, October 29

#Cre8time Tricks and TREATS... Monster Mash Party Thank You Cards by Maria Soto


Hi there, this is Maria and today I bring you a spooky Halloween Thank You card I created. Well Halloween is almost here and there will be lots of trick or treating going on, but also there will be lots of parties too. One of my sisters loves Halloween – it is her favorite holiday and she tries to always have a party for family and close friends to come over after all the walking around asking for treats or tricks. We get together for fun games, great food, candies and maybe even a scary movie. I thought it would be nice to make a few thank you cards she can give out to the adults that come over... a nice little treat to say thank you for coming over for a spooky gathering.

The materials I used for this project:

This project was inspired by this monster door I created with help from my daughter and friend a couple of weeks ago. 


So first thing was to cut out a similar shape out of cardboard with my Westcott scissors. Once I had the shape and size I wanted, it was time to get my Amazing Mold Putty out and get it ready to make my mold. You can CLICK HERE to view instructions on how to mix this amazing product. 


I wanted to show lots of distress on my mold, so I pealed off parts of the cardboard {as you can see on the photo above} until I had enough distress to make my mold. Once I had the cardboard shape I pushed it into the prepared Amazing Mold Putty – it only took about ten minutes for the mold to be ready to use.


Here you can see the finished mold.


I love how the Amazing Mold Putty shows
all the markings from the cardboard piece.


I thought coloring my mold with Sharpies in different colors would be a good idea. However I found out by trial and error, that this is not something you want to do. The chemicals in the Sharpies don't mix well with the Amazing Clear Cast Resin – it prevents it from curing 100%. To use this mold for my project, I used a Clorox wipe to remove as much of the ink from the sharpies as possible. 


Time to mix my casting resin, I will not add any color to my resin this time, I want to see if the resin picks up any of the sharpie ink left behind on my mold. CLICK HERE to view instructions on how to mix the Amazing Casting Resin


Here is a close up of the first resin piece I made, the resin did pick up some of the sharpie ink colors I used. To be honest this was my favorite, though it was hard to remove it from the mold, but it came out great. I added a little bit of black acrylic paint and I have to say I'm very happy with this piece.


Here is a fun piece I made using the Alumilite Fluorescent "FLO" green dye, I added the dye to the part "A" of the Amazing Casting Resin, mixed it well and then added part "B". I mixed completely and poured straight into the mold. I love the green color, and just might add some glow-in-the-dark paint on it later on – just for fun.


Here is a close up of the second piece I made, I brushed some of the Alumilite Metallic Powder to color this piece, copper and bronze, then I added the Amazing Casting Resin. Once it cured, I brushed some black and red acrylic paints, specially to highlight the mouth and eyes. 


For all these pieces I got the pin backs that have glue already on them – however I thought it would be safer to add these to the backs of my resin pieces before the Amazing Casting Resin was cured; hence using the resin as a glue to make sure the pins stay securely on. 


Here are a couple of photos of the finished thank you cards I put together, as you can see they get a little thank you note, along with a hand made Halloween jewelry piece and a candy treat. I'm hoping these are a hit at the party. 


For this card, I thought it would be fun to bring out some other resin cast pieces from my stash. I used a resin bird I colored with black acrylic paint with a tiny crystal for the eye and my resin doll head made with Amazing Casting Resin colored with the Alumilite Fluorescent "FLO" green dye, added some black acrylic paint and a few little crystals just to add some sparkle - everyone lives a little sparkle in their jewelry.


I hope you like my Spooktacular resin thank you cards! I think these little thank you gifts will be a hit with everyone at the party. 

How would you use these Amazing
products in your next party?

Share your projects with us, we love to see what
everyone creates with these Amazing Crafting Products.

Thanks for visiting! I invite you to stop over to my blog "What is Creativity"
at http://chuy-creativity.blogspot.com to see more of my creations. Maria Soto

• • • • • • • • • • • • • • • • •

Don't forget to subscribe to our blog on the right side bar:
Twitter at AmazingCrafting | Facebook at AmazingMoldPutty | YouTube at AmazingMoldPutty

Tuesday, October 28

A Mantle for all #Cre8time Ages... Shrunken Macabre with Rachel Whetzel

Hey, AMAZING gang!! Rachel Whetzel, here! Playing some more with my apothecary display!! I recently made some large scale Heads in a Jar for our High School's Zombie Ball Homecoming dance. 

*WARNING: this post is picture heavy

Here are my original gallon sized heads in a jar! 


For the gallon sized heads in a jar, I used pictures of some of our Seniors, following the instructions from THIS SITE. I didn't have the same photo editing software that the site used, so I used iPiccy, and PicMonkey along with Picasa to achieve the same results. When the full sized heads in a jar were such a huge hit, I got the idea to do a smaller, "shrunken head" edition with Amazing Crafting Products


WHAT YOU WILL NEED TO MAKE YOUR OWN SHRUNKEN HEAD IN A JAR:
*you can click on any of the photos in the post to view them larger. 
First, take a picture of your subject making a face for your jar. Take a side picture also. (These are the cropped photos... you can leave space around your face and crop once you load to Picasa.) 


In Picasa, crop your images to 4X6 size, and take the front of your face off of the side angle shot just near the corner of the eye.


Once you have cropped your images, load them to iPiccy. In iPiccy, choose the collage option, and then  select the second option on the fourth line, with three image areas. Don't load your photos. Simply select the red check mark at the top right of the screen when you're done choosing your collage. This is your background that will provide you with the space you need to work.


Next, choose the tray icon, which is the LAYERS tab in iPiccy,
and then choose the picture option for layering. 


Click the UPLOAD PHOTOS button on the left,
and choose the images you took and cropped. 


Drag your images one at a time, onto the background, and pull with your mouse curser, on one of the corner circles to make your image larger. 


Drag your side picture onto your background twice, and use the flip button to change it's direction on one of them. Layer the side images over the top of your front facing image and line them up to fit your front image using the hairline and eye area to best match up your photos. Don't worry if your side images don't fill your background completely. We'll fix that later. 


When you are done layering and positioning your images, click the red check mark at the top right of the screen, and then choose the "floppy disk" SAVE tab. You'll have the option to save your image as a PNG or JPG, but Picasa automatically converts PNG to JPG, so I use the JPG option.


Now, open your new image up again in Picasa.
Use the RETOUCH option to blend your hard lines. 


Click on the hard line, and then move your mouse to the left or right. The area you move the curser to, is the area that Picasa will replicate, so use areas of the face that will blend well. If you make a mistake, just choose UNDO PATCH to remove your last retouch. You can also adjust the size of the area to be retouched. 


At the bottom of the neck, I use the existing edge of the neck as a retouch area, and move my curser until the hard line of the underside of the neck lines up well in the spot I am retouching. 


Once I'm done, I save my photo and take it to PicMonkey


In PicMonkey, I click on the lipstick icon, and use the AIRBRUSH option in touch ups to smooth the lines and blend the color of my face further.


NOW FOR THE FUN PART!! I use the THEMES in PicMonkey (the Pumpkin icon) and play with the themes there. I used the BEARD edit, and the ZOMBIE BRUISE, along with some of the texturing in the WITCHES theme. 


Another favorite is the ZOMBIE theme GASHES AND SLASHES. I used one of the Gashes and Slashes to create a stitched effect over my shrunken head's mouth. The actual layer was too long, but there is an eraser edit on most layers in PicMonkey that allow you to remove the layers in whatever area you want. I used that to cut my staples short enough to *just* cover the mouth. As you can also see in the photo below, you can move the layer and tilt, flip, etc... to arrange it just the way you'd like. Clicking and holding the circle with a line to the surrounding line is how you drag the layer to move it.


I used another of the Gashes and Slashes to create a chopped off head look. 


I saved the image when I was done playing with creepy layers in PicMonkey, and took the image back to Picasa. In Picasa, I cropped my image to a 3X5 size. This is where you crop out any areas that your pictures don't cover your background. Once I had cropped, I used the LOMO edit over the photo to create a shadow around the edges, that make the effect of a head in a jar better later on. Save the image. 


FINALLY, you are ready to print! I printed out my 3X5 image onto regular paper, and then sealed it with some Krylon Matte Finish to keep the ink from bleeding in the Amazing Clear Cast Resin


When the paint was dry, I used some clear tape to pin the paper into my jar where I wanted it. I tried to keep my paper fairly close to the side of the glass, with a very small amount of space for resin. As you can see, the photo doesn't circle the entire jar. You can see it clearly here, but in the finished piece, you can't. 


To create the formaldehyde in the jar, and hide the harsh lines of the paper, I mixed Amazing Clear Cast Resin with a TINY drip of Alumilite Brown Dye. (CLICK HERE for directions on mixing Amazing Clear Cast.) Your Amazing Clear Cast Resin will look dark. To see if it's too dark, you can pull out your mixing tool, and if you can see through the tint, then you'll be able to see your image in the jar. I poured it all into my jar, and worked out any bubbles between my paper and the glass using the tool I mixed my Amazing Clear Cast with.

Be careful to you check your project soon after mixing and pouring your resin, because the reaction of the two parts create a lot of heat in large quantities. This is also the reason you want a canning jar or other heat resistant container. Now I have a tiny shrunken head to add to my collection! I thought about putting a lid on the jar, but I really like the liquid look of the resin, and being able to see it without a lid, so I decided to leave it off! 


What kind of Macabre things are you
dreaming up in your AMAZING minds? 

Thank you for reading! Want to see more of what I'm up to?
Visit me on PINTEREST and INSTAGRAM, or like MY PAGE on Facebook!
Thanks for stopping by! ~ rachel

• • • • • • • • • • • • • •

Don't forget to subscribe to our blog on the right side bar:
Twitter at AmazingCrafting | Facebook at AmazingMoldPutty | YouTube at AmazingMoldPutty