Pages

Friday, May 29

#Cre8time to Hide the Ugly... #DIY Home Beautification by Aimée Wheaton


I have Happy Resin Caps!

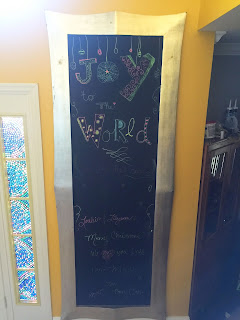
Hello creatives! I scored an amazingly large chalkboard a few years ago from a local framer shop for FREE!! I waited until we had the right home to hang it up. I lovingly repainted it at Christmas time and wrote a Christmas blessing to my girls on it in what I thought was chalk markers, well they stained the board and I now have to repaint it. So for this project excuse the message on the board, I couldn't find a roller brush to repaint it for photos but you will get the idea.


This chalkboard had to mounted by drilling through the wood sides for a secure mount. Because of that we had to fill the holes in with wood putty. It didn't look the best so I decided to make some resin covers or caps to cover the wood putty and make it look pretty. I used vintage buttons, Amazing Mold Putty, Alumidust and Amazing Casting Resin.


Vintage buttons...


Mold making with Amazing Mold Putty.


Cast resin buttons to match covering up the ugly!
All you need is a bit of glue...


to go from blah to beautiful!


All Finished! :)

I love how it turned out! I may end up making more just to make it a little bit funky but will keep it this way for awhile to see how I feel :)

To see how all of our AMAZING products can enhance your art,
please check out these AMAZING products!

Let's see what you can create

Feel free to stop by my FB page to see the latest with me. 
To see more of my work please visit my blog "Creative Flutters"
and also at the Aimée Wheaton Art and Design website.

Till next time! Xoxo Aimée

 • • • • • • • • • • • • • •

Don't forget to subscribe to our blog on the right side bar:
Twitter at AmazingCrafting | Facebook at AmazingMoldPutty | YouTube at AmazingMoldPutty

Thursday, May 28

AMAZING #Cre8time Dressup for #ACPthrowback Thursday #TBT

Hello Everyone! Today we are sharing another #ACPthrowback post – revisiting a tutorial from Tracy Alden... creating AMAZING doll shoes using Amazing Mold Rubber, Amazing Casting Resin and Alumilite Dyes and Metallic Powders.


Make custom shoes for your doll's wardrobe and fabulous colorful feet to display them on using Amazing Casting Products.

CLICK HERE to jump to
Tracy's full how-to.

Want to see more of what Tracy is up to?
Follow her on her blog HERE or her PAGE on Facebook!

• • • • • • • • • • • • • •

Share Your Creations with us
on Social Media to be Featured on
#ACPthrowback Third Thursday

June 18th is another THIRD THURSDAY... this is your chance to be featured. Post your creations to our Facebook page, Pinterest, and on Twitter! We'll be on the hunt for your projects with the hashtag #ACPThrowBack, (you can even go back into your past pins and add this pin to help us find you!) and share ALL your projects using the hashtag #AmazingCastingProducts!!

• • • • • • • • • • • • • •

Don't forget to subscribe to our blog on the right side bar:
Twitter at AmazingCrafting | Facebook at AmazingMoldPutty | YouTube at AmazingMoldPutty

Wednesday, May 27

#Cre8time Preservation with Amazing Clear Cast Resin... by Lynne Suprock


Lynne here with a fun tutorial using Amazing Clear Cast Resin. Two generations ago she blushed and said "I Do" to the man of her dreams. Barely a woman herself, she became a most loved and cherished mother, having 4 children, each the apple of her eye. This was my Gramma Rose.

I loved hearing the stories about my Rose's life. Her determination, love of family, savvy, and in later years, her strength and constitution, utterly amazed me. Yes, I love the stories because I was such a little girl when she died. I never really knew her, so I cherish and preserve what I do know and have learned about her.

Fast forward to a vintage picture. It is Rose's wedding day. I decided to use it in my project. Every time I put a piece of jewelry in, or take one out, I will see her picture and it will make me smile.


Here are the steps for making the picture:
  • Select a favorite vintage picture and size or crop to fit niche in wood.
  • Make a laser printer, toner, transparency
  • Decorative trim cut, if desired. (Mine is straight edged)
Here are the steps for the box:
  • Reclaim an old wooden jewelry box with some type of depression or mirror. (Apologies for not getting a "before" picture)
  • Remove the mirror carefully (if still in place)
  • Clean wood with soapy water.
  • Slightly sand wood.
  • Use Annie Sloan chalk paint in choice of color. My color is French Linen. (I use the Annie Sloan brand because coverage is better than other paints and it adheres without priming)
  • Once this solid coat of paint is dry, choose another color of paint thinned with water, to create a wash. (I used 3 parts water to 1 part paint in Old Violet).
  • Quickly brush on and pat dry with cheesecloth.
  • When dry, use a bit of clear Elmer's glue to the back edges of the picture transparency.
  • Smooth picture onto wood
  • Outline the picture in the clear glue to seal any cracks around the inner edge of the wood, where resin could seep out.
  • Allow 24 hours to dry.
  • Measure and mix equal parts of "A" and "B" of Amazing Clear Cast Resin. CLICK HERE to view mixing/preparation.
  • Pour the resin carefully over the picture in the niche.
  • Allow resin to cure for 24 hours.
  • Adding decorative knobs is optional.

I liked how this yard sale box was the perfect stage for these vintage photos of my grandmother. With a little chalk paint and Amazing Clear Cast Resin, a memory is preserved.

What memories will you preserve

I would love if you would leave a comment below to let us know how this technique works for you! Please share what you make with Amazing Casting Products on our website in the User Gallery.

Please visit my blog "Simply Pretty Stuff" to see more of my creations
and to view my upcoming workshop schedule.  ~ Lynne
. . . . . . . . . . . . . . . .

Don't forget to subscribe to our blog on the right side bar:
Twitter at AmazingCrafting | Facebook at AmazingMoldPutty | YouTube at AmazingMoldPutty
Tuesday, May 26

Amazing #Cre8time Jewelry Transformations...
by Maria Soto


Hi there, this is Maria and today I want to share a fun project. Back in January I created several molds using some fun items I found in my office. I've been wanting to use these for jewelry making. One day as I was looking at an old magazine and I found a page that inspired me to create a pendant. Well, I figured it was time to bring out my mold and see what would come from this mold, a magazine page and some Amazing Clear Cast Resin.

You can CLICK HERE to see how I made this fun mold. 


After adding some Alumilite Metallic Powders with a paintbrush on all the molds, I poured some Amazing Clear Cast Resin. As you can see, these are very thin molds so only a little bit of resin was needed.


Here are some of the resin pieces I made. I used two of them to make a couple of pendants... inspired by a magazine page, as you can see in the photos below. It had a cute little girl, and some very pretty flowers – I thought would make some cute pendants.


After trimming and adding the papers to the molds, I added some paint, glitter, and some beads. Once everything was put together it was time to add a bit more of the Amazing Clear Cast Resin to seal and finish these two pieces.

Here are the two pendants, all done and ready to wear.
These will make some fun gifts.


Funny how you never know when inspiration will hit you – I was on my lunch break looking at some old craft magazines... and looking at the pretty flowers inspired me to go home and create!

What inspires you to create?

Go ahead and share your creations with us on social media #AmazingCastingProducts.

Thanks for visiting! I invite you to stop over to my blog "What is Creativity"
at http://chuy-creativity.blogspot.com to see more of my creations. Maria Soto

• • • • • • • • • • • • • • • • •

Don't forget to subscribe to our blog on the right side bar:
Twitter at AmazingCrafting | Facebook at AmazingMoldPutty | YouTube at AmazingMoldPutty

Monday, May 25

Read All About It!! Casting with ReMARKable Detail in Amazing Mold Rubber by Melissa Johnson


Good morning everyone! Today I am sharing a fun bookmark that I created using Amazing Mold Rubber, which I have to say is pretty darn amazing! It cures so quickly (well, here in Texas!).

To begin, I wanted to cast a few antique crystals that I bought last summer at an antiques show. I mixed the mold rubber and glued down my pieces using a heavy duty glue dot {CLICK HERE to view mixing/preparation}. I used the lid of an container of beads as the mold box.


When the mold was completely cured, I pulled the original pieces out.


I decided to use the larger of the crystals for this particular project, so I mixed up some Amazing Clear Cast Resin and poured it into the mold. When that had cured, I painted it with a very thin layer of Golden paint in cobalt blue and drilled a small hole in the top. The detail is amazing!


I also had a small key laying around and since there was some extra resin, I found a bezel in my stash and laid down a scrap piece along with the key and poured the resin over it all.


While that was curing, I found a piece of ribbon in my stash and using the Alumilite Dye in Blue, I mixed up a few drops along with some water and some alcohol. The alcohol was actually an accident. :) It was still in my mini spray bottle I keep on my desk from a previous project.


I dipped the ribbon in the mixture and let it soak in.
Then I pulled it out, balled it up, and dried it with a heat gun.


To finish, I assembled all of the pieces (adding in a metal
finding from my stash) using jump rings and the dyed ribbon.


What found objects will you mold
and cast in Amazing Mold Rubber?

Make something that makes you happy :) ~ Melissa Johnson
Please visit my BLOG, to see more of my mixed media creations.

 • • • • • • • • • • • • • •

Don't forget to subscribe to our blog on the right side bar:
Twitter at AmazingCrafting | Facebook at AmazingMoldPutty | YouTube at AmazingMoldPutty

Friday, May 22

A Pendant for your Thoughts... AMAZING #Jewelry Inspiration by Tracy Alden


Hello! Tracy here with another Amazing Casting Products inspiration post! Whenever I craft I try my best to not waste many of my supplies, and save as much as possible for future projects. This is no different for the many molds I create using these amazing products! I might cut up some molds for filler for future molding projects but most of my molds I seal in freezer bags and label them for more casting projects. 

I have a wonderful collection of beads, chains and findings from Linpeng International Inc./Fiona Accessories but I wasn't sure what to put with them. Then I remembered I had some great Organic Shapes molded with Amazing Mold Rubber that a created awhile back. 


I found the large tear drop focal pendant mold was the perfect size for a deceased Garden Spider that was found. I tinted it with Alumilite Dyes and used some mica flakes to add visual interest. Delicate gold tone chain from Fiona Accessories worked wonderful with the warm amber tinted tone of the Amazing Clear Cast Resin.


Using both Alumilite Dyes and Alumidust I created this layered metallic flame piece. I finished off the dramtic look with a vintage frame and satin cording. 


I had quite a few people request I do more of the Cosmic Cabochons, such as the ones I made for the Amazing Casting Products CHA display, but this time instead of being attached to a dress, it was a necklace focal. With glitter, Alumilite Dyes and Alumidust, I created a multi-layer miniture universe cabochon. Once again I used a vintage frame, chain and crystals from Fiona Accessories to finish this flashy piece.


With many varieties of craft supplies and Amazing Casting Products at my finger tips, I can revisit and remake more pieces to enjoy.


What AMAZING arts and crafts can you create?


Visit my blog Art Resurrected for more craft tutorials!

Until next time, safe travels! ~ Tracy

• • • • • • • • • • • • • • • • •

Don't forget to subscribe to our blog on the right side bar:
Twitter at AmazingCrafting | Facebook at AmazingMoldPutty | YouTube at AmazingMoldPutty

Thursday, May 21

#ACPthrowback Third Throwback Thursday...
May Edition

Hey gang!! Rachel Whetzel here, and it's time for #AmazingCastingProduct's Third Throwback Thursday!! Every third Thursday of the month, I share links and projects that YOU share on line! There is no need for these projects to be NEW, because this is all about the throwback, so share some throwbacks from YOUR studios and workspaces! We want to see that you create. I hope you'll take the time to visit the links we've shared here, and enjoy all the awesome projects out there!


Revisit our posts from THIS MONTH, in 2012
See them all by clicking HERE.

Here's an #ACPthrowback post from right here on the blog in 2013, sharing one of our SUPER FANS' cool and creepy CAKE project.

INSTAGRAM
• • • • • • • • • • •

I wanted to share this little goodie I made my boy's track teams this year! I used a smooth poker chip, and layered the letter stickers D and C onto that, then made molds. Then I poured Amazing Casting Resin, and set two tacks into the back with their pins sticking out. Now, instead of the kid's step marking tape lifting off of the wet turf in the Oregon rain, the kids can count their steps, and leave their marker without it moving from it's spot!! DC stands for the school name, and each kid got their own marker, and could write their names on them. The dots on the white are from my son pushing his market into the ground with his spikes on. 


Have any Throwback Thursday
projects you can share?

Post them to our Facebook page, Pinterest, and on Twitter! We'll be on the hunt for your projects with the hashtag #ACPThrowBack, (you can even go back into your past pins and add this pin to help us find you!) and share ALL your projects using the hashtag #AmazingCastingProducts!!

• • • • • • • • • • •
Don't forget to subscribe to our blog on the right side bar:
Twitter at AmazingCrafting | Facebook at AmazingMoldPutty | YouTube at AmazingMoldPutty

Wednesday, May 20

#Altered Outlet Covers??! AMAZING Inspiration by Brenda Burfeind


Hello and welcome to another Inspiration post by me, Brenda, from Creativity is a State of Mind. I love my blog name, because everyone perceives creativity differently. I know I make some things and people just shake their head, but others love it. I'm here to show you how to dress up your outlet covers for every room in the house...

Since my 3 grandchildren came back to live with me I've had to child proof my house again. They range in ages from 1 to 5 and they are the love of my life but they mange to get into a bunch of mischief. They definitely keep me on my toes. The other day I caught the 1 year old playing by my outlets and was a bit concerned so I decided to make my outlets look pretty!


I purchased some of these outlet plugs, but they are so boring and I thought I could probably dress them up a bit so let's get started.

Boring RIGHT? So while rummaging through my big box of "Not Yet Finished" resin pieces I found a couple I could dress these plugs up with. Whenever I create resin pieces I manage to over create! I absolutely love using Amazing Casting Products – but I've managed to create a bunch of extra pieces that can be used for future projects, just like this one!

Everything shown below was created with all the Amazing Casting Products from the Amazing Mold Putty to create the mold. The Amazing Casting Resin to create the piece and the Alumilite Dyes, Alumidust or the Alumilite Metallic Powders to color the pieces!


Using my E6000® glue I added this elephant to a plug.


Again using E6000® I glued an altered domino resin piece to the plug after painting the plug black. This would go nicely in your game room!


Yet again, using the E6000® glue I glued this vine piece to a plug after painting it with a green to match! How about adding this to your sunroom?

I hope I've inspired you to create some plug covers for your house. 

Please leave me a comment and tell me what you'd create and for which room!

Until next time, Brenda unplugging!

Visit my blog, Creativity is a State of Mind to see some more of my creations.

• • • • • • • • • • • • • •

Don't forget to subscribe to our blog on the right side bar:
Twitter at AmazingCrafting | Facebook at AmazingMoldPutty | YouTube at AmazingMoldPutty

Tuesday, May 19

Resin Roses... a #Cre8time Thorn in My Side by Tanya Ruffin


I had such high hopes for this project in the beginning. BUT this is a good example how a giant FAIL can help you create something even better. So, if anything you will learn what didn't work well and maybe you can perfect my first attempt.


My first attempt was to pour colored resin on a non-stick surface, let it cure and then cut out rose petals using a Sizzix and put together an awesome resin rose. CLICK HERE to view mixing/preparation for Amazing Casting Resin.


Well, first off, resin doesn't fold or curl like paper. Second, unless you want to hold each piece in place for 20 minutes, E6000® won't work. So I attempted to hot glue the pieces. That worked but each petal slowly droops... Now all this work looks like it was constructed from red plastic spoons. EPIC FAIL!


So with my left over red resin sheet I cut out a spiral.

Below are two sketches you can use as a guide for cutting.


This spiral is flipped over, compared to the sketch above. 


I then started to curl the spiral from the outside in. I know, you would think you would start rolling from the center out, but it is the opposite. 


Get your hot glue gun ready before you start because you will need to glue it when you get it completely rolled... AND you can't let go or it will all unravel!


Your flower is done, add hot glue to the piece left at the end. You can now you can add leaves and punch a hole for a jump ring. I was able to slide one petal inside my Crop-A-Dile™ to punch the hole. 


I cut green fun foam leaves and glued to the back. I like the bright red and bright green colors. It makes it look so fairy tale to me!


Add a little glitter in the center and you are done!

What shaped flowers would you create

Craft Your Own Way!


with 


Please visit my site to see more of my inspiring creations at www.tanyaRuffin.com

• • • • • • • • • • • • • •

Don't forget to subscribe to our blog on the right side bar:
Twitter at AmazingCrafting | Facebook at AmazingMoldPutty | YouTube at AmazingMoldPutty