Pages

Saturday, October 31

Falling #Cre8time Jewels.... Tree of Life Pendant by Guest Designer Lyn Gill

Hi, Lyn Gill here again and I've got a fun new pendant to share with you today. I started off with a polymer clay piece that I made a mold from Amazing Mold Putty. This stuff is truly amazing and it gives such great detail... it even captured the little twist and turns in the bark of the tree!


Using the Amazing Clear Cast Resin which I colored with some Mica Powder (you could even use eye shadow), then I filled the mold.


Then I gave the piece some color with a wax based
paint, these are becoming very popular.


While I should have added the jump ring while my resin was setting up... well, I didn't... LOL – but I added another layer of resin to the back, and this time embedded the jump ring.


I've already had so much fun using the Amazing Casting Products, it's been a blast! This fun Fall Tree of Life pendant will last you a lifetime but it would also make a great gift too!

Thanks so much for joining me today... Till Next Time! ~ Lyn

• • • • • • • • • • • • 


• • • • • • • • • • • • 

Please comment below and give our AMAZING Guest Creative Lyn Gill some love. We would like to give a big thanks to Lyn for joining us this month – we have enjoyed her fabulous projects! Please visit her blog, "LynzCraftzto see more of her work. You can also follow Lyn on her YouTube Channel at LynzCraftz | and on her Facebook Page LynzCraftz.


• • • • • • • • • • • • 

Don't forget to subscribe to our blog on the right side bar:
Twitter at AmazingCasting | Facebook at AmazingMoldPutty | YouTube at AmazingMoldPutty

Friday, October 30

Lyn Gill... an AMAZING Guest Designer Spotlight


Greetings AMAZING Crafters! Its all aBuzz today as we have a fun questionnaire that we posed to our Guest Designer Lyn Gill! Have fun getting to know her a little better and enjoy today's eye candy... bee with honeycomb pendant. Enjoy :) Sb

A little bit about Lyn...


Hello, my name is Lyn Gill and I'm from Ft. Worth, Texas. I've been creating jewelry for about 8 years now but I'm also an artist in Mixed Media as well as Altered Art. I started my creative journey at a very young age when my Mother {who's also an artist} enrolled my in an art class at 6 years of age. Little did she know it was for oil painting... one of those still hangs in her kitchen today.


Although I often work in polymer clay –
I love how resin can really bring my pieces to life.

Some fun questions for the inquiring minds...

• • • • •

What did you want to be when you grew up?
"I wanted to be an archaeologist or a paleontologist, I've always
loved the way things look that have been buried for years.
"

Coke or Pepsi???
"Neither... I'm a Dr. Pepper girl."

What inspires you?
"History, Art History, Nature... and Pinterest... LOL."

What is the TOP thing to do on your "Bucket LIST"?

"I'd love to visit Australia."

If you could print any phrase
on a T-shirt, what would it say?
"Art... Is in the Eye of the Beholder!"

If you could mold ANYTHING with
Amazing Mold Putty, what would it be?
"Wow – this is a hard one... a butterfly or maybe a feather."

What style of music gets your creative juices going?
"Classic Rock-N-Roll."


• • • • • • • • • • • • 

Please comment below and give our AMAZING Guest Creative Lyn Gill some love. Be sure to stop back a little later today for some more Inspiration from Lyn. Please visit her blog, "LynzCraftz" to see more of her work. You can also follow Lyn on her YouTube Channel at LynzCraftz | and on her Facebook Page LynzCraftz.

Have a fabulous day! :) Sb

• • • • • • • • • • • • 

Don't forget to subscribe to our blog on the right side bar:
Twitter at AmazingCasting | Facebook at AmazingMoldPutty | YouTube at AmazingMoldPutty

Thursday, October 29

Last Minute #Halloween Costumes... a Wendigo Creepy #Cre8time Transformation by Maria Soto


Hi there! It's Maria and today I want to share a fun project I made just last night. See my son decided to dress up for his Halloween party at school. He is currently attending the American Academy of Art in Chicago. When he heard they were having a costume contest, he completely changed the costume idea he had in mind and decided he wanted to go as a "Wendigo" from a video game he loves to play called "Until Dawn".  


He asked his sister if she could do the make up and asked me if I could make the special teeth... of course I told him "no"... I needed more than two days to make it happen. So I sent him to the store to buy some teeth. He understood and he came home with these vampire teeth, and he asked me if there was a way I could make them look creepy. Of course I said "YES"!

http://chuy-creativity.blogspot.com/2015/10/resin-transformation-vampire-to-creepy.html#.VjKCeKKYVhY

I just sat there for a while trying to think on what I could do – I thought why not try and make a mold with Amazing Mold Putty, then use Amazing Casting Resin to make new teeth and use the resin to adhere them onto the vampire teeth he purchased.

I have to say, it was a bit of challenge for me. Once I got the idea in my head, I figured I had to give it a try and hope that it would work. Well... these products didn't fail me – they did exactly what I hoped they would do! I loved how these products never let me down... its like all I have to do is imagine what can I do next with them, and then go for it.


If you want to see the full process of how
this Creepy transformation happened,
please CLICK HERE to jump over
to my blog to see the how it all happened. 
  
I love using these products – my creative ideas have evolved so much since I joined this creative team. I would recommend you give them a try and see where your imagination combined with these amazing products take you. I know I've been able to create things I never would have done without these products.

Thanks for visiting! I invite you to stop over to my blog, "What is Creativityat http://chuy-creativity.blogspot.com to see more of my creations. Maria Soto

• • • • • • • • • • • • • • • • •

Don't forget to subscribe to our blog on the right side bar:
Twitter at AmazingCasting | Facebook at AmazingMoldPutty | YouTube at AmazingMoldPutty

Wednesday, October 28

Transform #Cre8time leftovers into Spooky Shrines... by Maria Soto

Hi there, this is Maria and today I want you to take a look at the resin pieces you have created and find other ways to use them. I've been really working a lot with skulls this month. I've never been so inspired by Halloween and the Day of the Dead like this before. This year I've done so much – its crazy to see all the different types and sizes of skulls I've created using resin.

I have this resin skull I made with the Amazing Clear Cast Resin – it was a test piece to see how the skull would come out using this resin. I usually work with the Amazing Casting Resin because I like the white opaque resin so I can paint it my way. I chose not to use it since the project I made last month required a lot of color, so I just put this clear skull aside for later. 


Well it was time to craft something with this clear resin skull. As I looked around, I noticed the tiny metal frames I got at the Dollar Store and thought why not frame it outside the glass. I gather all types of leftovers from other projects and put together a tiny little frame that now sits on my desk at the office. I have so many skulls that I think I'm going to be crafting with these even after the month is over, maybe I'll make next years projects now. You can see in the photo the mold I made from Amazing Mold Putty and a white plastic skull.


Here is the finished frame. I love the fact that its small, too! I really liked how it came out – the frame was black, and I added a little bit of alcohol inks; then brushed over with a thin coat of Amazing clear cast resin to seal the alcohol ink and to make it look as if it was a glass frame instead of metal.

You can also make these into shrines, by adding the name of a loved one and something personal, to give it a meaningful touch. These are great as just a fun Halloween decorations, too –  it's all up to you as to how you want to decorate these with... there are so many possibilities. 


Here is a close up of the skull in Amazing Clear Cast ResinTo see how I made the skull used in this project, click here to jump over to view my Dia De Los Muertos Celebration Skull.

I hope that I have inspired you to go back and challenge yourself to find other ways to use your cast resin pieces... you just never know what you can come up with!

How do you decorate for Halloween?

Thanks for visiting! I invite you to stop over to my blog, "What is Creativityat http://chuy-creativity.blogspot.com to see more of my creations. Maria Soto

• • • • • • • • • • • • • • • • •

Don't forget to subscribe to our blog on the right side bar:
Twitter at AmazingCasting | Facebook at AmazingMoldPutty | YouTube at AmazingMoldPutty

Monday, October 26

#Cre8time Painted Layers... #DIY Resin Bangle by Aimée Wheaton


You know that amazing artist that paints images on resin in layers? I was trying to emulate his style in a bangle and this is a far cry from his art. If you haven't seen it google resin and goldfish, it's amazing! Seriously, much respect to that artist.

My original project for this month was going to be a molded gourd, let's just say life got in the way and before I had a chance to get the gourd out of the mold it had decayed, that's what I get for trying to work ahead so excuse the simplicity of this post, I had to use a past mold of bangle as well as I ran out of Amazing Mold Rubber on the gourd. To see how to create a mold with Amazing Mold Rubber watch this video.


I had to do this in sessions over a few days so the resin would cure and I could paint different layers.

I mixed up my first layer or Amazing Clear Cast Resin and poured it into the mold. I let it sit overnight to cure completely. To see how to prepare resin please CLICK HERE.

After it cured overnight I chose some acrylic paints and various tools to make the marks on the resin. I chose a bamboo skewer, a fountain pen, and a paintbrush.


You can see blue, white, purple and yellow dots of acrylic paint on the first layer of resin. Next prepare another batch of Amazing Clear Cast Resin and pour over the top. This isn't a very deep mold so I only did 3 layers of resin. I let that cure again over night and then did a layer of green glitter and repeated the process of more resin.


Let that cure the rest of the day and
you end up with something like this!


I knew I would have extra resin like always so I applied the same technique to these little silver molds that were gifted to me. I may turn these into ornaments or magnets.


There you have it! :) Can you see the different layers I painted on?

Let's see what you can create with
Amazing Mold Rubber and

Feel free to stop by my FB page to see the latest with me.
To see more of my work please visit my new blog "Life Glitter Makeup"
and also at the Aimée Wheaton Art and Design website.

Till next time! Xoxo Aimée

• • • • • • • • • • • • • •

Don't forget to subscribe to our blog on the right side bar:
Twitter at AmazingCasting | Facebook at AmazingMoldPutty | YouTube at AmazingMoldPutty

Thursday, October 22

It's time for #ACPThrowback Thursday... October Edition #TBT

Hello Amazing Crafters!! It's time for another edition of #AmazingCastingProduct's Throwback Thursday!! Every third {or fourth in this case} Thursday of the month, we share links and projects that YOU share on line! There is no need for these projects to be NEW, because this is all about the throwback, so share some throwbacks from YOUR studios and workspaces! We want to see what YOU create. We hope you'll take the time to visit the links shared here, and enjoy all the awesome projects out there!


Revisit our posts from THIS MONTH, in 2013
See them all by clicking HERE.

INSTAGRAM

PINTEREST

• • • • • • • • • • •

Have any projects you want
to share for the next
#ACPthrowback Third Thursday
on November 19, 2015?

Post them to our Facebook page, Pinterest, and on Twitter! We'll be on the hunt for your projects with the hashtag #ACPThrowBack, (you can even go back into your past pins and add this pin to help us find you!) and share ALL your projects using the hashtag #AmazingCastingProducts!!

• • • • • • • • • • •
Don't forget to subscribe to our blog on the right side bar:
Twitter at AmazingCrafting | Facebook at AmazingMoldPutty | YouTube at AmazingMoldPutty

Wednesday, October 21

The Upcycled Mummy's Curse! A spOoky #Cre8time #DIY by Tracy Alden


Hello! Tracy with another home decor creation using Amazing Casting Products! I had some rather odd inspiration for this project and it all started with me finding some fun plastic Halloween skulls at a Thrift store. With two of them, I made Ghoulish Glam Skulls and the rest I saved for Halloween decor around the house.


While I was outside in the garden one of our dogs, Luna, decided to play in the house, the skulls were close to her toys and she cracked one of them. I of course couldn't be angry with her playing though her rather adorable "I totally did NOT do that" face also helped. When I was about to throw out the skull, an idea came to me, why not use the cracked skull as a base for a Halloween mummy head prop?

Supplies:


With the crack being along the side of the eye socket and most of the left side of the skull I needed to stabilize the now fragile skull. I thought of using Amazing Casting Resin but I needed to seal the hole before filling the skull with resin. I taped up the crack with clear packing tape, creating a temporary seal for the resin.


Knowing if I were to fill up the whole skull with Amazing Casting Resin would require not only a lot of resin but make the skull on the heavy side I needed to put some sort of filler inside the skull. Using used clean paper bags and aluminum foil crumpled up I slipped them inside the skull through a hole in the bottom.


Next I made small batches of Amazing Casting Resin poured it through the hole in the bottom of the skull. By pouring small batches and then tilting the skull I was able to make sure all of the inside of the skull was equally covered with resin, stabilizing the plastic skull. This process went very quickly because Amazing Casting Resin sets up in 10-15 minutes. I ended up using 3/4 of a resin kit to fill the inside of the skull.


Once I had filled up the inside of the skull I hot glued a tape roll to the bottom of the skull to create a neck for the mummy head. Any gaps between the tape roll and the skull I filled in with aluminum foil and hot glue.


I then mixed up some Amazing Casting Resin and poured it into the newly formed neck of the mummy head. I put some extra foil into the neck cavity and filled it up with more Amazing Casting Resin, using up all of the kit.


Once the resin was cured, I removed the tape from the now resin filled crack and removed any excess resin spills off the skull.


Since not much of the plastic would be visible under the wrappings but I didn't want it looking like a skull I painted the skull a mixture of yellow, brown and black acrylic paint. I glued on used tea bags to create eyelids and created a nose out of paper bags and tin foil. I glued on some loose tea grounds to give the look of sand/dirt and sealed it with Liquitex Matte Varnish.


To create wrappings: I dyed cotton muslin fabric in a bath of hot black leaf tea and bags. I let it soak for a few hours to stain and then let the fabric dry. Once dry I tore the fabric into 2 inch strips to make wrappings. I started applied the wrappings to the skull with a bit of Beacon's Gem-Tac and started to wind it around the skull. I didn't use any set pattern or style; I just had fun and made sure to cover up any of the more skull-like features of the head.


Once I was finished wrapping the skull I liked the overall look but felt it needed something more to create the look of age.


Since real mummies still have old oils and resin still visible on the surface of their wrappings I created some out of Liquitex Gloss Varnish mixed with some Brown Alumilite Dye. I used the varnish instead of resin because I wanted to control how it dripped and needed it to dry quickly. The Alumilite Dye allowed me to tint the varnish without losing the transparent nature of the varnish.


Once dry this spooky decor is a perfect addition to my
creepy curiosity cabinet on display for Halloween!
 
What AMAZING arts and crafts can you create?


Visit my blog Art Resurrected for more craft tutorials!

Until next time, safe travels! ~ Tracy

• • • • • • • • • • • • • • • • •

Don't forget to subscribe to our blog on the right side bar:
Twitter at AmazingCasting | Facebook at AmazingMoldPutty | YouTube at AmazingMoldPutty
 

Monday, October 19

Broken Jewels come Alive! #Cre8time Spooky Zipper Pulls... by Maria Soto


Hi there! I love making crafts to give to family and friends and since Halloween will soon be here... I've been really busy making all types of spooky crafts for the occasion. Today I want to share how I took a broken necklace and use it to make some fun vessels for jewelry making.


I want to share this fun and amazing product called Amazing Mold Rubber, it's so easy to use and it helps you make some very flexible molds – not to mention that this product picks up every little detail of the items you mold. Also, let me just say that when you use the Amazing Clear Cast Resin on the molds made with this product your resin pieces come out with a nice shine already – eliminates the need to add resin or another product to make it shiny, these molds will do that for you.

I recently got a new phone and I liked the case it came in. I figured I could use it to hold resin pieces, but also to mold small items. In this case I glued down some pieces from a broken necklace and used the mold rubber to create a few molds at once.


CLICK HERE to view mixing/preparation of Amazing Mold Rubber. Depending on the size of your mold and humidity it can take from 30 minutes to about 4 hours for your mold to cure {I leave mine overnight}.

Once the mold was ready I decided to try casting pieces in both the Amazing Clear Cast Resin and the Amazing Casting Resin, then decide which one I wanted to use. Here you can see some of the resin pieces I created. I like to work with the resin pieces when they are still soft. At this time I can add hangers to them, trim any excess resin on the edges, and once they are cured completely you can go ahead and paint them – I use acrylic paints most of the time to paint my resin pieces.


I decided that this time around I wanted to add color to my resin, so I added some Gold Alumilite Metallic Powder to the Amazing Casting Resin part "A" before adding part "B" (click here to see how to mix this product). I wanted the resin pieces to be gold for this project.

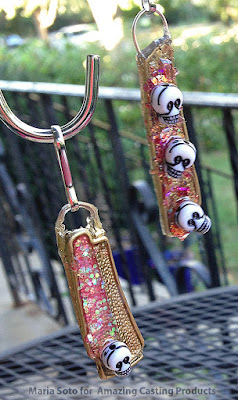
Once the resin pieces were ready, it just took some looking around to see what I would use to fill them with. I had some leftover pieces of a cut up a Halloween scarf from a previous project that I noticed these tiny skulls, so I cut them out. I took these along with fun glitter, tiny skull beads, and some sections of black fabric;p then glued everything down using Liquitex gloss medium & varnish.


Once dried, I thought at first I would use these to make some fun jewelry, by adding them to a chain, but then as I looked around I found a bag of zippers I got at a yard sale long time ago, and decided why not use one of the zippers to make a necklace instead of using wire or chain, I liked the idea and went with it, that's when I realized, why not take the other two and turn them into zipper pulls.


Most of the time it's cold during Halloween and the kids have to wear their jackets when they go out Trick-or-Treating... so why not make some spooky zipper pulls! That's what I did – two of these will be going to my youngest nephews so they can add them to their jacket's. I think one of my sisters would love to wear the zipper necklace, or maybe I'll wear it. Here are the final pieces I created, hope you like these as much as I do.


I hope to have inspired you to get crafty for the Holidays... and that you give these amazing products a try. Please make sure to share anything you make with these fun products, we would love to see your creations.

How do you decorate for the holidays?

Thanks for visiting! I invite you to stop over to my blog, "What is Creativityat http://chuy-creativity.blogspot.com to see more of my creations. Maria Soto

• • • • • • • • • • • • • • • • •

Don't forget to subscribe to our blog on the right side bar:
Twitter at AmazingCasting | Facebook at AmazingMoldPutty | YouTube at AmazingMoldPutty