Pages

Monday, February 29

A Little #Cre8time for Teachers... by Aimée Wheaton


"The best teachers teach from the heart and not from the book."

This is the quote that inspired this little piece that I will be bringing to the classroom. I found these two adorable pencils at school on the ground and I just had to do something with them. I plan on making more items with them because they're so much fun!


I used our Amazing Mold Rubber to cast these babies because I wanted to get all the details in them. It did an amazing job and I have 2 perfect pencils!! I cast them with our Amazing Casting Resin because I wanted them white.


This is what I ended up with, of course I had to glitter them up! This would make such a cute teacher gift. It's on a wooden coaster and it was quick and easy to make. I love the little details!


It's hard to see but there is the word 'teacher' in silver stickers down the side :)

Hope you enjoyed this quick teacher project!!
What would you have done with two little pencils?

Do you make your own teacher gifts?
What are your favorite ways
to create custom gifts?

Feel free to stop by my FB page to see the latest with me.
To see more of my work please visit my new blog "Life Glitter Makeup"
and also at the Aimée Wheaton Art and Design website.

Till next time! Xoxo Aimée

• • • • • • • • • • • • • •

Don't forget to subscribe to our blog on the right side bar:
Twitter at AmazingCasting | Facebook at AmazingMoldPutty | YouTube at AmazingMoldPutty

Friday, February 26

Inspiration: Cre8time Ink stained resin tie dye.


Cool Discovery!
 
Simply spritz ink misters on the white Amazing Casting Resin castings (I'm sure it works on Amazing Clear Cast Resin pieces too, but I have been playing with the white), and let dry.

I just love the look of these! Simply spritz and paper towel off excess and let dry. Don't worry, if you spray too much you can blot it off before it dries.


This project used a print pulled from a Gel Press plate and the ink misters were Dylusions Ink Spray and Memories Mist Ink Spray. The canvas flower is from Canvas Corp and made at a make and take at the 2016 Craft and Hobby Association show. It too was spritzed with misters.

How do you colorize your resin castings?

Craft Your Own Way!

Tanya


Please visit my site to see more of my inspiring creations at www.tanyaRuffin.com

• • • • • • • • • • • • • • • • •

Don't forget to subscribe to our blog on the right side bar:
Twitter at AmazingCasting | Facebook at AmazingMoldPutty | YouTube at AmazingMoldPutty

Thursday, February 25

#Cre8time Alterations... DIY Thrift Store Frame Redux by Lyn Gill


Hi all! Lyn Gill here again for with a DIY project – an Altered Framed Owl. I bought this frame at the thrift storeand it was a worn, scratched yellow color, and very unattractive. By just using some Amazing Casting Resin, black Gesso, crackle glaze and metallic acrylic paint I was able to completely transform it.


I decided to use some Amazing Casting Resin to create the Owl using an Amazing Mold Putty mold I created for a previous project... Oooo I can see it coming along nicely.

I used the black Gesso and Crackle Glaze in it as well as some Gold Leaf Flakes & the Metallic Acrylic Paint... WOW did it transform this thrift store frame!


I can't wait to hang it in my Craft Studio!
I do have a love for all things metallic... LOL.

What kinds of thrift store finds could
you alter with Amazing Casting Resin?

Well thank you so much for joining me today
with Amazing Casting Products... Till Next Time! ~ Lyn

You can find more of my work on Facebook Page LynzCraftz,
on YouTube atLynzCraftz, as well as my blog LynzCraftz.

• • • • • • • • • • • • 

Don't forget to subscribe to our blog on the right side bar:
Twitter at AmazingCasting | Facebook at AmazingMoldPutty | YouTube at AmazingMoldPutty

Wednesday, February 24

#Cre8time Reflections of a Vintage Valentine...
by Melissa Johnson


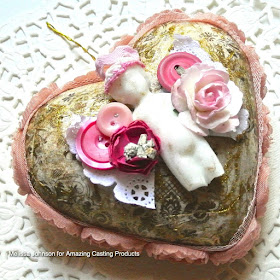
Hi everyone! Valentine's Day has come and gone, but to me, hearts are fabulous any time of the year! For today's inspiration, I would like to share a vintage style heart ornament that I made featuring Amazing Mold Putty and Amazing Casting Resin.


Earlier this year I was fortunate enough to make the trip to CHA and meet and work with my fellow team members at the Amazing Casting Products booth. We had fun scouting out and sharing interesting things to mold. One of the molds I made on that trip was of a frozen Charlotte doll. I used Amazing Mold Putty to mold the doll, then filled it with Amazing Casting Resin. The resin takes paint well, but in this case I opted to leave it in it's natural state and just add a dust of gold.


I had fun adding some pieces of paper doily, vintage style tissue paper, and some flowers and buttons from my stash to complete the project.


How do you embellish your mixed media creations?

Make something that makes you happy :) ~ Melissa Johnson
For more of my mixed media projects, please visit my blog.

• • • • • • • • • • • • • •

Don't forget to subscribe to our blog on the right side bar:
Twitter at AmazingCasting | Facebook at AmazingMoldPutty | YouTube at AmazingMoldPutty

Tuesday, February 23

It's Wine o'Clock and Time for #Cre8time... AMAZING Inspiration by Brenda Burfiend


Good day! Brenda here from Creativity is a State of Mind again hoping to inspire you to create coasters using an everyday household object. I have an obsession with coasters and wine! And since I work in a wine store I really obsess about it... Wine that is!


I love trying to figure out things are not costly and I think I'll be making a bunch of these fun coasters for my wino friends. All you need is some lids from a container, some Amazing Clear Cast Resin, printed paper, glitter (optional) and some patience. You can see the full tutorial HERE!

What would you create if you had a tight budget
and what common item would you use as a mold?

Thanks for stopping by and I hope to see you soon. Wine on! ~ Brenda

Visit my blog, Creativity is a State of Mind to see some more of my creations.

• • • • • • • • • • • • • •

Don't forget to subscribe to our blog on the right side bar:
Twitter at AmazingCasting | Facebook at AmazingMoldPutty | YouTube at AmazingMoldPutty

#Cre8time Stamp TRANSFERmations... DIY Resin Transfers by Bridget Cordero


Hi Everyone! I have an exciting technique I want to share with you all. I have been playing around with Amazing Clear Cast Resin, stamps, alcohol inks and StazOn® ink... just wait until you see this! If you’re interested in seeing how some awesome embellishments are made please check out the video below on my YouTube channel

I've figured out a NEW way to make resin transfers... and it couldn't be easier! I hope you enjoy my video tutorial and I'd love to see your take on this technique.


If you are having trouble viewing video, please CLICK HERE.


These are a couple of art journal pages
I embellished with the clear butterfly wings. 

How will you transform your stamp
stash with Amazing Clear Cast Resin?

Thanks everyone for stopping by! Be sure to check out all the other designers on this blog.
If you’d like to see more of my creations, please stop by my YouTube Channel at https://www.youtube.com/user/BsAlteredDesigns 
Happy crafting! ~ Bridget

• • • • • • • • •

Don't forget to subscribe to our blog on the right side bar:
Twitter at AmazingCasting | Facebook at AmazingMoldPutty | YouTube at AmazingMoldPutty

Sunday, February 21

#Cre8time Valentine's for One... by Maria Soto


Hi there! This is Maria and today I want to share a special project. I got a new paint kit and had been waiting for a project I could create using my favorite resin and these new paints. I previously shared how I took a frame mold I made in Amazing Mold Rubber and used the back to either create sheets of resin or to use as a resin work area instead of non-stick mat. 


For this project I used Amazing Clear Cast Resin and the Mixed Media Discovery Set by Pébéo. I received these paints in a Charity Wings Live in 4D Ultimate Sample Box for winter CHA. 

Though I have the Alumilite Dyes and Metallic Powders – it is wonderful how versatile Amazing Clear Cast Resin is in accepting a wide variety of media for coloring... as long as it's not water-based. These paints are solvent-based, so I knew they would be OK to try with the resin.


Have you heard there is a new Live from CHA event coming up on March 6th... Live in 4D from NAMTA/CAMEX and there is an Ultimate Sample Box to correspond with this event. CLICK HERE for all the details. We hope you join us... Amazing Casting Products will be just one of the amazing companies featured.


First step was pouring into a plastic cup 1 oz. of each parts "A" & part "B" of Amazing Clear Cast Resin, making sure to mix well – then let the resin rest for a few minutes before adding into my mold slab {CLICK HERE to view mixing/preparation}. 


I added drops of paint onto the resin using a wood stick. I think I added a bit too much, it was fun to see how this paint reacts in the resin... but even more fun when you add other colors, into the mixture – so I added some gold too.


I loved how the paints were mixing together all on their own, but I decided to just mix them up using the wood stick. The results were very pretty, however, one thing I learned in this process is that until the resin is totally set, the paints continued to mix. I ended up with a very overpowering red, yet the gold came through very pretty.

I let the resin cure over night. I did get up very early the next day, to make sure the resin was not completely hardened, because I wanted to cut up some resin hearts to use in this Valentine project. Lucky me, it was still flexible, so I was able to cut the resin sheets using my Westcott scissors. 


Since the resin was still flexible and not fully cured, when I applied the resin sheets onto the glass, the resin served as glue. I pressed them into place and left it alone then went to work. When I got back home after work, the resin hearts were completely cured and glued onto the glass. I had cut a very thin resin strip that I wrapped on the stem of the glass – I thought it looked pretty so I left it alone.

I have to be honest it needed something else... so I figured why not do some etching on the glass. I cut up some hearts making sure these were big enough so that the resin heart would sit in the center and I would be able to etch around the resin hearts. 


I used masking tape to protect the rest of the glass from getting any of the etching cream, as I only wanted the etching to be done around the resin hearts.


I decided to use the little hearts on the bottom of the glass as you can see below, I added some etchall resist gel around the hearts and I added etching cream around the strip of resin on the stem... figured why not, so I did.


After the 15 minutes were up, I removed and rinsed off the etching cream under running water in my bathroom sink, then removed all the tape and the hearts. I was left with a pretty etched glass, but I didn't like the hearts on the bottom of the glass – they looked very distorted. I was also not happy with the resin strip on the stem... I didn't like how it felt when I held the stem so I removed it. Since it was never glued onto the glass, it was loosely wrapped which made it easy to remove.


I painted over the hearts at the bottom of the glass with the red Pebeo paint and I also added a few red dots over the etched hearts.


I decided to mix a little bit more Amazing Clear Cast Resin. I took a few drops of the resin and added this to the painted hearts on the bottom of the glass. I really liked the red hearts at the bottom, the addition of resin was enough to bring out the painted hearts. I love it!


This is my Valentine glass for one... I had my chocolate hearts, a few candies and a little bit of wine after I got home from taking my kids out for pizza on Valentine's day. A perfect way to end my day with my very own one-of-a-kind Valentine's glass.


How will you customize your wine glasses?

Please do share your ideas with us by leaving a comment below.

Thanks for visiting! I invite you to stop over to my blog, "What is Creativityat http://chuy-creativity.blogspot.com to see more of my creations. Maria Soto

• • • • • • • • • • • • • • • • •

Don't forget to subscribe to our blog on the right side bar:
Twitter at AmazingCasting | Facebook at AmazingMoldPutty | YouTube at AmazingMoldPutty

Friday, February 19

#Cre8time for a Swim in an Upcycled Sea... AMAZING Inspiration by Tracy Alden


Hello! Tracy here with another Amazing Casting Products inspiration post! Recently I have been inspired by community clean-up projects and how to upcycle plastic. Having already seen many beautiful upcycled plastic soda bottle jellyfish sculptures, I wanted to try a version with water bottles.

My first learning curve was finding out using a candle isn't always the best; it can cause the plastic to light on fire, uneven melting and of course make the project not very child friendly.

I found out using a heat gun was a better way to control the melting of the plastic and older children can join in with the crafting with adult supervision. However even with using a heat gun the plastic would curl, fold over and make all kinds of lumpy and rather un-jellyfish shapes.

I realized when using a heat gun I needed to create a base for the plastic bottles to mold to while being shaped. This is where Amazing Mold Putty came to my rescue!


I started off with 3 over-sized glass beads, small, medium and large. I pushed the beads on wood dowels cut to 12 inches.


While I could heat and mold the plastic water bottles over the beads I would risk the plastic shrinking to the glass so tight it couldn't be removed and the glass beads overheating from the heatgun. I needed to make a heat tolerant base that was flexible and would retain the round shape. I mixed up some Amazing Mold Putty and applied a small amount to each bead, covering the majority of the bead.


Once cured I placed each Amazing Mold Putty coated bead into a heat tolerant cup and filled it with glass pebbles. The cup with pebbles would act as a temporary base, to stick the now finished round molds in, that would not shift while the plastic bottles were being heated.


With a sharp pair of scissors I cut off the top nozzle of each bottle, and then cut each bottle bottom off; they will become the bell top of the jellyfish and the sides, cut like fringe, would become the tentacles. I tinted the plastic with alcohol inks but there are many different pigments and paints you can use to tint the plastic.
*Depending on the shape of the plastic bottles you might find you will need to cut them in a different manner; there is no right or wrong way, it is all about having fun!


Using a pair of tweezers I placed one of the plastic bottle bottoms on the largest of the round molds and heated it with a heat gun. I was careful to rotate the plastic to make sure all of the plastic was heated and would shrink down into jellyfish bell shape.


Using a pair of tweezers I placed one of the plastic bottle sides on the medium size round mold and heated it with a heat gun. I heated the top first, shrinking the plastic and making it snug around the Amazing Mold Putty. I then grasped each cut piece of plastic with the tweezers, twisting to create tentacles.


I then placed both the tentacle and bell shaped plastic pieces together on the small round mold and heated them one final time to create the final shape.


The bell and tentacle pieces can be attached together with glue or eye-pins, as I did to create tropical party ornaments. If you drilled a large enough hole through the bell of each jellyfish, then thread on the tentacles, you can make them into string light covers!

What AMAZING arts and crafts can you create?

Please share them on the user GALLERY on the Amazing Crafting Products Website!

Visit my blog Art Resurrected for more craft tutorials!

Until next time, safe travels! ~ Tracy

• • • • • • • • • • • • • • • • •

Don't forget to subscribe to our blog on the right side bar:
Twitter at AmazingCasting | Facebook at AmazingMoldPutty | YouTube at AmazingMoldPutty