Pages

Tuesday, May 31

#Cre8time to Light Up the Night... by Lara Hjorthoy #FlowerPower


Good Morning Artists! With the weather up here in Canada proving to be remarkably warm for May, Hubbs and I have been fixing up the deck for summer use! I noticed our patio was a bit dark and dreary at night and wanted to create some outdoor decor that would also work as mood lighting!

Since May is Flowers as inspiration – I made flowers! Using the Amazing Mold Putty allowed me to make this a quick and easy process, and Alumilite Metallic Powders in Bronze and Silver added a tarnished bronze metallic shine. 


Glow in the dark powder mixed in with Amazing Casting Resin
produced a strong glow for the middles! 


Who knew it could be so easy to make outdoor lighting for your deck!

What would you make for your deck?

Hope you enjoyed the May inspirations and hey... WELCOME June!

See you soon, Lara!

Check out my website at www.larahjorthoy.com and YourToyCreation.etsy.com. You can follow my day to day creations at Facebook and Instagram, look for YourToy Creations!


• • • • • • • • • • • • • •

Don't forget to subscribe to our blog on the right side bar:
Twitter at AmazingCasting | Facebook at AmazingMoldPutty | YouTube at AmazingMoldPutty

Saturday, May 28

#Cre8time Garden Play... Teeny Tiny Fairy Doors by Maria Soto


Hi there! I want to share a cute little project I made... it reminded me how much I love getting my hands dirty as I create fun crafty items.

I joined a swap group a few years ago, we always do jewelry, but this time I was asked if I wanted to take part of the fairy garden swap and I accepted the invitation. CLICK HERE to jump over to see my owl charms, and HERE for the Star Wars themed charms I made for previous swaps.


We had to make tiny doors and a window. I decided to make the door with a window, just didn't know how. After a lot of thinking and a few craft fails, I went to the craft store and I found a section of tiny miniatures for fairy gardens. I had no idea they had these available, so I purchased a door. I decided to use Creative Paperclay® to make an impression of the door only – and then I added the remaining details by hand.

The door I purchased had a tiny butterfly on it, it was cute but I decided to add a window in it's place. Once the doors were done with their new windows it was time to let the clay dry over night. Next I hand painted each with acrylic paints. To finish them up, I added some sparkle and a bit of flowers to decorate each tiny door.

I also had to make these safe for outdoor use, so I used Amazing Clear Cast Resin to seal the paper clay... and at the same time used it as glue to add all the glitter, beads and tiny plants/flowers. Just a little bit of resin was enough to finish up these tiny houses – I love how glossy they look thanks to the resin.


Here you can see one of the tiny doors all painted,
ready for the final embellishments.


I applied the resin all over the piece and then added beads
to serve as tiny rocks around the plant and flowers.


Here are the finished doors, all ready to go to their new homes.
It's great when you have a product that you can use in so many different ways.


I really like these tiny little doors – adding the trim on the doors, and the tiny windows to make each door different and unique. I loved how the Amazing Clear Cast Resin not only allowed me to make these outdoor safe, but I think the glossy finish makes the texture, the color, and the little details really POP.

What would you create for your fairy garden?

I hope I have inspired you to find new ways to use this amazing resin, the more I play with it the more creative fun I have. These little doors are ready to welcome some fun fairies. Share your ideas with us, we'd love to see how creative you are with Amazing Casting Products.

Thanks for visiting! I invite you to stop over to my blog, "What is Creativity"
 at http://chuy-creativity.blogspot.com to see more of my creations. ~ Maria Soto

• • • • • • • • • • • • • • • • •

Don't forget to subscribe to our blog on the right side bar:
Twitter at AmazingCasting | Facebook at AmazingMoldPutty | YouTube at AmazingMoldPutty

Wednesday, May 25

#Cre8time Happy Accidents... DIY Butterfly Hairclip by Brenda Burfeind

Good day! Brenda here from Creativity is a State of Mind with a tutorial how to use your resin paper to create a butterfly hairclip. The paper I am going to use today was created by accident, literally!

My box of resin paper.

So what happened... I was going to pour a mold using Amazing Casting Resin and the Violet Alumilite Dye that I had mixed up. While picking up my measuring cup, I knocked it over instead and my resin spilled everywhere. Thank goodness I keep paper towels within arms reach when pouring molds. 

I quickly wiped it up and was about to throw the paper towel away when I realized it may come in handy. I laid it out on my teflon sheet (if you don't have one you can also use a white plastic garbage bag) as flat as possible and within 10 minutes it had set up nicely. I tried to make sure that there weren't too many thick areas so that it would still be somewhat pliable and easy to cut.


Then I wondered if my new Stampin' Up butterfly die would work on it?


I located an area of the paper towel with most of the purple, cut around the butterfly and ran it through the Cuttlebug! Perfection!!!


Now the paper towel is pliable and the die cut it out AMAZINGLY! Do you see the awesome texture the paper towel gave the butterfly?


I had just enough of the purple resin area
so that I was able to cut the butterfly twice!


I glued the edges and pinched it together to create a 3D effect. 
Kind of like a cage.


I also used a Sharpie to draw in the butterfly body and my E6000® 
was the perfect way to attach the butterfly to the hair clip.

I love happy crafty accidents! 

:)


My granddaughter has the perfect hair for this awesome butterfly clip.

What would you create
with resin paper?

Thank you for stopping by today and I would love to hear from you. Leave me a comment and tell me what you would create using your Amazing Resin paper!

Until next time, ~ Brenda 

Visit my blog, Creativity is a State of Mind to see some more of my creations.

• • • • • • • • • • • • • • • • •

Don't forget to subscribe to our blog on the right side bar:
Twitter at AmazingCasting | Facebook at AmazingMoldPutty | YouTube at AmazingMoldPutty

Tuesday, May 24

Purple Resin Rain, Purple Resin Rain-ay-ainnnn... by Tanya Ruffin

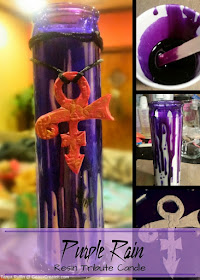
Purple Rain Resin Candle- Tanya Ruffin for Amazing Mold Putty

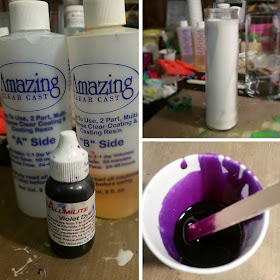
and Violet Dye I made a tribute to the late great Prince.

Purple Rain Resin Candle- Tanya Ruffin for Amazing Mold Putty

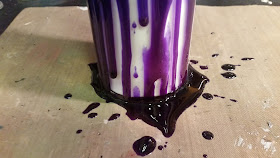
Super easy, scoop up some resin on the craft stick
and drip down the side of the candle.

Purple Rain Resin Candle- Tanya Ruffin for Amazing Mold Putty

You can leave it pooled around the bottom or trim with scissors.

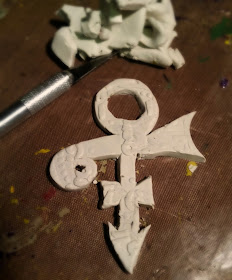
After looking at it I decided it needed a little something extra,
so I pulled out some polymer clay and came up with this...

Purple Rain Resin Candle- Tanya Ruffin for Amazing Mold Putty

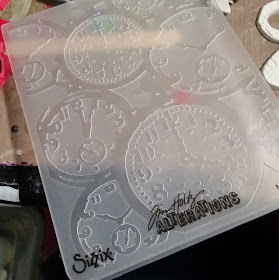
It was a tad plain so I pressed a Sizzix embossing folder into the clay design. 

I used the clock design. Clock, Time, Morris Day and the Time... get it? Anyway...

Purple Rain Resin Candle- Tanya Ruffin for Amazing Mold Putty

After baking clay the next step – make a mold of the Prince Love symbol...


It's quick and easy with Amazing Mold Putty!


Mix Violet Dye with Amazing Casting Resin. Pour into mold and wait about 10 minutes to cure. Rub some Gold Rub 'n Buff® to highlight the design. I ended up casting a pink version that I used to finish my candle. I am also going to make some necklaces with my Amazing Prince Love symbol!


Go Craft Your Own Way!

Tanya


Please visit my site to see more of my inspiring creations at www.tanyaRuffin.com

• • • • • • • • • • • • • • • • •

Don't forget to subscribe to our blog on the right side bar:
Twitter at AmazingCasting | Facebook at AmazingMoldPutty | YouTube at AmazingMoldPutty

Monday, May 23

From #Cre8time Organization to Springtime Pendants... by Tracy Alden


Hello! Tracy here for another edition of Mold Rubber Monday! I am always looking for new shapes and textures to mold and cast in resin. In the process of sorting my beads recently I noticed the hard plastic containers many small beads come in have perfectly smooth and glossy lids. With the help of Amazing Mold Rubber I was able to create new resin pendant molds from them!

Supplies:


I went through my collection of plastic bead containers picking the best shapes and glossy smooth tops. I cleaned each piece to be molded with rubbing alcohol to remove any debris or dirt.


Carefully following the instructions, I mixed up a small amount Amazing Mold Rubber and slowly poured it into my mold box, in this case a former plastic food tray. CLICK HERE to view mixing/preparation. In the process of mixing, the Amazing Mold Rubber had formed bubbles. To quickly pop the bubbles I used a heat gun to slowly heat the uncured mold rubber to pop the bubbles.


Once cured I had a perfectly smooth layer of Amazing Mold Rubber at the bottom of the mold box. I mixed up more Amazing Mold Rubber to fill up the tray with another thin layer. I carefully placed each lid into the liquid Mold Rubber and pressed them into place with a stir stick.


Since many plastic objects placed in Amazing Mold Rubber tend to shift or drift in the liquid silicone, I placed little glass decorative pebbles into each lid to anchor the lids in place while the Mold Rubber cured.


Once the Amazing Mold Rubber was completely cured I removed the lids from the plastic tray. When I gently removed the lids from the Mold Rubber they came out rather cleanly, requiring very little trimming of the mold rubber with craft scissors.


I mixed up a small portion of Amazing Clear Cast Resin, making sure to slowly stir to reduce air bubbles and let it sit for 10 minutes. I poured resin into each mold, filling them up halfway. Using tweezers I placed small amounts of dried herbs and flowers into each mold. In a few of the molds I placed Paper House Productions Stickers on top of the dried plant material. Since these stickers are thin plastic I did not need to seal them before placing them into the resin. I carefully removed any air bubbles by using a heat gun. I let this layer cure to a tacky set.


I mixed up another small portion of Amazing Clear Cast Resin, this time just enough to fill each pendant mold to the top. I added a few more stickers and bits of dried plants to create a 3D effect in each piece. I let the resin cure completely.


Once I removed the pendants from the molds I carefully sanded any edges smooth. With the addition of a small hole drill through the top or a small jewelry bail glued to the back of the pendants, these pieces are ready to be made into wonderful Springtime jewelry!

What AMAZING arts and crafts can you create?

Please share them on the user GALLERY on the Amazing Crafting Products Website!

Visit my blog Art Resurrected for more craft tutorials!

Until next time, safe travels! ~ Tracy

• • • • • • • • • • • • • • • • •

Don't forget to subscribe to our blog on the right side bar:
Twitter at AmazingCasting | Facebook at AmazingMoldPutty | YouTube at AmazingMoldPutty

Friday, May 20

Lost and Found #Cre8time Jewelry by Aimée Wheaton


Ever have a favorite pair of earrings and then you lose one? Yeah that's what happened with this pair of earrings, they were my favorite and I happened to lose one while I was out on a weekend getaway with the hubby. I was so bummed, then I remembered I had a secret ingredient to recreate them! 


I molded this earring and it made the perfect pair
of earrings, not exactly the same but very close!


Of course to mold it you mix equal parts of Part "A" and "B"
of the putty and then form it around the item. See how it works here.


Look how amazing the mold turned out! Here it is brushed with our silver Alumilite Metallic Powder! When the resin cures it will be attached to the final product. I poured Amazing Casting Resin after mixed into the mold and let it cure. I did this two times. See how to do it here.


This is the finished product! I sanded the edges
for a clean finish to clean them up a bit.


Then to make the details stand out I brushed 
Jet Black StazOn Ink onto the surface.


Add a few jump rings and ear wires and you're good to go!! These are even lighter than the original pair! Amazing Mold Putty to the rescue!!!

Do you keep your broken jewelry
parts or orphaned pieces?

Feel free to stop by my FB page to see the latest with me.
To see more of my work please visit my new blog "Life Glitter Makeup"
and also at the Aimée Wheaton Art and Design website.

Till next time! Xoxo Aimée

• • • • • • • • • • • • • •

Don't forget to subscribe to our blog on the right side bar:
Twitter at AmazingCasting | Facebook at AmazingMoldPutty | YouTube at AmazingMoldPutty

Wednesday, May 18

Sealed with a #Cre8time Kiss... DIY Springtime Frame by Maria Soto


Today I want to share a nice project I made using an inexpensive wood frame that I purchased at Michael's {similar to this one}.


I really had no idea what I was going to do with this frame, so many ideas came to mind. I figured this would be a simple project, and I let my creative ideas just come to me as I worked on this piece. 

First thing I did was decided on two colors to use – since we are still waiting for Spring to come here in Indiana, I thought why not use red and yellow acrylic paints... they remind me of the warmth from the sun. I painted the frame and left it alone for a couple of days waiting for some more ideas to come to me.


One day I was working on some resin projects and had quite a bit of Amazing Clear Cast Resin left, I usually just pour extra resin into old molds but this time I thought why not use the extra resin to cover the front of this frame and make it look like it's all glass; so I took a foam make-up applicator and applied the resin over the entire front of the frame. 


The Amazing Clear Cast Resin is so easy to mix and use, and depending on the climate where you live, it can start to set within 30 minutes of mixing. Just remember to use equal amounts of both parts "A" and "B" to make sure your resin sets perfectly {CLICK HERE for full mixing instructions}. The photos show how the painted frame looks after adding the clear resin.


It was then that I thought about adding some flowers to the frame and I noticed the tiny clear beads I had taken out to used on my other resin projects and figured these would give the frame a bit of dimension. I added these tiny clear beads on some parts of the red areas, and next it was time to add some flowers on the resin before it all sets. I also took some paper and fabric flowers and tiny butterflies and added these over the resin, playing around a bit. I was able to move the flowers from one area to another until I was happy with the placement, as long as the resin has not started to set, you can move your embellishments around like I did here. 


Once I was happy with the look of the frame I let it set over night. There's no glass in the photo section of this frame but the frame itself looks like it's all covered in glass thanks to the Amazing Clear Cast Resin. A very simple project, but very pretty and ready for a nice photo of the kids to give to Grandma as a gift, or for me to keep at the office... just a nice "Spring" like frame. 


How would you use resin on a frame? 

I used it to embellish the frame and as a adhesive on this project. Share your ideas with us, we'd love to see how creative you are with Amazing Clear Cast Resin.

Thanks for visiting! I invite you to stop over to my blog, "What is Creativity"
 at http://chuy-creativity.blogspot.com to see more of my creations. ~ Maria Soto

• • • • • • • • • • • • • • • • •

Don't forget to subscribe to our blog on the right side bar:
Twitter at AmazingCasting | Facebook at AmazingMoldPutty | YouTube at AmazingMoldPutty