Pages

Friday, December 29

Serving up #Cre8time Greetings... by Tracy Krueger


Hello everyone! It's Tracy here and I'm super excited to share with you my first project as an Amazing Casting Products Creative Team member! The project I'm sharing today is something I created to display at a Holiday Market that my employer holds every December. I knew I wanted to incorporate a technique I learned about 3 months ago... Fluid (or Flow) Painting.


I started by staining two wood plates with Minwax Classic Grey wood stain. I left the centers unstained as I will be painting that area with acrylics.


After the stain has dried thoroughly, I picked out the Acrylic paint colors I want to use. I usually always include black and white, then 2-3 other colors (here I've used 4 colors of Artist Loft paints from Michaels). If you've never tried Flow Painting, there are tons of videos and techniques on YouTube.


I taped the edges of the plate so I didn't accidentally get paint outside the middle of the plate. Then I took the plate and placed it on top of the cup containing all the colors combined, and flipped over – holding the two tightly together. 

You want to wait a minute to let all of the paint settle, then lift the cup off of the plate and begin to gently tilt the plate so that the paint covers your surface. After surface is covered, I use a kitchen torch to make more of the "cells" appear (with flame couple of inches above the paint). Gently remove tape and place on a very flat/level surface. It's a good idea to covered them while drying – creating a "hood" so dust does not settle onto the paint. You will need about 24 - 48 hours for the paint to FULLY dry {depending on your climate/conditions drying time may vary}.


Now you are ready for your first coat of Amazing Clear Cast Resin. I mixed equal amounts of Parts "A" and "B" (I used two Tbsp. of each) according to the package directions, and poured onto the dry paint, using the stir stick to spread it around. Depending on the size of your substrate, you may need to vary amount of resin needed. I always let the resin cure 24 hours (sometimes even more) to make sure it is fully ready.


I pulled out some of my rub-ons and applied "Live, Laugh, Love" in white and "Family" in black on the two different plates. By placing on top of the cured layer of resin, you will see that the letters sort of "pop off" the plate. I love the dimension that it gives! 

Now you are ready for a second coat of Amazing Clear Cast Resin to seal the letters in place. Spread resin around with your stir stick so it reaches all of the edges. Again, let this cure at least 24 hours (until it isn't sticky).


These plates will make fantastic Holiday serving plates {Amazing Clear Cast Resin is food safe} or even lovely decorations for your wall.


Thank you for taking time to read my first post. 
 I look forward to sharing more in the future!

Do you have any Holiday party ideas?

Stay tuned for more... Tracy

You can find more of my work on my Blog: http://tracykrueger-nine.blogspot.com/2017/

• • • • • • • • • • • • • • • • •


You can see Tracy's work along with other AMAZING Creations from our Creative Team at Creativation – Drop by the Alumilite/Amazing Casting Products Booth #2214.

• • • • • • • • • • • • • • • • •

Don't forget to subscribe to our blog on the right side bar:
Twitter at AmazingCasting | Facebook at AmazingMoldPutty | YouTube at AmazingMoldPutty

Thursday, December 28

A #Cre8time Game of Horseshoe... AMAZING Inspiration from Brenda Burfeind


Good day Crafties! Brenda here from Creativity is a State of Mind and today I want to share some inspiration... another project I've made using a mold I created a while back! 


As you may remember... this "lucky" sign that I created
from molding/casting a real horseshoe.


Or my first horseshoe make – this red, white and blue star?
If you missed them, you can view these projects HERE.


There is a little history as to why I molded this particular horseshoe. When we bought our house we found this horseshoe among some flowers in a flower bed. My husband said, "this was going to be our LUCKY horseshoe and it needed to stay in the yard". It's very old and rusty, but it's been with us ever since (now 16 years).


I've used the same horseshoe mold filled with Amazing Casting Resin and a bit of Alumilite Dye. I rubbed the resin cast horseshoe with some paint to age and distress, then wrapped with some colored twine to create a faux twine-wrapped horseshoe to hang in my home. Now I can enjoy this "lucky" charm every day.


What I love best about Amazing Casting Resin is that once it's cured it is almost weightless. Imagine if you hung a real horseshoe on a wall in your home and it wasn't hung properly. If it would fall it could hurt someone or break something... but made with Amazing Casting Resin it is featherlight! 


You can also paint plain white resin castings to create very different variations! Wouldn't this make a wonderful rustic gift topper?!


Oh and by the way, my horseshoe sign made it on the new packaging for Amazing Casting Resin! I love seeing my creations on their product. You can find it at Michael's, Hobby Lobby and of course online at MoldPutty.com!

I hope I've inspired you to use the Amazing Casting Products to create your own custom home decor that is very lightweight and so easy to recreate! I've used this mold a several times now and it is still as strong and detailed as the original!

What items would you mold 
to accent your home decor?

Thanks for stopping by and I hope you will come back often to see what the other designers have created!

Until next time, Happy Crafting! ~ Brenda

I invite you to stop over to my blog, Creativity is a State of Mind
to see all that I've been making. 

• • • • • • • • • • • • • • • • •

Don't forget to subscribe to our blog on the right side bar:
Twitter at AmazingCasting | Facebook at AmazingMoldPutty | YouTube at AmazingMoldPutty

Sunday, December 24

Frosty in a #Cre8time Winter Wonderland... by Michele Kosciolek


Holiday crafting is my FAVORITE! And in Michigan winter is a holiday! Michele here today to share some wintery molding fun!


I used Amazing Mold Rubber and Amazing Casting Resin for the snowman in this festive lantern. I started with a ceramic ornament and molded it in Amazing Mold Rubber. First, I need to build a moldbox...


I hot glued him to the lid of the rubber container.


Next, I used some cardboard from a box I received some crafty goodness in to create my mold box. I created a cylinder shape and secured with tape – leaving at least 1/4" around all sides of the snowman original.


Make sure you seal completely around the bottom. 
I used hot glue to seal the box to the lid.


Mix container of Amazing Mold Rubber according to the directions {CLICK HERE to view mixing/preparation}.


And pour until whatever you are casting is completely covered. Set aside to cure.


After the rubber is cured, gently peel away the mold box.


Pull item from mold. If needed, carefully slit down the side of the mold with a blade so you can remove what you molded.


To prepare mold for resin casting, I used rubber bands
around the mold to make sure I had a good seal.


Then filled with Amazing Casting Resin
{CLICK HERE to view mixing/preparation}.


In about 15 minutes the snowman is cured and ready to remove from mold! Can you see all that texture??!


I used my Copic markers to do some coloring.


Add a little snow and a tree with lights...
and a cute little deer to complete the scene.


And viola! A cute wintery scene!


A perfect little place for Frosty to spend the winter!!!

How do you decorate for the holidays?

Thanks for joining us today. Until next time... 
Happy Holidays!! ~ Michele

For more projects and inspiration please visit my blog "Stuff by Belle"
or follow on Facebook: https://www.facebook.com/michele.kosciolek

• • • • • • • • • • • • 

Don't forget to subscribe to our blog on the right side bar:
Twitter at AmazingCasting | Facebook at AmazingMoldPutty | YouTube at AmazingMoldPutty

Saturday, December 23

#Cre8time Peace on Earth... Polymer Clay Dove Ornaments by Tracy Alden


Hello! Tracy here with another tutorial using Amazing Casting Products! Around the holidays I often find myself making last minute gifts to complete a package or basket... and this year was no exception. Harking back to the traditional theme of doves as a symbol of peace and goodwill, I decided to create "Peace on Earth" Dove ornaments. 

Supplies: 


Using a pasta machine (devoted to craft use only) set on the thickest setting, I conditioned some polymer clay. I stacked two pieces of the now smooth clay on a ceramic tile and rolled an acrylic roller over the stack to make them stick to each other. 

I drew a simple dove outline on a piece of parchment paper, then placed the paper on top of the clay. I traced the dove outline with a stylus to transfer the image.


Using a craft knife I cut out the dove shape, being careful around the edges to not tear the clay. I then smoothed out any uneven cuts in the clay with a stylus. 


Instead of stamping images into the clay (like I have done with these tag ornaments), I create a free form pattern of swirls and dots as a decorative element on the clay dove. Using a small diameter stylus I gently press into the clay – drawing on the clay, not going too deep but just enough to get a visible pattern. 


I bake the clay dove on the tile as per the manufacturers instructions. Using an emory board, I carefully sand any uneven raised surfaces created in the drawing process, without removing the dove from the tile.

Now the fun begins... 


I condition more polymer clay and create a clay wall around the cured clay dove piece. To make sure I was creating a tight seal with the clay to the tile, I press the clay in place with a metal stylus. I don't need to bake this clay – it is just serving as a wall to contain mold-making material, Amazing Remelt.


I sprayed the piece lightly with cooking spray to act as a mold release. I heat the Amazing Remelt in the microwave, in the container it comes in (click here to view preparation). I pour the heated Remelt into prepared piece on the tile from a 12 -15 inch distance – this distance gives the Remelt a chance to release more bubbles before cooling.


I let the Amazing Remelt cool until no longer tacky or warm. When completely hardened, I carefully remove the tape, clay and the original from the Remelt mold.

Now to make more...


I condition the polymer clay, making sure the clay was soft and warm enough to be pushed into the mold. I push the clay into the mold tight, using an acrylic roller to push the clay further into the mold – making sure the clay gets into the tiny embossed details.


I carefully place the mold, with the polymer clay still inside, face down on a ceramic tile, then gently peel back the mold leaving polymer clay piece stuck to the tile. I refill the mold with more polymer clay and repeat this process again and again until I have plenty of doves. 


I made holes in the clay doves with a stylus which will be for adding ribbon hangers later. I applied two to three shades of Alumidust to each clay dove and then baked the polymer pieces to cure.


These shimmering clay doves are ready to hang
on the tree or put a finishing touch on gift baskets. 

What AMAZING arts and crafts can you create?

Visit my blog Art Resurrected for more craft tutorials!

Happy Holidays and until next time, safe travels! ~ Tracy

• • • • • • • • • • • • • • • • •

Don't forget to subscribe to our blog on the right side bar:
Twitter at AmazingCasting | Facebook at AmazingMoldPutty | YouTube at AmazingMoldPutty

Wednesday, December 20

How #Cre8time Charming... AMAZING Inspiration by Lyn Gill


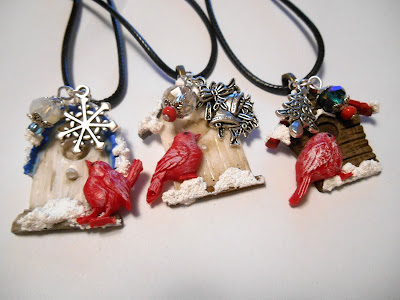
Happy Holidays everyone! Lyn here to share a bit of Christmas inspiration... cute little Winter Birdhouse Charms accented with a few feathered friends made with Amazing Casting Resin.


Using some tiny cast birds from Amazing Casting Resin and red Alumilite Dye, combined with some beads/findings, metal Christmas charms, acrylic paint and Snow Tex (available at most craft stores) –  I created these tiny Birdhouse Charms just in time for the Holidays. How cute are they? They'll be perfect Holiday gifts for loved ones!

What gifts will you create this season 

Well that's all for now... Till Next Time! Lyn

As always you can find more of my work on my blog LynzCraftz
or on YouTube LynzCraftz, or my Facebook page LynzCraftz.

• • • • • • • • • • • • • • • • •

Don't forget to subscribe to our blog on the right side bar:
Twitter at AmazingCasting | Facebook at AmazingMoldPutty | YouTube at AmazingMoldPutty