Welcome to the Inspiration Blog for Amazing Casting Products from the Alumilite Corporation. Here we share and explore projects and ideas using Amazing Mold Putty, Amazing Mold Rubber, Amazing Remelt, Amazing Casting Resin and Amazing Clear Cast Resin. We will have you sculpting, molding, and casting your own crafting ideas in no time. Celebrate your creative freedom with Amazing Casting Products!
Pages
Tuesday, March 27
Let Amazing Mold Putty Bring Out the Artist in You... by Peg Rounds
Monday, March 26
Resin Shell Pendant with Jingle - My Last Post!
This is a super easy project! Begin by cleaning your shell with mild soap and water to get any grit or residue off of it. I used one I found on the beach, so the sand had to go! LOL! Add whatever trinkets you would like. My shell contains a vintage button, a sprinkling of vintage glass glitter, and a bit of vintage lace tucked inside. Mix a small amount of the Amazing Clear Cast resin according the the manufacturers instructions and carefully pour into the shell. Allow this to sit for 24 hours to cure. Add a jump ring through the hole in the shell and extend from the chain of your choice!
I hope you give this a try! It's super easy and so cute!
Jingle Out.
Friday, March 23
Make Your Own Cocktail Ring... by Niki Meiners

Wednesday, March 21
You Can Make Anything Your "HEART" Desires with Amazing Mold Putty!!!
This piece I will be using in an altered book round robin project that is "Fairie" themed. This is just part of the whole fairy I am creating. It all began with a sketch...
Monday, March 19
Dress Form (x2)
Friday, March 16
Pendant Necklace
Thursday, March 15
Domino Bookmarks with Amazing Mold Putty
 |
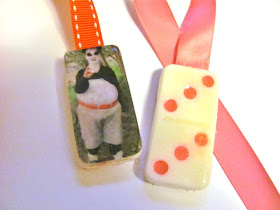
| The "domino" side of Sam's bookmark and the photo side of Will's |
Today I bring you my last post as part of the 1st design team for Amazing Mold Putty. After a great deal of consideration--as I LOVE Amazing Mold Products--I decided not to reapply and give others the awesome opportunity to work for this team and experiment and craft with a truly exciting product!! I will still on my own blog post crafts featuring the putty and resins from time to time but for my last post here I made Domino Bookmarks.
Some things you look at and think, that's gonna be simple to cast...and then it comes time to do it. Let me tell you, dominoes is not under the easy to cast project.
|
 |
| I thought I would simply press the dominoes into the putty, let it set up and voila! domino molds. |
 |
| WRONG. The air gets trapped in the little divots an you don't get a perfect domino mold. |
 |
| Finally a near perfect mold...there are still imperfections in this that can be sanded out...the hardest part the divots are awesome and will be perfect for my project. |
 |
| I fill the molds with the Amazing Casting Resin which is almost instant gratification, setting up in 10 minutes! |
 |
| A little sanding with some sandpaper produces quick effects making the cast dominoes look almost ready to play with! |
 |
| I colored the divots in using BIC Mark-its. In hind site I might not do that again as when i dipped them into the UTEE it smeared a bit. not something I would normally expect from an alcohol ink. |
 |
| The nice thing about the resin pieces is that when I colored outside the lines of the divot, it was easily sanded clean! |
Tuesday, March 13
You Can Never Have Too Many Shoes!

Sunday, March 11
Mold Putty and Resin Embellishments for My Gourds!
Most of the projects that I’ve posted on my blog using the Amazing Mold Putty and the Amazing Casting Resin have been for something other than Gourd Art. Today is going to be different. You know once I became a member of the Amazing Mold Putty design team it was like the world was open to endless possibilities to create molds from. I started picking up things everywhere that could be molded. In this project I had picked up this drawer pull to create embellishments from for putting on gourds, so I mixed up Part A and Part B of the putty and pushed my drawer pull into it to create the mold:


Barbara


