I declare this..."YEAR OF THE GIRAFFE!"
While organizing my office I came across an old magnetic dart board and being totally unable to just throw things out, I decided to give it a new life. Of course Giraffes are my absolute FAVORITE animal so it was no great leap deciding on a year-long celebration in honor of our long necked friends by creating a magnetic calendar using Amazing Crafting Products. I began by harvesting the metal sheet and magnetic tips from the old dart board and darts and decided on an 11" X 17" foam sheet to be used as the new backing.
After measuring and making sure everything was centered I used a Sharpie to trace the metal sheet onto the foam and started drawing a repetitive pattern. The next step was coloring it all in. Any markers can be used, but I prefer to relive my childhood moments by using Crayola markers-the washable ones came in handy because sometimes I make a mess and this way I could just wipe away any messy smudges while working. Come on, you know messy happens sometimes!
Once the background was finished I coated all colored areas with Amazing Clear Cast Resin. This gave it a cool texture, a 3-Dimensional look, and also ensured that the brilliant colors would be sealed and protected. The coat would have to dry for about 12 hours, so I set it aside and started on the fun details of the calendar.
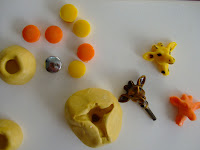
I have several giraffe themed things in my house. For what I wanted to make I would need something small like this Giraffe head from a kitschy ring holder I received as a gift. As a crafter I find that kitschy things always come in handy when it's time to get creative. For the date numbers I found an old metal button. I would be needing multiple numbers for the calendar days and making multiples is fast and easy with Amazing Mold Putty. I prepared equal parts of "A" & "B" for each piece.
The putty should be mixed until it is a consistent yellow color. Once it is ready, the giraffe head and button were pressed into the putty and left to set. Curing time is about 10 minutes. While waiting I separated more of parts "A" & "B" to make multiple molds. This would cut down on the time it would take to make this project by making it super fast to cast multiple pieces instead of casting one piece at a time. I made 2 molds for the giraffe and 4 molds for the button.
I have to say that I had the BEST time playing with the Alumilite Dyes! There are many colors to choose from but in order to keep with my color scheme I chose Orange, Yellow and Green {these are the standard dye colors, not the new fluorescents}. To get perfect, vibrant color it only took a very small drop added to part "A" of the Amazing Casting Resin. Once it was mixed to a clear consistency I poured it into the molds and waited about 10 minutes for the resin to set. I repeated the process until I had enough pieces for my calendar - 6 giraffes and 31 buttons.
Remember those harvested parts from the dart board? The metal sheet was attached to the back of the foam and the magnetic dart tips were attached to the back of the giraffe heads. Because they are metal pieces I used a two part epoxy adhesive to make sure it would hold. I used a black Sharpie to draw details on the heads, numbers on the buttons and the names of the months on foam strips. Small magnets were added to the buttons and months. The finished project was then mounted onto fabric to hang on my office wall. The magnets on the days and months make it possible for this calendar to be used year after year and the days to be adjusted every month.
Use the giraffe heads to mark special dates or appointments. It just so happens that my birthday is this month so I marked my birthday and gave this calendar to myself as an early birthday gift.
What important dates will you mark on your calendar?
I'd love to see what you create! Please upload and share your creations to the NEW
user GALLERY on the Amazing Mold Putty Website for all the world to see.
.................................
Don't miss a single post!
Please subscribe to our blog via email on the right side bar:
Twitter at @AmazingCrafting | Facebook at AmazingMoldPutty | YouTube at AmazingMoldPutty


Isabel this is a great recycled project. I think it would be awesome as a gift to a teacher -
ReplyDeleteThank you Maria!
Delete