Pages

Monday, September 30

Princess Hooks for ONE and ALL... AMAZING Inspiration by Brenda Lee Burfeind

Good day all - Brenda here again with an AMAZING inspiration post for my little princesses. Recently I was given one of those party favor rings, you know the ones you get on cupcakes? Well, it was a princess crown and I kept thinking about what I could make from it for my granddaughters because they are my little princesses. Since I have two granddaughters – I couldn't just make one thing, but I did only get one ring... so Amazing Mold Rubber to the rescue! This is a brand new product that Amazing Crafting Products has come out with and it really is amazing. When you have a 3D project in mind the Amazing Mold Putty doesn't always do the trick, but this new product is the bomb!!! 

When you have only one of this...


you create this!


Which become these...


Now both of my granddaughters will have their own hooks to hang their coats on. 

Thanks so much for visiting us. I will be back in a couple of weeks to show you a step by step tutorial on how these amazing hooks were made. Therefore, I hope you keep following our blog and keep crafting along with us. Please go to our Gallery area and upload what you've been crafting with these Amazing Crafting Products.

What would you mold if you only
had one but needed multiples?

For see more of my creations, please feel free to come check out my blog

at Creativity is a State of Mind. Until next time, have a great day!
...........................................

Today is the last day of our 20% Coupon
 to shop for Amazing Crafting Products!
Use coupon code { celebrate } at

Coupon Expires September 30, 2013.
...........................................

Don't forget to subscribe to our blog via Networked Blogs,
bloglovin' or via email on the right side bar:
Twitter at @AmazingCrafting | Facebook at AmazingMoldPutty | YouTube at AmazingMoldPutty

Amazing Mold Rubber Breeds a Ghoulish Glam Necklace... AMAZING Inspiration by Tracy Alden


Hello! Tracy here again with another inspiration post! Some of you might laugh but my inspiration for this project is my allergies and a lack of time. I have a lot of allergies to key ingredients in beauty care products, which makes putting on any makeup for Halloween difficult. Compounding that, on Halloween we set up a haunted house and yard for the kids and a potluck for friends, which means very little time for a costume. I wanted to come up with something ghoulish but easy to add to most costumes quickly. Well... Amazing Mold Rubber came to the rescue for me! I wanted to do a faux blood drip necklace made from resin that was optically clear, had great detail but was super light. 


I made a faux liquid drip original in polymer clay. I made a mistake with trying to mold the original without making it super smooth. The Amazing Mold Rubber takes such a super fine detail mold of the original that it was making a slightly matte castings. So I went over my original polymer piece with several gloss coats of sealer; in this case I used Mod Podge after degreasing the polymer clay. Now that it is super smooth and glossy, I let it dry before molding.


Because my original was an odd shape, I made my mold box out of a coated cereal box. I used packing tape and hot glue to seal the edges. I glued my original to the bottom of the mold box and poured the Amazing Mold Rubber. The mold came out super glossy and smooth, perfect for casting a ghoulish necklace for Halloween using Amazing Clear Cast Resin and Alumilite Red Dye! I drilled a hole on each side of the pendant and threaded clear elastic jewelry cord on for easy wear.


What AMAZING arts and crafts can you create???

Please share them on the NEW user GALLERY on the Amazing Mold Putty Website!


Visit my blog Art Resurrected for more craft tutorials!

Until next time, safe travels! ~ Tracy

...........................................

Today is the last day of our 20% Coupon
 to shop for Amazing Crafting Products!
Use coupon code { celebrate } at

Coupon Expires September 30, 2013.
...........................................

Don't forget to subscribe to our blog via Networked Blogs,
bloglovin' or via email on the right side bar:
Twitter at @AmazingCrafting | Facebook at AmazingMoldPutty | YouTube at AmazingMoldPutty

Saturday, September 28

Make Christmas Merry and Bright! AMAZING Color Variation with "Flo" Green by Brenda Lee Burfeind

Brenda here again with another but similar post. I've been creating heavily lately and I will be showing you so much more gorgeous stuff soon, but today I am showcasing some color variation. Now a while back I showed you the awesome different looks of some of the fabulous cool new colors that Amazing Crafting Products has come out with. Remember... you can go here to check out the post if you missed it.


Well what happens if you combine colors? What I mean is I took this beautiful pendant that I created with a mold using the Amazing Mold Putty. There are tutorials all over the blog on how to mix up your mold putty – if you haven't already seen how CLICK HERE. Please go check out all the other posts while your at it. We just love showing you how you can make beautiful and practical things.

The creative team is amazing and we also
have a fabulous leader in Susan!!!


So back to my project. Using the Amazing Casting Resin part "A", I mixed in 2 tiny drops of the Fluorescent (Flo) Green Dye. You DO NOT need a lot of the dye – but depending on the color you want to achieve, you must use your own judgement. After the dye and the resin were mixed up good, I added the part "B" into that mixture; again making sure to scrape the sides. I mixed them together completely and poured into my mold. After only 5 minutes, a beautiful jade pendant is born... but now what?


Well this is where more Amazing crafting supplies come into play. You know we also have the Amazing Clear Cast Resin? Yes, it does the same thing – only it's clear and not white when cured. It does need to cure for about 24 hours, but when you are creating beautiful things, the wait is well worth it. So, I took part "A" of the clear cast resin and again added 2 tiny drops of Flo Green Dye and mixed them up. Then part "B" was added to that mixture and mixed up well again. I normally let that sit for about 5 minutes to make sure all the air bubbles are out of it before I pour, but in this case I didn't need to. Why you ask? Because I basically used it as a paint. Yes, I painted with it. Now mind you, you cannot reuse your paint brush after you've dipped it into the clear cast resin because it will NOT wash out. Believe me, I've tried.


Now this is what became of
that beautiful jade pendant...


First I used a little bit of black Rub 'n Buff® and then I just painted some of the Amazing Clear Cast Resin into the gaps of the pendant and surrounded the middle part with it also. See how the color changes when you use the Amazing Clear Cast Resin -vs- the Amazing Casting Resin? I also added some green rhinestones while the clear cast resin was drying and that becomes my glue. By adding a ribbon and a tree hanger to it – then becomes a beautiful Christmas ornament. I know exactly who this was made for without the intention to begin with. I hardly ever know what I will create when I get into the mood.


Thank you for stopping by today and I so hope you've enjoyed your stay here today. 

 What would you create if you used
the same color in variation? 

Also, if you haven't gone to see everyone's creations lately, please check them out here and please feel free to come check out my blog at Creativity is a State of Mind. Until next time, have a great day!
Brenda Lee Burfeind
...........................................

Time is running out to get 20% discount
including the new Fluorescent Dyes!!!
Use coupon code { celebrate } at

Coupon Expires September 30, 2013.
........................................... 

Don't miss a single post!
Please subscribe to our blog via Newtorked Blogs,
bloglovin' or email on the right side bar:
Twitter at @AmazingCrafting | Facebook at AmazingMoldPutty | YouTube at AmazingMoldPutty

Save the DATE!!! Operation Write Home's World Cardmaking Day Bloghop on Oct. 5th


Amazing Crafting Products will be proudly participating in this bloghop. You are invited to drop by as we join in making "THANK YOU" cards for our men and women serving in the armed forces. This special bloghop is the place to spend October 5th... World Cardmaking Day - packed full of creative inspiration from the creative community, prizes and more!

If you are interested in joining in on the fun - there's still time to signup. CLICK HERE for all the details - and please put in the comment box you found out about this from the Amazing Crafting Products Blog.

This is where the bloghop will begin...

We hope to see you there!
...........................................


Join us each Monday for Mold Rubber Mondays – where we will share projects and inspiration using this fabulous new product available at Amazing Crafting Products!

Friday, September 27

AMAZINGLY Spooky Wax Seal Re-Creation
with Rachel Whetzel

Hello, AMAZING creatives!! Rachel Whetzel, here again to show you what's inspiring me today! Halloween is one of my FAVORITE holidays. One of my favorite things to do, is create bottles for my Witch's Apothecary. Often, the bottles I like don't have tops or seals on them, and I love the look of wax sealed bottles, so for some of my bottles I re created the look of a wax seal using Amazing Casting Resin and Alumilite Black Dye


What recreations are YOU working on
this Halloween season using 

Please share your projects in the comments below! If you create something inspired by my idea, please leave a comment with a link here, so I can come and visit to see! I would love for you to visit me at my "house" too!! Thank you so much for reading!! ~ rachel
...........................................

How about a 20% Coupon to shop
Use coupon code { celebrate } at

Coupon Expires September 30, 2013.
...........................................

Don't forget to subscribe to our blog via Networked Blogs,
bloglovin' or via email on the right side bar:
Twitter at @AmazingCrafting | Facebook at AmazingMoldPutty | YouTube at AmazingMoldPutty

Thursday, September 26

Keep Finding Skeletons in the Coffins... Make AMAZING Altered Coffins by Maria Soto


Hi there, this is Maria with another spooky project...
using no other than Amazing Crafting Products.


Wood coffin, ready to be decorated!!! 

I found this cute coffin at the craft store and decided to get a few to decorate, at the time of purchase I was thinking paper as the main material to decorate these, however once I got home and looked at all the molds I had poured I decided to go with Amazing Casting Resin to do the decorating of these coffins.

The coffin after a couple of resin pours, is all ready to add the black make up cream, yes I decided to use this instead of acrylic paint, just wanted to see how it would work on the resin and the wood.
Now I made two different ones, following the same steps. I used the Amazing Casting Resin for two reasons, it sets in a white color and it sets in just about 10 minutes each pour. I poured resin over the coffins in different areas, the objective was not to do a solid coverage, I wanted some areas of the wood to be left uncovered, and by pouring several layers of resin, you get a lot of dimension. 

This is the final result after applying with my fingers the black make-up cream paint to the areas covered in Amazing Casting Resin, you can't see the inside but I did the same as on the outside, after wards I added a little of the green make-up cream paint to the inside of the coffin to add more color.
On the other coffin used for this post (photo below) I mixed some of the Alumilite Copper Metallic Powder to add some color to the resin, once it was set, the inside was painted all in red and on the outside where I used the resin I went over in some areas with red acrylic paint, adding and removing the paint so only some areas had the red, I used some of Tim Holtz new distress glitter in red over the resin before it totally set, to use it as glue for the glitter to stay and it worked. 


Front of coffin (you can see on the bottom some of the
copper colored Amazing Casting Resin used).


Back of Coffin (used the same black make-up cream paint),
and the white you see is the white Amazing Casting Resin.


Side views showing the texture you get from the colored resin,
and the paints added to bring in more color.


Close up of the front of the coffin.

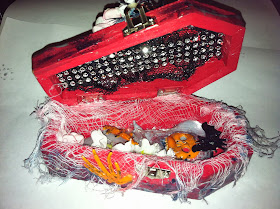
Once the coffin was painted it was just a matter of gathering objects I had on hand to decorate it. On the photos below you will see I took a skeleton that only had a head and arms, three rings a skull, spider and a bat (I cut the bands off). I like to make a lot of molds of things I have around the house, pour resin and keep on hand for future use, that is what I did with the frame you see on the top of the coffin, it was made with mold potty and I used an old makeup box to make the mold. Below are photos of the open coffins I decorated, I will be making a few more as gifts. 


A view of the Open coffin - this one was just painted all with red
acrylic paint and used black lace and ribbon.

A view of the second Open coffin. Here you can see how the inside is a lot different from the other coffin – on this photo you can see the the green make-up paint and red acrylic paint I added to finish the coffin.
I really liked the inside, I took the skeleton that only had a head and arms and cut him up, I placed the head and one hand inside the coffin and then used some old resin spill I had and placed it inside the coffin, instead of using glue to adhere the resin piece and the skeleton head, I mixed some more Amazing Casting Resin colored with Alumilite Silver Metallic Powder and poured it in the inside – leaving some areas exposed of the skeleton head. I added flowers and a bat before the resin set so they would stay permanently. I glued one hand on the outside of the coffin – to make it look as if he melted away while trying to get out.

For the second coffin, I decided to use resin only on the coffin to match the outside, the entire skeleton was used but since it was too big, I figure why not make it look like he's getting out, so I cut the head and arms off and glue them to the outside while the rest of the body was glued inside the coffin. 

Below are photos to show how different the inside of both coffins look.


A close-up of how the inside looks of the first coffin I made 


Here is a close-up of how the inside looks on the second coffin.

I used a lot of left over materials to decorate this coffin. How you decorate is up to you, but using Amazing Casting Resin to color, add texture and dimension to the coffin is what I did here, and to also use it as a glue, now you can't beat that, I say is great when one product can be used in many different ways. Not to mention I did use molded objects such as the cabochon and picture frame casting used on the front of the coffins and resin spills to decorate, I've found out working with wire ribbon has an advantage, since I didn't need the wire on the edges, I cut it off and used it as a decoration (wire already covered with fabric, a plus) as you can see on coffin #2, I wrapped the wire on a paintbrush handle and added to the coffin, nothing really goes to waste.

This cabochon casting was made using Amazing Mold Putty and Amazing Casting Resin with Alumilite Silver Metallic Powders, once set I used the Alumilite Gun Metal Metallic Powder all over. Once done, added some Alumilite Gold Metallic Powder and dry brushed some red acrylic paint on top; then coming back with a little bit more of the gun metal and gold metallic powers. These powders are amazing to work with! 

I had so much fun decorating these coffins, I can't wait for Halloween so they can go to their new owners. Have you tried Amazing Crafting Products? Here is a link to our photo gallery, come and share your amazing projects. http://www.moldputty.com/Gallery.cfm

If you have not tried resin, I suggest you try Amazing Crafting Products, it will change how you create, there are so many different ways to use their products, and the Alumilite Metallic Powders work great on resin dry or mixed in the resin,  it makes experimenting fun. Check out the website to find out more about the products http://www.moldputty.com/products.cfm

Materials used: Wood coffins from the craft store; Amazing Mold Putty; Amazing Casting Resin; Alumilite Copper, Gold, Gun Metal and Silver Metallic Powders; black and green make-up paint; red acrylic paint; Tim Holtz distress red glitter; skeletons; Halloween spider; skull; bat rings; ribbon; lace; flowers; cheese cloth; black feathers; Viva Decor glitter paints; and a hot glue gun.

***********

Thank you for stopping by. I invite you to stop over to my blog "What is Creativity" at http://chuy-creativity.blogspot.com to see more of my creations. ~ Maria Soto

What AMAZING arts and crafts can you create???

Please share them on the NEW user GALLERY on the Amazing Mold Putty Website!

How about a 20% Coupon to shop
Please use coupon code { celebrate } at http://www.amazingmoldputty.com/products.cfm

Coupon Expires September 30, 2013.
...........................................

Don't forget to subscribe to our blog via Networked Blogs,
bloglovin' or via email on the right side bar:
Twitter at @AmazingCrafting | Facebook at AmazingMoldPutty | YouTube at AmazingMoldPutty

Wednesday, September 25

Make a Smart Phone STAND on its HEAD!!!
AMAZING Inspiration by Michelle Frae Cummings


I have had my iPhone 4S for less than a year. And in this short time I have searched high and low for a suitable holder/stand on line and in retail stores.

They do exist, but unfortunately, they only work for phones with out their protective case.

So I have suffered as I am unwilling to leave my phone un-protectcted.

I wanted something so I could snap-photos and video with ease on a steady surface.

I wanted something that would allow me to listen to music effortlessly or watch instructional videos while I worked on a project.


I tried to cut a slit in the lid of a Tupperware container to hold the phone. Fail.

I tried to make a wire stand out of large paper clips. Fail. 

I tried to make a (awkward) holder of wire, chunky beads and duct tape to shoot video... Epic fail!

Then recently I searched for tips on how to take better selfies with the iPhone. In reading the article, the writer suggested placing the phone in play dough to hold it up. At first I was horrified that anyone would use play dough, that can't be good for the phone, right?

Then BAM! 

A light bulb went off and I thought of Amazing Mold Putty!


I simply covered the bottom portion of my phone with press and seal. Then I mixed equal amounts of Amazing Mold Putty parts "A" and "B", using half of each container. I made a nice solid round ball, pressed lightly onto a hard surface, then pressed in the bottom of the phone to about half way into the ball. I pressed the putty around the phone and held in place with my fingers until the putty began to harden. 


After it was set, I trimmed out a small piece on each side of the base so the holder could accommodate the phone upright and side ways. 

Now I have a perfectly stable holder that will not leave a mark or a scratch on my phone and will work anywhere, any time.... Thanks to Amazing Mold Putty and Amazing Crafting Products!

What AMAZING solution will
Amazing Mold Putty provide for you?


Thanks for coming by! Please visit my blog, Faerie Dust Dreams 
for more creative inspiration. ~ Michelle Frae Cummings

...........................................

How about a 20% Coupon to shop
Use coupon code { celebrate } at

Coupon Expires September 30, 2013.
...........................................

Don't miss a single post!
Please subscribe to our blog via email or bloglovin' on the right side bar:
Twitter at @AmazingCrafting | Facebook at AmazingMoldPutty | YouTube at AmazingMoldPutty