Hello! Tracy here with a tips and tricks post using Amazing Crafting Products awesome Amazing Mold Rubber. I love testing out products and seeing what can be made but sometimes even the best plans can have interesting learning curves.
I have already shown you in the past you can make mold boxes to pour the Amazing Mold Rubber into out of coated cereal boxes (such as my snowflake mold box above). The Amazing Crafting Products Design Team has used plastic containers, lids, tape, and even foam to pour Amazing Mold Rubber into. All work beautifully and as long as the edges are sealed so no Amazing Mold Rubber will leak out of the mold.
Since the detail of the molding using Amazing Mold Rubber is stunning I wanted to try making more jewelry piece molds. I made three abstract pieces to create matching resin earrings and a bib necklace. Because of the odd shape of the originals I used a popcorn tin lid with foil and tape to fit around the original pieces. I glued the originals down to the tin, but here was my problem: I was in a hurry and I didn't check to see if the glue was dry completely before I poured the Amazing Mold Rubber!
Sadly this is how my mold came out. The little dents and swirls are wet glue that floated around in the Amazing Mold Rubber while it cured. One of the originals even floated to the top while it was curing, all because the glue was not dry. So lesson learned make sure to always let your adhesive dry completely before pouring the Amazing Mold Rubber to get a clean and high detailed mold!
Even though I had messed up with making the first mold there is no waste when using Amazing Mold Rubber! I cut up the mold with a pair of sharp scissors into little slivers and chunks. I place these in a jar to use in future molds. You can do the same for any cured drips or spills of Amazing Mold Rubber.
I glued my original carvings back to the bottom of the tin, waited for the glue to completely dry and poured a layer of Amazing Mold Rubber. I then carefully started to place the chunks and slivers from my other mold into the liquid Amazing Mold Rubber to add as filler. This can be done with any mold shape you want to create.
Sometimes when pouring the Amazing Mold Rubber I notice bubbles forming from the pouring process. This is nothing to worry about since the bubbles will gently float to the surface and pop. If you happen to notice any really large bubbles you can gently pop them with a tooth pick. Now some people have noticed the curing time for the Amazing Mold Rubber can vary. In low humidity environments it takes the silicone longer to cure. So since I live in a arid desert I put on a humidifier in the same room I am crafting in and the Amazing Mold Rubber cures quickly in just a few hours.
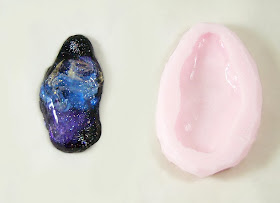
Here is the second pouring of my mold, clean, and clear of any dents and swirls! It might look somewhat like a deranged smiley face but I am more than happy with this high detail mold.
Another aspect of the cured Amazing Mold Rubber molds is that because it has such fine detail it is very easy to dust the molds with powders, glitters and fine inclusions for wonderful depth and shimmer. Here I am using a soft bristle brush to dust the inside of a mold with Alumilite Pearlescent Metallic Powder.
With this mold I poured a layer of resin and after it has cured for a few hours I can carefully rub on Alumilite Metallic Powders. Repeating this technique with multiple layers of resin you can create amazing effects.
What AMAZING arts and crafts can you create???
Please share them on the NEW user GALLERY on the Amazing Mold Putty Website!
Visit my blog Art Resurrected for more craft tutorials!
Until next time, safe travels! ~ Tracy
• • • • • • • • • • • •
Have you entered our
CHRISTMAS WISH giveaway YET???
There is just shy of EIGHT (8) hours left to enter. You can enter until 11:59pm EST tonight when the contest ends for your chance at all four of our Amazing Crafting Products!!! This is what you have to do... please follow the Rafflecopter instructions below.... don't miss out on your chance for up to 6 entries to win.
One lucky elf will win an Amazing Crafting Products prize package {pictured above} - containing one of each product: 2/3 lb. package of Amazing Mold Putty; Amazing Mold Rubber Kit {which is now available in Hobby Lobby Stores}; 16 oz. Amazing Casting Resin Kit; and 16 oz. Amazing Clear Cast Resin Kit}. Good Luck and Happy Holidays!!! :) Sb


Fabulous examples. I love your tutorial on keeping a "bad" mold and using it for filler. Great idea.
ReplyDelete