I found myself in the hardware store after my door bell broke a few months ago. I went looking for something that said, "Are you sure you have the right address?". Nothing caught my eye. What I did find was a little inspiration to make my own. The following how to is a custom doorbell created using Amazing Casting Products.
Parts/Tools:
Poster Board
Hot Glue Gun
Box Knife (razor for cutting poster board)
Xacto Knife
Ruler
Sharpie
Modeling Clay
Clay Tools
LED's; white (1) blue (2)
Steps:
- Create Primary Object
- Prepare the Part for molding
- Mold the Primary - part 1
- Demold
- Mold Prep
- Mold the Primary - part 2
- Demold
- Casting
- Final Prep
Primary Object
I started with foam board and metal push button.
Mount the switch plate to another foam board base.
Start adding modeling clay to support the jaw.
Add chunks of clay to create the main shape of the skull.
Smooth the clay surface using the clay tools and fingers.
Create the teeth (I choose to use white clay – its optional).
Mold Part 1
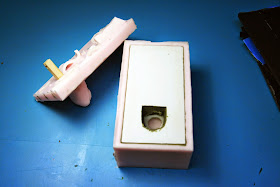
Create a mold box out of foam board.
Mix Amazing Mold Rubber (per instructions) and cover the primary at least 1/4",
let cure. CLICK HERE to view mixing/preparation.
let cure. CLICK HERE to view mixing/preparation.
Demold
Remove the back of the mold box.
Mold Prep
To make sure the mold backing insert stayed
exactly where it should, I added extra support.
Mold Part 2
Add cured rubber chucks from cut up old molds to save on new product. Let cure.
Demold
Carefully remove the mold box and primary from the cured mold.
Casting
Mix Amazing Casting Resin (CLICK HERE to view mixing/preparation) and fill part one of the mold over 3/4 of the way to the top. Rest part two of the mold on the back of part one. A little casting resin should overflow. Let cure. Remove the casting from the mold.
Alumilite Metallic Powder (left) • Alumilite Black Dye (center) • Clay Primary (right)
Final Prep
Drill 3 holes in the casting: one in each eye, and one into the back of the roof of the mouth with a #7 drill bit. Install the two blue LED's in the eyes and one white LED in the mouth, from the back of the casting. Install the metal button.
Mix Amazing Clear Cast Resin (CLICK HERE to view mixing/preparation) and fill the eye sockets – just enough so that it doesn't spill out. Let cure.
Every house has different wiring for the door bell. Some older homes have low voltage A/C power running to the button that activates a coil that hits a 'mallet' against a bell bar. Some have a D/C wired button that operates a digital tone speaker. I am able to wire mine so the white LED is always on and the blue (eyes) LED's turn on when the button is pressed and the door bell rings.
It will take a little ingenuity on your part to figure out what kind of voltage your door bell has and how to wire in a new button with LED's. It is very easy to figure out. Typically only 2 wires supplied with either A/C or D/C Voltage ranging between 1-3vDC or 14-18vAC. Always check the source with a multi-meter to ensure the limits. LED's will not run off A/C without rectifying the voltage using a AC~DC inverter.
Drill a hole at the top and bottom for mounting.
I always enjoy the process of making thing's from scratch. Figuring out ways to make them work and sharing the fruits of labor. Thanks for stopping by and come back soon. ~ Lonnie S.
How would Amazing Casting Products
help design your custom doorbell?
Please upload and share your creations to the
• • • • • • • • • • • • • •
Don't forget to subscribe to our blog on the right side bar:
Twitter at AmazingCrafting | Facebook at AmazingMoldPutty | YouTube at AmazingMoldPutty


I must have one of these! Great project Lonnie!
ReplyDeleteyou are AMAZING! How you incorporate the lights into your projects is very cool
ReplyDelete