Hi all! Aimée here with some ideas of turning random textures into reusable pieces for your mixed media art. I'm always looking for unique patterns and texture so I thought I'd search the house for random items to mold and then create some textures to use and reuse in any project.
I have to say this was a breakthrough for me, I knew what I wanted to mold but was going to just show you the pieces I created, instead it ended up a piece of art. I haven't done "art" since losing my Dad very suddenly last Summer. This amazing design team has been keeping my hands crafty and for that I'm grateful. I was in complete shock when I finished this!! I hope you enjoy, it's been stewing since last Summer apparently.
I gathered up the elements I wanted to mold, just bits and pieces of things, an old frame, trim, a broken earring that was made a long time ago by my Mom.
Of course I started with my favorite product Amazing Mold Putty! I only wanted a part of the picture frame but the whole thing has some awesome texture. I grabbed equal parts of the putty and began mixing it.
When it was mixed I spread it on the area I wanted to mold and let it harden, while it was setting I started molding my other pieces I was going to use.
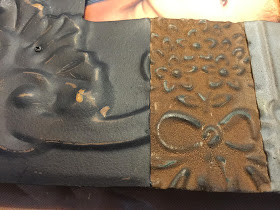
I used the rusty part with the flowers and bow.
Working it's magic!
Next came the trim that I wanted to use as embellishments and cut out if I wanted them while the resin was still soft. I chose a bunch of different rope like trim.
Kinda fun right?
Next I started making my texture plates which I will use like stamps which is what I wanted for that extra grunge effect.
I crumpled up aluminum foil – I wasn't sure it would work but it did!!
It looks like a brain to me.
Broken earring that had some fun texture.
I pressed it into the soft putty and created my own pattern.
The end result.
OK... so I made two texture plates and two molds. For these molds I ended up adding a lip on all sides so the resin wouldn't spill out by mixing more mold putty and and adding it to the already cured mold – it adheres to itself!
Once the molds were done I decided to use some Alumidust to add to the interest. I just love the colors of these dusts, very shimmery and fun to use in so many ways.
So pretty!!
Love this combo!
Next, I mixed my favorite Amazing Casting Resin and poured into the molds. This sets quickly which is great for any project if you need something and don't have it. Please CLICK HERE to view mixing/preparation.
Waiting is the hard part. Amazing Casting Resin cures in about 10 minutes (approx. depending on how big the molds are and how much resin you use).
This is kind of a cheat but I created it last year, it's a 12" x 12" canvas panel that I collaged and painted on with water colors and inks. It's been sitting in a drawer waiting to be used. I took it out and started playing with it, so glad I had this part done already. This project came together quickly.
Love how the tile turned out and the rope accents are fun too! I trimmed out the pieces I wanted while it was still soft enough to do that.
So vibrant!!
Next I applied gesso to soften the background.
Derwent Inktense Chalk – first time using this kit!! I scribbled around the canvas.
Then I applied water with a brush to turn them into water color and let them drip a bit.
I collaged on the dress form graphic and let that dry, then I went around with my "brain" texture using StazOn Teal Blue ink.
BRAIN!
Then I smudge the earring one in parts using the ink as well.
This is the place I like to call a CREATIVE PAUSE because I got so in the zone I forgot to take photos. Basically I just went around the canvas and painted, gessoed and drew on more Inktense, smoothed areas out and just played. Sorry about that! LOL!
I added on some shimmery Alumidust on here while the paint was wet, can you see it?
You can see it really good here! Also noticed I've glued down the elements I created.
The top rope! Love it!
I really like it!!! Last thing I did was edge it with Black StazOn ink (not pictured here).
You can see the dimensions here.
What do you think? I had fun with this one!! I am still considering coating it with Amazing Clear Cast Resin but I'm going to think about it for a bit. :)
Let me see what amazing textures you have around your house!!
To see how all of our AMAZING products can enhance your art,
please check out these AMAZING products!
Feel free to stop by my FB page to see the latest with me.
To see more of my work please visit my blog "Creative Flutters"
and also at the Aimée Wheaton Art and Design website.
Till next time! Xoxo Aimée
• • • • • • • • • • • • • •
Don't forget to subscribe to our blog on the right side bar:
Twitter at AmazingCrafting | Facebook at AmazingMoldPutty | YouTube at AmazingMoldPutty


.jpg&container=blogger&gadget=a&rewriteMime=image%2F*)


.jpg&container=blogger&gadget=a&rewriteMime=image%2F*)


No comments:
Post a Comment