Hello! Tracy with another home decor creation using Amazing Casting Products! I have really been getting into country style crafts and home decor. With Halloween coming up I had an idea to make a rustic and fun bat garland for my fireplace with some help from Amazing Remelt and a few bat cookie cutters!
Supplies:
- Amazing Remelt
- Alumilite's 4 Piece Carver Set
- Original Sculpey Polymer Clay (In White for making the original sculptures)
- Sculpey III Polymer Clay (In Black to mold the clay bats)
- Flat Backed Acrylic Gems
- Non Stick Cooking Spray
- Acrylic roller
- Craft Knife or Clay Blade
- Ceramic Tile
- Craft Scissors
- Clear Packing Tape
- Emery Board
- Acrylic Paint
- Cosmetic Sponge
I started by conditioning and rolling out the polymer clay to the thickest setting on a pasta machine devoted to polymer clay use only. I rolled out two layers of clay and using an acrylic roller pressed the two layers together. I pushed the two cookie cutters all the way through the clay sheet layers.
I then carefully removed the excess clay from the sides of the cut bat images. I used the Alumilite's 4 Piece Carver Set to carve out the wings and add some textural detail. I wanted to make the bats have a hand carved quality to them. I baked the clay as per the manufacturers instructions.
Once the clay pieces were fully cured I put clear packing tape on the tile the polymer clay pieces were still attached to. The tape would act as a quick mold box for the Amazing Remelt and by not removing the baked-on clay pieces from the tile I didn't need to glue them in place.
I then sprayed all of the pieces lightly with cooking spray to act as a mold release. I heated the Amazing Remelt in the microwave, in the container it comes in. I poured the heated Remelt into the taped tile with the polymer clay pieces from a 12 -15 inch distance – the distance gives the Remelt a chance to release more bubbles before cooling.
I let the Amazing Remelt cool until no longer tacky or warm. I carefully removed the tape, tile and the originals from the Remelt. A little of the Remelt was uneven and I removed the excess with sharp crafting scissors and saved it for another mold. There was a bit of excess cooking spray which I soaked up with a dry paper towel.
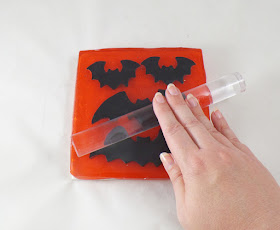
I conditioned the polymer clay, making sure the clay was soft and warm enough to be pushed into the molds. I pushed the clay into the molds tight, and used a acrylic roller to push the clay further into the molds, making sure the clay got into the tiny embossed details.
I then carefully placed the mold, with the polymer clay still inside, face down on a ceramic tile. I then peeled back the mold and the polymer clay piece was then stuck to the tile. I then refilled the mold with more polymer clay and repeated this process again so I had plenty of bats and then baked the polymer pieces.
I lightly sanded and trimmed the edges of the now baked polymer clay pieces with a craft knife. I carefully created a small hole in one wing of each bat so that later one I could thread a ribbon through the hole.
I then used cosmetic sponge to apply a gray acrylic paint wash to the tags and let dry.
Using an emery board, I sanded the raised surfaces of the bats. The embossed portions were now back to the original clay colors and increased the visibility of the carved details.
I attached flat backed acrylic gems with glue to the bats to give them eyes and I carefully threaded the bats onto the ribbon to create the garland, knotting each bat in place.
What AMAZING arts and crafts can you create?
Please share them on the user GALLERY on the Amazing Crafting Products Website!
Visit my blog Art Resurrected for more craft tutorials!
Until next time, safe travels! ~ Tracy
• • • • • • • • • • • • • • • • •
Don't forget to subscribe to our blog on the right side bar:
Twitter at AmazingCasting | Facebook at AmazingMoldPutty | YouTube at AmazingMoldPutty


Great project
ReplyDeleteGreat project
ReplyDelete