Pages

Wednesday, February 28

Memorabilia of #Cre8time Family... DIY Keepsake by Tracy Krueger


Hello everyone! It's Tracy here and I wanted to share with you today a project I created that holds some memorabilia pieces. A few months back I purchased some wood pieces at an antique market that used to hold watch parts. I knew I wanted to use these with Amazing Clear Cast Resin at some point... easily transforming one into a keepsake.


I decided to join my parents, my in-laws, my husband and I in a hanging with some pieces that either belonged to them or had some special meaning. I gathered some pins, a jewelry charm, tigers eye, shells and a silver heart. I also made some clay hearts that I painted red and wrote the initials of each of us on them. I played around laying them in different spots until I found the way I wanted them.


I mixed up a small batch of equal parts of Amazing Clear Cast Resin and mixed it with some fine glitter {CLICK HERE to view mixing/preparation}. I filled up the small outside circles and the top one.


After letting cure for at least 24 hours, I mixed up another small batch of Amazing Clear Cast Resin with some gold glass glitter, then filling the bottom half of each of the center sections.


I wanted the resin to be cured, but not fully hardened so that I could lay each piece of memorabilia into the resin and it would "settle" and not move around when I add the final resin layer. I set aside to let resin completely harden.


Then I mixed up my final batch of Amazing Clear Cast Resin and filled each of the center sections to the top... covering the keepsakes in each.


After the resin is fully cured, this is ready to hang! I drill small holes in the top sides and screwed in small screws. I opened my stash of sari ribbon and tied a piece of cream sari ribbon to the top to hang it by.


I hope you enjoyed my little piece of family history.
See you again soon!

What ideas do you have
to preserve family history?

Stay tuned for more... ~ Tracy

You can find more of my work on my Blog: http://tracykrueger-nine.blogspot.com/2017/

• • • • • • • • • • • • • • • • •

Don't forget to subscribe to our blog on the right side bar:
Twitter at AmazingCasting | Facebook at AmazingMoldPutty | YouTube at AmazingMoldPutty

Friday, February 23

#Cre8time for Ocean Magic... by Kristie Taylor


Hello everyone! Do you ever create something and find it leads to an avalanche of ideas?! It happens to me all the time. Kristie here to share another under-the-sea creation... and how you can make some "Ocean Magic" in your Cre8time.

This all started when I was working on another mixed-media piece featuring a lovely handmade resin casting of a starfish which was an old refrigerator magnet I retired to my crafty stash {CLICK HERE if you missed it}.

Let me show you how easy it is!

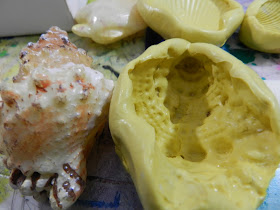
First, we need a LOT of molds... a LOT! Let's start by molding some seashells with Amazing Mold Putty {CLICK HERE to view how to quick and easy it is to make a mold}. 


Remember, when making molds for mixed media, all sides of the object can be used!


Just look at all that yummy texture – and beautiful details!


I especially love this one!

Now we need castings of the seashells.


Begin with pouring equal amounts of Part "A" and Part "B" of Amazing Casting Resin {CLICK HERE to view mixing and preparation}. 


In a larger cup, combine both parts and stir for two minutes... then pour in to molds!


Wait until it resin cures and turns an opaque white – 
now you have amazing castings to use in your art!


I paint all the castings with gesso.


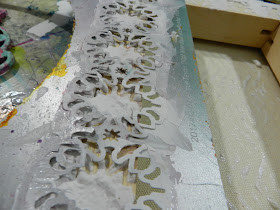
While that dries, we need to prep our substrate {for this project I've used the back of a small canvas}. Use modeling paste through a stencil. This is one of my stencil designs called "30 Point Mandala" on the outside edge.


In the center of the canvas, I used another one
of my stencil designs called "Symmetrical Waves".


Once modeling paste is dry, paint the entire surface with gesso.


Once the gesso is dry, I painted the canvas with a variety of Art Anthology paints.


I start to add the primed resin casts and painting them as I go.


On the starfish, I used a combination: first some alcohol ink,
then when dry, adding sparking minx by Art Anthology.


Then I used some metallic rubs to highlight the details.


I added some small seashells, sea glass and
some mesh to further enhance that ocean feel...


and more metallic rubs to highlight all the great texture on the seashells!


How's that for some "Ocean Magic"! Another undersea creation featuring my seahorse! The wonder of Amazing Mold Putty and Amazing Casting Resin – you can create a mold, and use an object more than once, in so many ways! 

What will you create using these

Thank you so much for stopping by today! Kristie

To see more of my work, please visit my blog, "The Scrapinater", 
over on my YouTube Channel or on Instagram.

• • • • • • • • • • • • • • • • •

Don't forget to subscribe to our blog on the right side bar:
Twitter at AmazingCasting | Facebook at AmazingMoldPutty | YouTube at AmazingMoldPutty

Friday, February 16

How #Cre8time Charming... on any Surface be sure to Make It Artsy


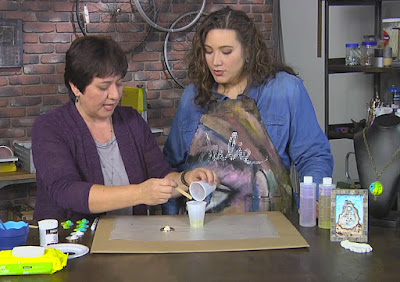
Hello Amazing Makers!! Today we are sharing the latest episode of Make It Artsy where you will see two, yes TWO AMAZING Creatives... Lynne Suprock and Cat Kerr with ideas on making jeweled creations with Amazing Casting Products.

You don't want to miss this
episode of Make It Artsy?!


CLICK HERE to view this week's episode

The surface reflects your artistic flair. Lynne Suprock transforms shot gun shells into trendy jewelry. Debbi Simon adds heat to encaustic wax to create special effects. Cat Kerr creates a beautiful pendant with cool resin techniques and Mary Hettsmansperger adds color to copper.


Bookmark or PIN the Make It Artsy Website


Make It Artsy launched September 29, 2016 on Public Television stations across the country! Look for it on your local PBS channel – new episodes from series 300 are now airing. If you can't find it on your local programming, you can view this episode online by clicking this link Series 200, Episode 307 - On The Surface.


Make It Artsy is a show dedicated to the crafter, maker and artist! A series celebrates that maker spirit and enthusiasm that extends to every part of life. It’s more than crafting, more than art or scrapbooking; this is an all-encompassing show for any one that loves to make “things”. From mixed-media to metalsmithing, using tools from saws to sewing machines, and materials from paper to wood; today’s most creative “makers” join host Julie Fei Fan Balzer and unleash a new look for crafting with a touch of industrial style.


Amazing Casting Products by Alumilite Corp. is proud to be one of these fabulous group of companies partnering with Make it Artsy. Stay tuned for upcoming episodes with projects featuring more of our amazing friends using Alumilite's AMAZING products

• • • • • • • • • • • • • • • • •

Don't forget to subscribe to our blog on the right side bar:
Twitter at AmazingCasting | Facebook at AmazingMoldPutty | YouTube at AmazingMoldPutty

Wednesday, February 14

Like Honey to a #Cre8time Bee... DIY Valentine's Crown by Lyn Gill


Hi everyone! Lyn here again and this time I've got a really cute project to share using Amazing Casting Products just in time for Valentine's Day! 


It started out with this 5" x 6" crown shaped chipboard
"canvas" for lack of a better term.


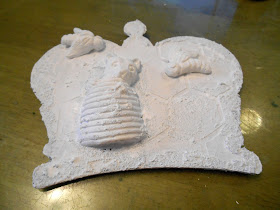
Now first I started off with this vintage Chalkware Salt Shaker that I picked up at a thrift store a few years ago – cute isn't he? Well I needed him to be flat on the back and light enough to use on the project... so out came the Amazing Mold Putty

I quickly molded him making sure the Amazing Mold Putty covered him at least half way up the sides, then layed him down on the table to flatten the back of the putty so I could pour him "level" when filling with resin. 


Once cured, I removed the salt shaker from the mold and then mixed some Amazing Casting Resin and also made a couple of bees using another mold from a previous project. These resin castings are ready to use in about 10 minutes.


Using a honeycomb stencil and some modeling paste, I added some texture to the background. Then I decided on the placement of the handmade elements for my design.


I glued down the elements then added some graphite texture paste around them and around the edges and let it all dry.


Then I covered the entire piece with some Gesso
to give a uniform surface to paint on.


Now the fun begins! I painted the entire piece with some yellow acrylic paint, followed by some orange acrylic paint, and then spritzed the entire piece with some water and let it run down the "canvas". I finished it off with a little spray with some pearl shimmer and some Silver Spark Metallic Luster.


Now for the finishing touch! I mixed up some Amazing Clear Cast Resin with a bit of Alumilite Dye (yellow with the tiniest touch of orange), and let it set in the mixing cup for roughly an hour to thicken up – I needed it to to be thick and not runny for this step. 


I placed "drips" of this "honey" in some strategic places and the tilted the "canvas" at an angle so the "honey" would "drip". You need the resin to be thick in order for it not to run off your piece and not level out.


Cute isn't it?! I think so...

what will you make for your Valentine?

Hope you have a sweet Valentine's Day!
Till Next Time! Lyn

You can find more of my work on my blog LynzCraftz
or on YouTube LynzCraftz, or my Facebook page LynzCraftz.

• • • • • • • • • • • • • • • • •

Don't forget to subscribe to our blog on the right side bar:
Twitter at AmazingCasting | Facebook at AmazingMoldPutty | YouTube at AmazingMoldPutty