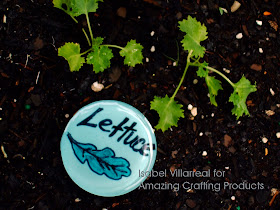
This summer I decided to try my hand at growing a vegetable garden and it's been fun planting seeds and watching them grow into actual plants. I've watched my plants go from tiny seedlings to leafy sprouts that are starting to look like actual things and what I've learned is that all plants look incredibly similar when they first start out, especially if you're a noobie gardener like me. So how do I keep track of what I'm planting? I figured the easiest way was to use garden markers to identify my new leafy friends as they grew.
When I started this labeling adventure I had an idea of the size and shape I wanted so i looked through my supplies and found this plastic jar of Stampendous Pearlized Mica I got in a Frog Dog Studio kit earlier this year. It was the perfect size so I used it to create a custom mold using Amazing Mold Putty. I coated the jar with alumilite rubber release (you can also use olive oil) and pressed the bottom of the jar into the mold putty, making sure the edges were snug and even around the original jar. It only took about 7 minutes for the mold to set and the jar was really easy to remove from the mold since it had been coated. Please CLICK HERE to view mixing/preparation.
Amazing Casting Resin cures in just a few minutes, so I mixed up a batch and poured it into my mold {CLICK HERE to view mixing/preparation}. I poured a layer about 1/2" thick and figured I would use that as a base and build up layers until I got to a thickness I was happy with. Once the resin cured, I used Sharpie Markers to draw pictures of the veggies in my garden. This resin turns solid white when it dries so it makes an ideal canvas. The Sharpies dry quickly and are smudge free, but just to be safe I brushed a thin layer of Mod Podge® over the entire surface to protect the ink from smearing or running.
Once the Mod Podge dried it was nice and clear so I mixed up a round of Amazing Clear Cast Resin to pour my next layer {CLICK HERE to view mixing/preparation}. This resin is crystal clear, so I added the tiniest amount of Alumilite Green Dye to give it the look of vintage green glass. This layer was also about 1/2" thick.
Okay, so I cheated and made a couple of molds – since I'm trying to grow lots of different veggies at once. I ended up with 8 different varieties. Since I was mixing individual batches of resin for my molds I got some slightly varying shades of green, but I think it gives each marker it's own unique look.
Now when I removed the markers from the mold I realized that the edges were a bit sharp and the markers looked a little flat. My original goal had been to create garden markers that simulated the look of polished glass rocks, but these were flat and I would have to do something to give them a smoother, more rounded look.
I built up the rounded surface by adding thin layers of Amazing Clear Cast Resin until it started to dome on top. This gave me the smooth top surface I was trying to create. The domed top also refracted the light and made the colors a little brighter. If you prefer, you can print out images and cut them to size instead of drawing. Just be sure to coat your images with a clear sealing coat for protection so they don't smudge or run before pouring resin over the top.
It's been about a month since I started gardening and I'm now on my 4th raised garden box so these cute garden markers give my garden a personal touch and they are really helping me keep track of what's sprouting. Plus I no longer have to recite a list when friends are curious about about what I'm growing. And since these are so easy and fun to make, I'll just keep making and adding new markers as I add variety to my garden.
What will you create with
and Amazing Mold Putty?
I'd love to see what you create! Please upload and share your creations to the
User GALLERY on the Amazing Mold Putty Website for all the world to see.
• • • • • • • • • • • • • •
Don't forget to subscribe to our blog on the right side bar:
Twitter at AmazingCrafting | Facebook at AmazingMoldPutty | YouTube at AmazingMoldPutty


Wonderful idea, love the domed look
ReplyDeleteIsie - these are so fabulous! Your creativity is absolutely amazing and I can't wait to see these up close and personal :)
ReplyDeleteadorable!!! Great idea!!!!
ReplyDeleteThanks so much ladies <3
ReplyDeleteWow. The sharpies underneath really pop. I love the two layers of resin for this project.....
ReplyDeleteClever ! Now I have a reason to garden.
ReplyDelete