Thursday, November 21

I Can SEE Clearly NOW... AMAZING Inserts in Clear Cast Resin by DeeDee Catron

Heya Folks! DeeDee here today!

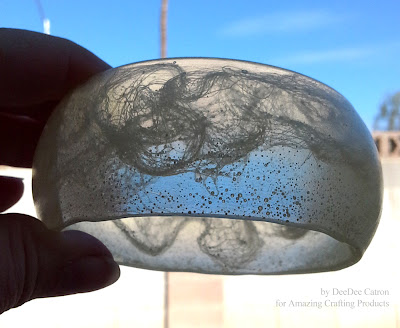
Remember earlier this month when I shared with my Amazing Mold Rubber bangle?? Well look what happens when you use Amazing Clear Cast Resin instead of Amazing Casting Resin and then INSERT things into it:


This particular casting has a bit of cheesecloth inserted in it. I just cut a bit of cheesecloth off a big roll, spread it out, tore it up a bit and laid it in the mold made of Amazing Mold Rubber. Then I poured the Amazing Clear Cast Resin over it. It cured for 24 hours and demolded like a gem!

What might you like to wear around your wrist?
Feathers? Ribbons? Rocks?
Go ahead and try Amazing Crafting Products,
and share with us by posting photos
of your projects in our User Gallery

***********

Don't forget to stop by and see me on my own blog
and I thank you for visiting me here today. ~ DeeDee
 
...........................................

Don't forget to subscribe to our blog on the right side bar:
Twitter at @AmazingCrafting | Facebook at AmazingMoldPutty | YouTube at AmazingMoldPutty

Wednesday, November 20

Once in a BLUE MOON... Creating Special Holiday Ornaments by Maria Soto


Hi, there this is Maria Soto bringing you a How-to project, perfect for the Holidays. My daughter received a moon magnet from her best friend who lives in Chicago – she knows how much my daughter loves the "Moon". This is a really cute magnet so I thought this year I would make special ornaments for my kids. I decided to make her a "moon" ornament. I know she's going to love it.

Take the Amazing Mold Putty and combine equal amounts of parts "A" & "B". When mixed completely, I pressed in the magnet to create the mold of the moon. It usually takes about 10 minutes or less for the putty to set, however I noticed that it was a bit cold the day I made my mold – and it took about an additional 5 minutes to cure. So keep in mind that the weather conditions in your area can affect how fast/slow your mold putty sets.


I had extra space, so I took a tiny clip earring that I can't wear anymore,
and pressed it in to make a tiny mold that I might use later on.


Here is my mold, ready for the next step! 

Next step was combining the Amazing Casting Resin and the Alumilite Blue Dye. I took part "A" of the casting resin and added a few drops of the blue die, mixed it well and then added part "B" of the casting resin. I stirred to combine both until it feels warm, then poured into the mold. Wait until it cures – in about 10 - 15 minutes it's safe to remove from the mold. If the resin feels too soft, just leave it alone for a while longer.


Make sure to follow the directions on the box for proper mixing of Amazing Casting Resin – and remember it is best to add your dye to part "A" first before combining parts "A" and "B". 


Part "A" and Alumilite Blue Dye all mixed;
ready to combine with part "B" of the Amazing Casting Resin.

Once you remove your new cast piece, check to see if you need to trim any resin from the edges. I use small scissors or emery boards to remove any rough edges.


Once my moon was all ready for embellishing, it was just a matter of deciding what types of paints to use. I used some Viva Decor silver paint – rubbing on some areas only. I liked the blue color of the piece so I didn't want to completely cover it.

I removed the little star that was part of the original piece and decided to add a beaded bead; made from  some Beadalon silver wire and gold wired ribbon for hanger. I made a few fun wire loops just to add more embellishment to the ornament. I can't wait to give this to my daughter to hang this year. Now all I have to do is come up with two more ornaments for my sons.


Materials used:

I hope this post will inspire you to get creative,
to go ahead and try Amazing Crafting Products,
and share with us by posting photos
of your projects in our User Gallery


***********

Thank you for stopping by. I invite you to stop over to my blog "What is Creativity"
at http://chuy-creativity.blogspot.com to see more of my creations. Maria Soto
...........................................

Don't forget to subscribe to our blog on the right side bar:
Twitter at @AmazingCrafting | Facebook at AmazingMoldPutty | YouTube at AmazingMoldPutty

Tuesday, November 19

With ONE Mold, Create Lots of Possibilities... AMAZING Inspiration by Brenda Lee Burfeind

Hi all, Brenda here again from Creativity is a State of Mind. With today's inspiration post, I'm going to show you how you can use 1 mold of a pendant to create a variety of finished jewelry.


Original mold made with Amazing Mold Putty and casting using Amazing Casting Resin to make multiple different looks. I love making my own jewelry and with just adding some baubles (rhinestones), paper, Alumilite Dyes, Alumilite Metallic Powders, etc. you can create so many different looks. 


The above pendants are not done yet, but I love the look of the marbled effect. 


Alumilite Black Dye, black and silver sparkle paper with flat back rhinestones.


Alumilite Brown Dye with a partial mold of an elephant head colored with Rub 'n Buff®


Alumilite Brown Dye (less dye than in above photo) also with a Fleur-de-lis I molded with the same Alumilite Brown Dye and different shaded pink stone chips. 


Amazing Casting Resin with purple and gray Rub 'n Buff® smeared here and there.

Use whatever you have and seal it with Amazing Clear Cast Resin,
giving you can have the most amazing looks.


When you leave a comment today, please tell me which necklace you like the best and if you are interested in how any one of these was made.

Until next month, have a fantastic day and be sure to check out what all the other designers have made. To see more of my creations – I would love it if you came over to my blog Creativity is a State of Mind. ~ Brenda

........................................... 

Don't miss a single post!
Please subscribe to our blog on the right side bar:
Twitter at @AmazingCrafting | Facebook at AmazingMoldPutty | YouTube at AmazingMoldPutty
Related Posts Plugin for WordPress, Blogger...