Sunday, March 31

Summer Table Setting

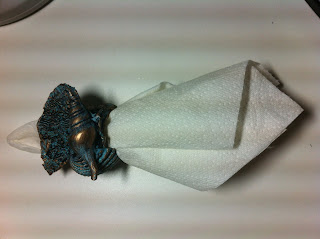
Hi all!  For my project this month, I decided to concentrate on summertime table settings. With spring in the air and my husband readying the back yard pond and fountains and patio for guests, I wanted to create some fun new napkin rings.  So out came my Amazing Mold Putty and Amazing Casting Resin.


To start, I had to search for something to use as a base.  I chose the cardboard center of a (or spool) of a roll of ribbon.  Then, to give it some texture and depth I used my glue gun to add some stings of glue all over it.


Next I mixed my Amazing Mold Putty part "A" and part "B" in equal parts
(see website via the link for detailed instructions).


Next, I made molds of this and some other items to use on my napkin ring.


Once my putty was set (about 10 minutes - or when you can scrape the side with your fingernail and it doesn't come off).  The detail I was able to get in my mold was really quite amazing. With all of the mold I've created, I still wasn't sure this would work, but just look at the next picture to see how detailed you can actually get with your putty.


Is this cool or what?

Next, I used my Amazing Casting Resin to mold my pieces.


Now, I'm not gonna lie, the ring itself took a little work to get out, but it was totally worth it. Once I popped the pieces out I glued them together and then painted them solid black. 


I went over the black with a blue green color, then a seafoam green. I finished it off with some antique gold rub.


What do you think? I love how this looks like some high end metal napkin ring that I might have bought in downtown Laguna Beach; but really I made it lickety split in my craft room.  Now I just need to make 7 more!  Thanks for stopping by and checking out my project.  Please leave me a comment and let me know what you think.  Don't forget to hop over to the Amazing Mold Putty website and check out their truly Amazing products!

~ Make Today Count
Wendy

Wednesday, March 27

Spring Wedding Trinket Box


Our family is so excited in the planning of our middle daughter's wedding this April. There will many goodies to distribute, so I made this little trinket box for "something old, something new, something borrowed, something blue."


  I pulled out my faithful jars of Amazing Mold Putty A and B.
Be sure to grab equal parts of each so that the mix is correct.
Knead the 2 parts together til uniform in color.   


As you can see I made 2 perfect replicas of an egg half and antique button. 
I added tan paint to the egg and ivory to the button. 
I also applied 3D Crystal lacquer to give the button some shine.


 This is the bottom half of the box. I lightly stenciled a hexagonal
motif in warm brown ink to add interest to the box.


Although small, I think it is just the right size for presenting a tiny treasure.
The eggs are in keeping will the wedding theme birds, eggs and nests.

Amazing Mold Putty is always a constant in my craft corner. Have a Happy Easter!!!!!!!!!!! 

Joyce

Sunday, March 24

Resin Bottle Charm


The little bottles are all the rage; you can fill them with glitter, notes, almost anything! I thought about a spin on them and actually decorate the outside of the bottle. But instead of using a glass bottle I thought I would cast a bottle and decorate the outside. All it takes is Amazing Mold Putty and Resin, bottle and ephemera.


Directions:

Cast a mold of the glass bottle.


Next pour the resin.


Take the resin cast and begin to glue ephemera to outside.
I used book pages.


I then used some brown ink to stain and distress the book pages once it was glued to the bottle.


I then wrapped wire around the top of the bottle and loop for a necklace.

String a chain and you are ready for the town.


Tanya Ruffin


tanyaruffin.com


Create Studios


Tuesday, March 19

Owl Statue For My Garden

This is my last month on the Amazing Mold Putty Design team. I am a bit sad. I really do love this product and will miss the team. I will however, continue to use the resin and AMP because it is one of my favorite craft supplies as I say all the time! For my last project I molded an Owl I got for Halloween. I am on of those people who have Halloween and odd things sit around the house all year ON PURPOSE! I molded just the owl off of the piece so i can then add it to a base and put it in my garden. As you can see I painted it bright colors to add to the garden of vegetables and flowers and I love having these things set around my flower beds and such. One of my first AMP projects I did was a statue I got from the dollar store so I could use it outside for the same reason!


What I did first was molded the owl. I did not mold the bottom part as I knew I wanted to attach it to a few branches from outside. 


(THERE IS MY ADORABLE BABY SPYRO JAMES WALKING AROUND...I COULD NOT EDIT HIM OUT!) Once it set I then mixed my Resin and added a bit of silver to it. I wanted to see if I wanted to keep it silver or paint it.


Resin poured in mold.


Completely cured owl cast in Amazing Casting Resin.


Once cured, I decided I wanted it bright - so I painted (which AMP takes paint wonderfully) the owl bright green, added iridescentblue eyes, pupils, a beak and dry brushed a darker green all over it. Now I need to do a clear coat on it and paint a wooden heart I got from the craft store and glue this to it and set it out in the garden. I LOVE IT!


And one last thing... I have also been Blessed to have my Octopus now on the Amazing Mold Putty and Casting Resin Boxes! Thank you!


I want to thank Terri Sproul and the AMP Design Team and the company itself for Blessing me with this opportunity to be on your Design Team for a year! It is by far one of my favorite products and things I have done! 

Saturday, March 16

Resin Sun Catchers


Here is a pretty craft you can make to personalize a gift or fill your windows with color!

To make Resin Sun Catchers like these, you will need the following:
Amazing  Mold Putty
Amazing Clear Cast Resin
Decorative tissue paper napkins
Precision scissors
A pencil
Clean and dry prism crystal (real or plastic)
Wax paper, mixing cup for resin, mixing stick, tooth pick, foam brush, wire, clear thread and a paper piercer.


First begin by mixing your putty according to package directions, equal amounts of white and yellow until one solid color of yellow. Press your prism face down into the putty and let set 15 minutes. Pop prism out. Make a few more of the same. Mix equal amounts of the clear cast resin into the measuring cups provided. Stir well, scraping the sides and bottom as you work. Pour carefully into your molds. Don't worry if you cover up the part where the prism hole is. We will fix that later. 


Select your tissue paper napkin of choice. I collect mine from discount shops and store them in a decorative box. Separate the top tissue layer from the plain tissues. Place your prism onto your desired pattern and trace with a pencil. Then cut out the traced design inside the pencil lines. Place design face down into the resin filled mold. No need to press down, it will absorb right away. Fill in any gaps with little bits of decorative tissue. Use the toothpick to put things in their place.


When you have covered all your areas with tissue, make up a small batch of the clear cast resin. Pour this on top of each prism, covering the tissue just so. use your toothpick to corral any stray pieces. Leave to set in a dry, low traffic spot in your house.


These will take about 24 hours to fully cure, but half way through, you should be able to work them out of the mold. Use the paper piercer as shown to open up the holes.  If I were to place the piece on my work surface, the not fully cured resin would stick. Once I get the piercer through the hole, I can pick it up and wiggle the piercer to enlarge the hole. Do this to each one. Then place back into the mold as found to continue curing.


Now when you removed your pieces from the mold, you may have noticed that they were cloudy. This is normal. Here is what you can do to achieve the same glass like finish all around, place your pieces flat side down onto some duck tape. Really smooth the tape onto the piece so there is no air pockets.


Make up a very small batch of clear cast resin and proceed to paint your pieces with the foam brush and resin. You only need one coat for the top and sides.


Here you can see instant results!

Let your pieces set until the top coat is no longer sticky to touch.


Now slowly peel off the tape. Trim off any rough edges with your scissors.


Work at the hole again with your paper piercer if needed.


Add some wire through the holes to make a loop,add the thread, hang and enjoy!


I hope you have enjoyed my idea and are inspired to try some of your own!


Related Posts Plugin for WordPress, Blogger...