Showing posts with label Metal. Show all posts

Thursday, February 27

AMAZING Rusted Inspiration by Rachel Whetzel

Hello, Amazings!!

It's Rachel Whetzel here with some inspiration and a bit of a sneak peek! It's no secret that I ADORE all things rusty and crusty. The older, more used, more loved, more worn out the better. My kids used to point out old rusty cars on the side of the road and say, "Mom! You love that car, don't you? It's RUSTY!" My adoration is probably closer to an addiction if I am honest with you. I'm not above reaching into the dirt to pick up a piece of rusty metal or something else old and worn that catches my eye. Most often, those things end up in my pocket, and then in my stash of "Things to use to make something someday."


I am also a thrift store junkie. Anytime I visit the thrift store, I check the silverware bin. These habits are what bring you this inspiration post! Check out the adorable short handled spoons that I found! One of them is going to be just the perfect balance to the rusty metal bit I am working on molding and casting even as I type! Stay tuned! I will be sharing my casting adventure of the metal piece (front and back shown in the small images on the bottom left of the picture above) to use in a necklace I'm making!

Thanks for reading! I hope my bits and bobbles pile above inspires you to start getting your own bobble pile together, so that when I share more with you next month, you'll be ready to create a piece of your OWN! If you'd like to keep up with me, and see more of what I'm up to, I'd also love it if you'd visit MY BLOG and Subscribe! You can also find me on FACEBOOK!


• • • • • • • • • •

LAST CALL - Today is the Last Day to Enter!


CLICK HERE for Details how you can enter to WIN!

Saturday, April 20

AMAZING Twisted Metal Art with Rachel Whetzel


Hello AMAZING fans!! Rachel Whetzel here!! I'm here today, to show you how I most recently used Amazing Mold Putty and Amazing Casting Resin to create a piece of art work. I'll also share a little bit about what happens when you have a plan, and it doesn't go the way you hoped. Here's a peek at what I made!


and the piece as a whole


To create your piece like this, you'll need the following:
Various pieces to mold! I used: A starfish, Frame Piece, and a Key.
Thrifted fabric
Craft Paint (I prefer Folk Art Acrylic)
Dictionary pages
Elmer's glue
Clear Gesso
String
Vintage spoon
Drift wood
Amazing Mold Putty
Amazing Casting Resin

First, you'll need to mold your pieces. For this piece, I had an idea... and I wanted to use some of the molds I had made before. I reused the molds from Frame Piece, and a Key. For a recap of how to mix-up a batch of Amazing Mold Putty {CLICK HERE}.


I also wanted to try and mold a starfish.


One of the things I had planned to do, was to use stamps on the Amazing Casting Resin during the stage when it has set, but is still pliable. I wanted to get the look of stamped metal on my keys. I thought I would try both metal and rubber stamps.


It turned out, neither worked for me... the soft resin "healed" and my metal stamps weren't strong enough to make an imprint once the resin was more firm. I didn't let that set back stop me though! While I was working with the soft, early set resin, I had an idea. I'll tell you about that in a bit. I'm getting ahead of myself.

Pour your molds, and watch them as the resin starts to set. Amazing Casting Resin starts out clear, and the turns while as it cures. Once your piece is completely white in the mold, you can pull it out.


At this stage, (the early set) you can bend the pieces. Which is what I decided to do with my keys once I realized I wouldn't be able to stamp them like I wanted. I got to thinking about how neat it would look for KEYS to be bent!! Thing is, what caused the stamps not to work, also makes it tricky to bend Amazing Casting Resin and have it STAY that way until it's fully cured. So I used tape.


Once the resin cured, there was no bending it back!! Here is a picture of the key I ended up using, on the piece. You can see the bend in the key!


I spray painted the Frame and Keys black for their base coats, but I wanted to take advantage of the white base for my starfish. I painted the starfish orange, and wiped off much of the paint from the ridges on the piece. However, Amazing Mold Putty captures details SO WELL, that my molded piece was a rough as the original, and taking paint off to the white base wasn't working as well as I wanted, so I used some white paint and my finger tip, and rubbed white over the top of the piece. Worked like a charm!


While my starfish was drying, I cut my background fabric, and glued Dictionary pages to it. Once the glue was dry, I used clear Gesso over the pages and fabric, and let it dry. Next, I dripped paint down the pages. When I dripped the paint, I needed a firm support for the piece and the fabric, so I used a clip board.


Once the paint was dry, I got to work assembling the pieces...


Here's another angle, so you can see how the bent key looks.


I'm so pleased with how this came out, and I LOVE it when I come up against things not working quite as planned... It's even better when those bumps turn into something really cool!!


Do you have some metal you would like to twist up?

If you create something inspired by my project, please leave a comment with a link here, so I can come and visit to see! I would love for you to visit me at my "house" too!! Thank you so much for reading!! ~ rachel
.................................
__________________________________________
.................................

Want to SOCIALize? Please follow Amazing Crafting Products on Twitter at @AmazingCrafting and on Pinterest HERE -or- join us on our Facebook page.

Sunday, March 31

Summer Table Setting

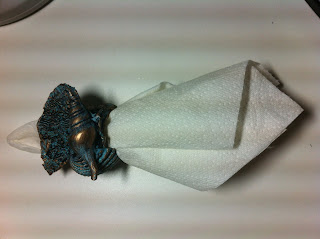
Hi all!  For my project this month, I decided to concentrate on summertime table settings. With spring in the air and my husband readying the back yard pond and fountains and patio for guests, I wanted to create some fun new napkin rings.  So out came my Amazing Mold Putty and Amazing Casting Resin.


To start, I had to search for something to use as a base.  I chose the cardboard center of a (or spool) of a roll of ribbon.  Then, to give it some texture and depth I used my glue gun to add some stings of glue all over it.


Next I mixed my Amazing Mold Putty part "A" and part "B" in equal parts
(see website via the link for detailed instructions).


Next, I made molds of this and some other items to use on my napkin ring.


Once my putty was set (about 10 minutes - or when you can scrape the side with your fingernail and it doesn't come off).  The detail I was able to get in my mold was really quite amazing. With all of the mold I've created, I still wasn't sure this would work, but just look at the next picture to see how detailed you can actually get with your putty.


Is this cool or what?

Next, I used my Amazing Casting Resin to mold my pieces.


Now, I'm not gonna lie, the ring itself took a little work to get out, but it was totally worth it. Once I popped the pieces out I glued them together and then painted them solid black. 


I went over the black with a blue green color, then a seafoam green. I finished it off with some antique gold rub.


What do you think? I love how this looks like some high end metal napkin ring that I might have bought in downtown Laguna Beach; but really I made it lickety split in my craft room.  Now I just need to make 7 more!  Thanks for stopping by and checking out my project.  Please leave me a comment and let me know what you think.  Don't forget to hop over to the Amazing Mold Putty website and check out their truly Amazing products!

~ Make Today Count
Wendy

Tuesday, December 20

Molding with cutouts..

Hey everybody!! I cannot believe it's my 3rd post here @ AMP -- this stuff is so amazing and I'm having so much fun molding anything and everything in site.. it's also been so great to experiment with! One of my favorite things so far has been to mold old "embellishments" that I'm afraid to use because I don't want to run out of them...

and one of them is this gorgeous elaborate little metal frame -- and it has all these fun cutouts.. At first I was a bit intimidated but after giving it a go I now have some super easy tips to share with you!!


Start by mixing your equal parts A and B (yellow and white) of the molding putty. (I have actually found that it doesn't take very many extra seconds to measure out my putty in measuring spoons.. less wasted if my mixture seems to be off!!)


Flatten slightly (for my piece.. you may not need to do this!) and insert frame. Keep your fingers out of the way of your cutouts.. only go as far as you're comfortable... you don't want to ruin your mold.


Then grab something super small... I used a pin with a head on it.. so that I had something to press onto with out hurting my little fingers.. use this object to press your piece down into the mold nice and deep. You want the putty to ooze out of the cutouts so that there's a nice barrier for when you lay down your resin!


Allow mold to cure... then demold your original slowly -- don't pull too hard, you may pull off the parts that will create your cutouts!


Get your favorite Alumilite Metallic Powder --- I used BRONZE


and dust your mold :)


Then.. Mix your white quick cast resin -- equal parts A and B -- stir till clear and pour.
-I always have extra molds laying around to dump my excess mixture into.. I hate waste!!!-


Allow to cure! See it drying with the mold sticking out of it? YAY!!


Then demold!! =D

My piece got a bit thick.. but I think I may try brushing in the white casting resin and seeing if it will still cure -- will be wonderful to have TONS of these frames around!! 
See you next time! -DeeDee
Related Posts Plugin for WordPress, Blogger...