Showing posts with label Sandra Strait. Show all posts

Tuesday, January 12

#Cre8time Adventures in Landscape #Resin Paintings... by Sandra Strait

Hello! Sandra here to continue my adventures in 3D resin painting. I've been experimenting (and got my Christmas presents done, too) with the technique, and decided to try it with a more traditional style of painting – the landscape.


Supplies:
  • Amazing Clear Cast Resin
  • 4 x 6 Postcard
  • Paint Brush
  • Duct Tape
  • Golden Acrylics – Green Gold, Chromium Oxide Green, Phthalocyanine Green, Quinacridone Nickel Azo Gold, Iridescent Bright Gold

This was surprisingly simple. Although, it took seven days because each layer of resin had to cure, I think actual painting time was about 1/2 hour.

I made some mistakes, none of them fatal, but I'll know better next time.


To start, I used a postcard to use as my base and a
photo reference from my brother's North Carolina farm. 


I mixed up the two parts of the Amazing Clear Cast Resin, letting it sit so any bubbles would clear, while I did my drawing and painting. Please CLICK HERE to view mixing/preparation.


I drew an outline of the scene, numbering sections of it, each section corresponding to the layer I wanted. I scanned the numbered outline, and reprinted it as a guide, then erased all the numbers.

I painted the base layer on the postcard. At this point, the sky was the only section I was really worried about, because the rest would all be painted over. Once the paint dried completely (about 10 minutes), I created a mold by sticking duct tape all around the postcard (mistake #1), to hold the resin.

Then I poured the resin so that the postcard was completely covered with about 1/8 inch of resin and set it aside to cure.


Each day, I painted another layer. Mistake #2 happened while the 3rd layer was curing. You can see from the photos, how each day I added a few more trees, varying the colors. In the first couple of layers, I kept the colors lighter, and had no real details. In the last two layers, I painted the darkest colors, the most specific details, and I used the Iridescent Bright Gold, which just grabs your eyeballs and demands your attention. These are common techniques for implying distance, even if you aren't doing a 3D painting.

So what were my mistakes? Number 1 was using the duct tape frame to hold the resin. I've done this before with good results, but the postcard was too flimsy as a base, and the tape buckled giving me uneven edges. I wasn't expecting completely straight, but what I got was beyond sanding down.


The second mistake was that I set my piece on a flat surface, but it wasn't safe. Somehow, it slid down on one side, so that my resin cured thicker on one side. This just got worse as the layering process went on.

I'm not sure when the 3rd mistake happened, but I think about the 4th layer. I missed a bubble that formed on the surface. It isn't surprising. I can't actually see the bubble because it is soooo tiny, and I can't feel it. But it casts a shadow. It happened just at the skyline, against the blue, and it looks like there is a distant UFO coming over the hill. It isn't incredibly noticeable, but annoying all the same.

So my conclusion – next time use a sturdier base. Maybe a mixed media board or canvas. The duct tape might be okay with the sturdy base, but I'm still trying to think of something that would work better. And, last of all, I'll make sure I've left the piece where it will stay completely flat until the resin is thoroughly cured.


It took about 20 minutes a day, including the time for set up, mixing the resin, waiting for bubbles to pop, and painting. A good project for the person, who has several days to get a something done, but very little time in any given day.

For more complete instructions in using Amazing Mold RubberAmazing Casting Resin and Amazing Clear Cast Resin, see the videos at Amazing Casting Products website.

To see more of my watercolors, Zentangles and resin projects,
please visit my Life Imitates Doodles blog. ~ Sandra

• • • • • • • • • • • • • • • • •
Don't forget to subscribe to our blog on the right side bar:
Twitter at AmazingCasting | Facebook at AmazingMoldPutty | YouTube at AmazingMoldPutty

Monday, December 28

#Cre8time Indoor Gardening... Amazing Mini Fish Pond by Sandra Strait

Hello!  Sandra here to tell you how I turned a ramekin into a fish pond!

About a year ago, I saw some wonderful 3D resin paintings and wanted to try my hand at it. I was a little afraid though. It looked difficult and I wasn't sure how to start. But I finally found a tutorial that roughly explained the process and I decided to give it a go. Just for grins, I decided to add a frog and some water lilies.


Supplies:

The Frog and the Water Lilies

I used Sculpey Oven Bake Clay to make a model of my frog, the water lilies and lily pads. For the frog I used an almond as a base for the body. I didn't intend to keep the originals so I didn't bake the clay.


For the lilies, I rolled some Sculpey flat, rolled it into a tube and cut the stems like I was making a crown. I did three of these and nested them. Then I cut out the shape of the lily pads and stuck the lily onto the pads. I made two sizes of lily.

To create the mold, I cut an empty Swiss Miss Cocoa tin in half, and taped my frog, two lilies and lily pad to the bottom with two-sided tape. Then I mixed Parts "A" & "B" of the Amazing Mold Rubber, and poured it in. I used cut up pieces of old molds, that I don't use any more, to reduce the amount of new liquid mold rubber needed, and ended up using about half a tub of the product.

After about twelve hours, it was ready for me to pour the resin.


I mixed Parts "A" & "B" of Amazing Casting Resin. This cures in about 5 minutes, turning white. I ended up doing two ramekin fish ponds, one with a frog and lilies, and one with just lilies, so after pulling out the first casting, I made two more castings of the lilies, painting the centers yellow. Some of the lilies I left white, and others I painted with the magenta.

Painting the Koi

Now for the actual 3D painting part!

The essence of this technique is to pour a layer of Amazing Clear Cast Resin, paint a faint layer of the fish, pour more resin, paint another layer of fish, and so on. I used 1 inch ramekins to do some practice, and found that the first layer before you start painting should be about 1/4 inch, and each layer after about 1/8 inch of resin. It takes about seven layers of resin with the top layer being thicker in this case, so that the frog and lilies were partially under the resin.

That actual time spent painting and pouring resin is probably about two hours. However, each layer of resin has to cure, which takes 12 to 24 hours, so it takes at least seven days to make a painting. That gave me time to make my frog and lilies, though.

I didn't try to photograph every layer.
Here I've shown the 3rd, 5th and 7th layers.

The first two layers are very watery and faint, getting darker and more detailed for the tail and fins. I used the same color for both layers.

On the third layer you're getting a solid silhouette, and at different angles you can see the layers underneath. I switched to another color, keeping the paint thin enough that some of the lower color shows through.

On the fourth layer, I added the eyes and started suggesting the scales with the iridescent paints. I switched to another color, keeping the paint thin enough that some of the lower color shows through.

On the fifth layer, after painting a layer of the same color as the fourth layer, I used the Payne's Gray to add a bit of shadowing along the sides and firm up the shape of the fish.

The sixth layer is the final layer of paint. I used the iridescent golds to blend in the shadow and reinforce the feeling of scale.

The seventh layer doesn't get painted it's to seal and attach the resin frog and lilies.


There was something a little fishy about this project, but I thoroughly enjoyed doing it. I hope you found it fun as well!

For more complete instructions in using Amazing Mold Rubber, Amazing Casting Resin and Amazing Clear Cast Resin, see the videos at Amazing Casting Products website.

To see more of my watercolors, Zentangles and resin projects,

• • • • • • • • • • • • • • • • •
Don't forget to subscribe to our blog on the right side bar:
Twitter at AmazingCasting | Facebook at AmazingMoldPutty | YouTube at AmazingMoldPutty

Sunday, August 23

A #Cre8time tale of a Creepy Doll and the Papier Mache Mask... by Sandra Strait

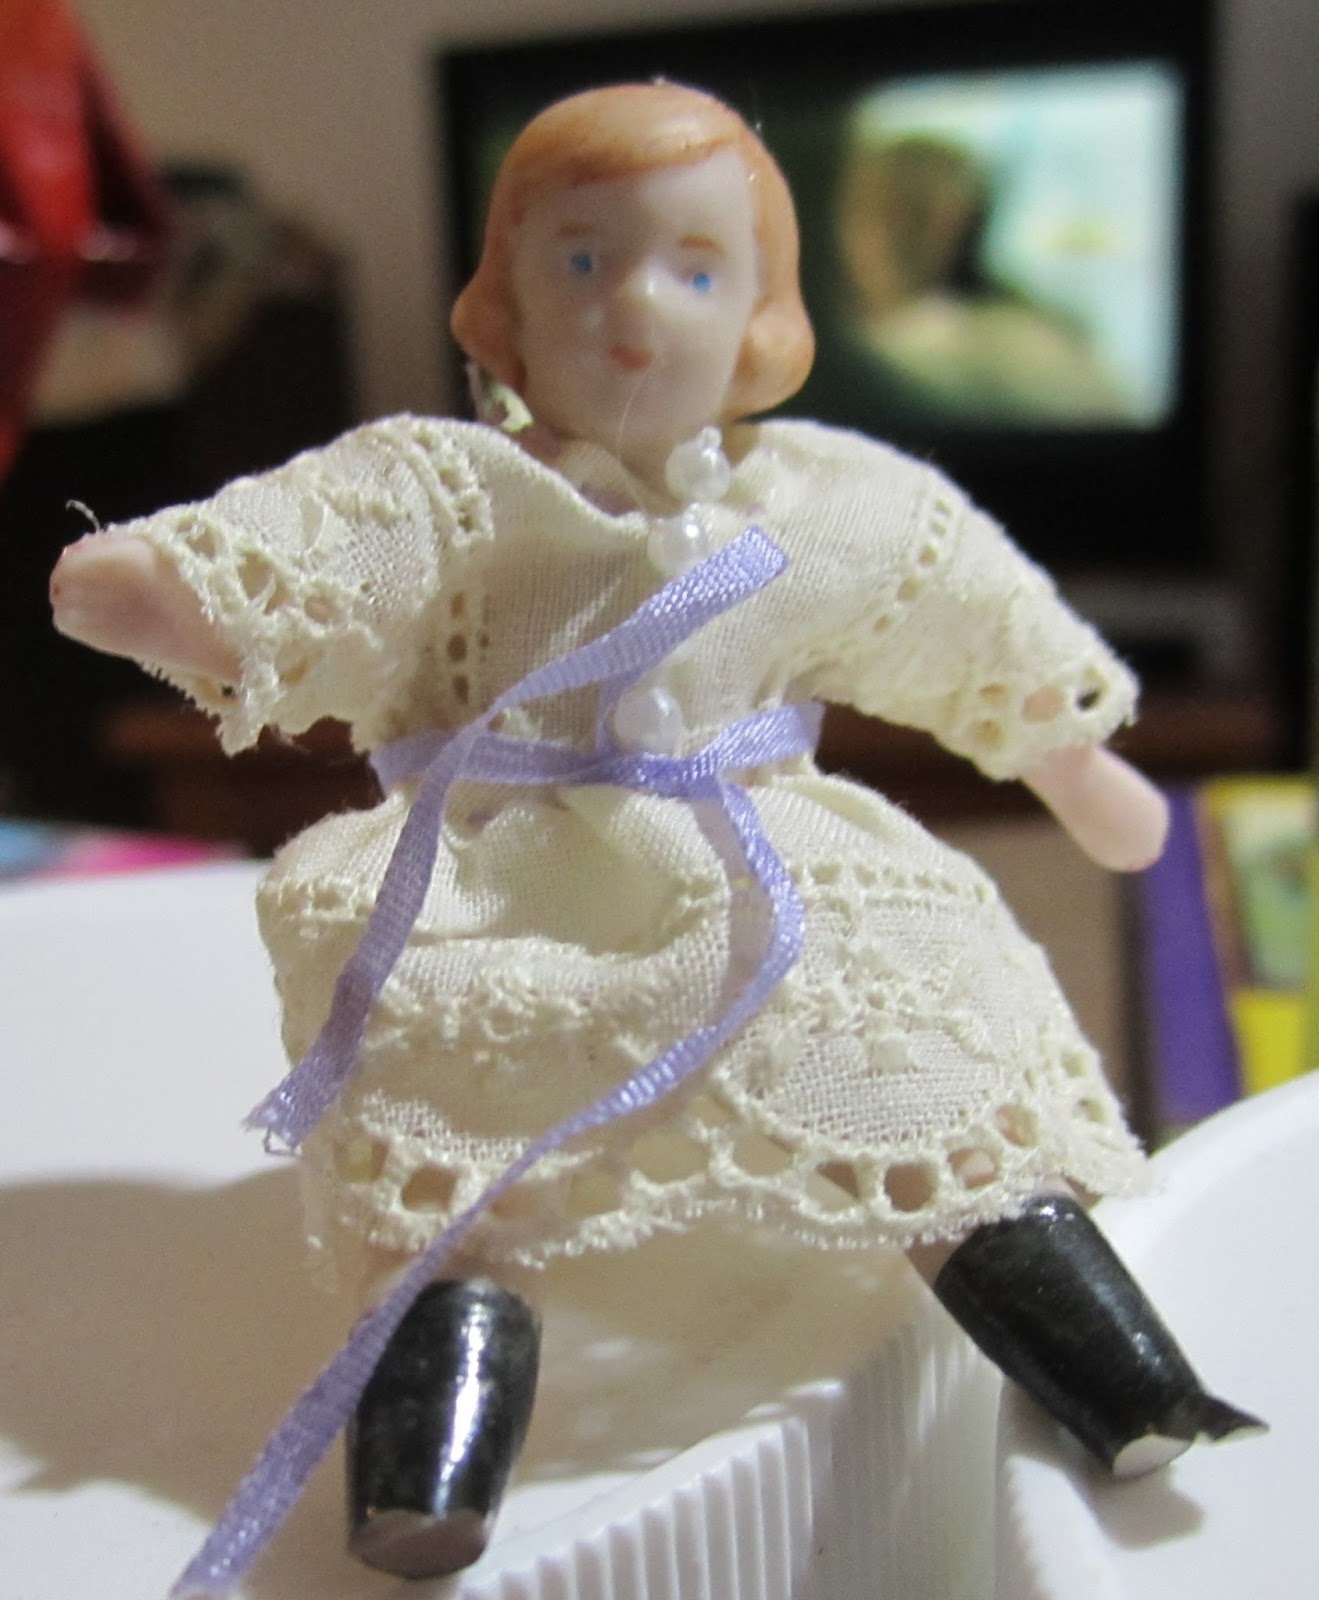
Sandra Strait here today to tell you how I made this creepy doll from an innocent and rosy-cheeked little porcelain baby.


Supplies: Amazing Mold Putty and Amazing Casting Resin, Golden's Micaceous Iron Oxide Acrylic Paint, a tiny porcelain doll.

My mother used to clean and paint porcelain dolls, making little dresses for them. This one lost her feet and one of her hands -- so sad! -- and Mom was going to throw here away. Visions of Frozen Charlottes flashed through my head, and I said ... "I'll take care of that!"


I wasn't too sure how this was going to work. The doll has joints that would look odd if I took off the dress -- though I may try a mold without it one of these days. But for now, I wanted to see how well I could get the dress.


After rolling out the same amounts of putty part "A" and putty part "B", I mixed them together until everything turned yellow, and flattened out the ball so it was larger than the doll.

Then I just smooshed her face down into the putty. I could hear a little voice in my head screaming "Oh! Mr Bill!" (am I the only one old enough to get that reference?). 

I thought about casting the back of the doll as well, but I didn't really need it for what I had in mind, and I wanted to see how well the dress worked first, anyway.


For complete instructions on using Amazing Casting Resin, please visit the Amazing Casting Products website.


After I removed the doll from the cast (the doll incurred no injuries, but the dress did get stained yellow), I mixed up some Amazing Casting Resin and poured it into the mold. After about five minutes, I took it out, trimmed off any ragged edges and rubbed some of the acrylic paint over it to pick out the detail. The dress came out better than I thought it might.


I've done a review on a Decopatch Queen Papier Mache Mask (and there's a giveaway, too!) and the creepy doll was used as the headpiece for the crown – CLICK HERE to jump over. 


I'll be doin' Halloween and
Day of the Dead in style!

For more of my work in Amazing Mold Putty, zentangle-inspired art, and daily links to tangles, tutorials, and giveaways please visit my "Life Imitates Doodles" blog. Sandra Strait

 • • • • • • • • • • • • • •

Don't forget to subscribe to our blog on the right side bar:
Twitter at AmazingCrafting | Facebook at AmazingMoldPutty | YouTube at AmazingMoldPutty

Monday, August 17

#Cre8time for an Amazing Birthday... #DIY Puffin Doll by Sandra Strait

My husband has been bugging me to make a resin puffin for quite a while, so I decided it would make a good birthday present for him.


Supplies: Amazing Mold Rubber and Amazing Casting Resin, Delight™ air dry modeling compound, styrofoam egg, googly eyes, pipe cleaner, foam pad, acrylic paint, Aleene's Tacky Glue, mold spray release.


To start with, I molded the Delight™ around the styrofoam egg until I had a puffin-like object. I let it set for 3 days, so the compound could cure all the way through. Turns out that wasn't long enough, but more about that later.


I used duct tape to create a mold just slightly larger than the puffin.


I sprayed my puffin with mold release, stuck him in the duct tape mold, and poured in the Amazing Mold Rubber.

It took an entire tub of Amazing Mold Rubber, so I didn't need to measure amounts. I just poured the catalyst into the mold rubber tub and mixed until it was all pink. For complete instructions on mixing, please visit the Amazing Casting Products website.


The next day I tore off the duct tape.

What's this? Did my mold come out diseased? LOL! No. One tube wasn't quite enough to cover my puffin, so I cut up some of my old Amazing Mold Putty molds that I knew I wouldn't use again and used the pieces instead of mixing up more Amazing Mold Rubber.


To get my puffin free, I had to cut the mold rubber in half with scissors.

Remember, I said that I didn't let my Delight™ puffin sit long enough? Even though I used a mold release, I hadn't let my puffin cure long enough, and it was still soft and moist on the inside. I think next time, I'll let it sit about two weeks!

Fortunately, it was just a matter of scraping away the compound with a spoon, so it didn't ruin the mold, and only added 15 minutes or so of time to the project.


I used rubber bands to hold the two halves of the mold together and poured Amazing Casting Resin into it. Rather than mixing up a huge batch of resin, I mixed several small batches, letting each cure (about 3-5 minutes) before pouring in the next batch {CLICK HERE to view mixing/preparation}. This helped prevent bubbles.


After the last batch of Amazing Casting Resin cured, I removed the mold, and went over the resin piece with sandpaper to remove any rough edges.


The pipe cleaners were shaped into feet, and glued to pieces of foam that I had cut to feet shape. After the puffin was painted, I used Aleene's Tacky Glue to stick on the eyes and feet.


My husband always watches the morning news, before leaving for work. The morning of his birthday, I sat the puffin on top of his other gift and placed both on his chair where he'd find them.

What Cre8time characters will you bring
to life using Amazing Casting Products?

Please upload and share your creations to the

For more of my work in Amazing Mold Putty, zentangle-inspired art, and daily links to tangles, tutorials, and giveaways please visit my "Life Imitates Doodles" blog. Sandra Strait

 • • • • • • • • • • • • • •

Don't forget to subscribe to our blog on the right side bar:
Twitter at AmazingCrafting | Facebook at AmazingMoldPutty | YouTube at AmazingMoldPutty

Thursday, July 16

Having Amazing #Cre8time Travels... Custom #Watercolor Palette by Sandra Strait

Hello! Sandra here to share how I made a custom watercolor palette for myself – using items I had on hand and Amazing Casting Resin.

Supplies:
  • Amazing Casting Resin
  • Qor Watercolor sampler tin (approx. 8.5 in x 6 in)
  • 14 full-size watercolor pans
  • 8 half-size watercolor pans
  • Sharpie marker
  • Two-sided Miracle tape


Unlike Acrylics and Oil paints, watercolor can be squeezed into palette wells and allowed to dry out. You can keep them indefinitely this way and it makes them fantastic for carrying around when you paint Plein Air (on site). 

Truly, the palette itself is probably one of the least important items in your painting kit. You need something with wells (indentations) to hold the seperate colors, an area to mix colors, and a leakproof lid, if you're going to be traveling.

For a long time, I've wanted a wheel palette, one with wells in a circle that allows you to lay your paints out in ways that help you match certain colors easily. But I have a 1000 palettes of different kinds and the wheel ones cost more than I felt I should spend. But...

Last year, I scored some Qor watercolor tins, that when opened had one side for mixing and side for holding watercolor tubes. I also had several empty watercolor pans. Perfect for turning into my own custom watercolor wheel palette!


Often when you buy a watercolor set, the paint comes in pans, little wells that can be removed so you can change the colors in your set. I had lots of empty ones that I kept for just such an occasion as this. In this case, I wanted a palette where the pans would NOT be removable.


With a Sharpie marker, I drew lines in my tin to help show where each pan would go, and then used two-sided tape to hold them down.


I mixed up a batch of Amazing Casting Resin and poured it into the tin, taking care not to get any inside the wells. It took two batches to get the resin to the depth that I wanted. Deep enough to hold the pans securely, but not to overflow the pans.


Easy peasy! The cured Amazing Casting Resin is white, which is good, because you want to see the true color of the paints. Clean up is easy. A wet cloth or paper towel picks the paint right up without stain (though I may get staining with some colors eventually... that always happens). I've got exactly the number of wells I want in a tin that shuts securely for traveling – I'm a happy camper...er... painter!


How would you customize
your Cre8time tools using

Please upload and share your creations to the

For more of my work in Amazing Mold Putty, zentangle-inspired art, and daily links to tangles, tutorials, and giveaways please visit my "Life Imitates Doodles" blog. Sandra Strait

 • • • • • • • • • • • • • •

Don't forget to subscribe to our blog on the right side bar:
Twitter at AmazingCrafting | Facebook at AmazingMoldPutty | YouTube at AmazingMoldPutty

Thursday, July 2

#Cre8time to Play with Animals and Kiss a Dog's Nose... #ACPthrowback #MakeThings #TBT


Hello Amazing Crafters! It's a new month and we have reached week five of the Make Things! Craft Challenge. Our AMAZING creative friend Katie Smith of Punk Projects is hosting this fun craft challenge this summer and Amazing Casting Products is proud to be one of the sponsors. Play along for your chance to win weekly prizes and a super amazing grand prize at the end!


This week's "Make Things!" theme is... INSPIRED by a MOVIE! So to give you some inspiration we are sharing some AMAZING #ACPthrowback ANIMAL projects using Amazing Casting Products... you can even a mold a Dog's nose {photo above by Amazing Creative Tanya Ruffin}!

We hope you are inspired to go make someTHING and link-up :)

Remembering a Special Friend...


Lonnie Sexton created this keychain as a memorial to his fur baby Cassidy. He made a master shape that he cast in Amazing Mold Rubber and Amazing Clear Cast Resin; then created versions in different colors using Alumidust and Alumilite Metallic Powders to give to other family members.

CLICK HERE to jump to
Lonnie's heartwarming post.

Want to see more of what Lonnie is up to?
Follow him on his blog HERE!

Ode to the Giraffe...


Isabel Villarreal created this fun and whimsical magnetic calendar using Amazing Mold Putty, Amazing Casting Resin and Alumilite Dyes.

CLICK HERE to jump to
Isabel's full how-to.

Want to see more of what Isabel is up to?
Follow her on her blog Ruff Stuff HERE!

Leaping Leopards...


Sandra Strait created a shadow-box scene to give a home to her paper origami animals. But before she embedded them in layers of Amazing Clear Cast Resin, she made of mold of the shape with Amazing Mold Putty and cast them in Amazing Casting Resin to transform them into her own illustrated critters.

CLICK HERE to jump to
Sandra's full how-to.

Want to see more of what Sandra is up to?
Follow her on her blog Life Imitates Doodles HERE!

• • • • • • • • • • • • • •

Share Your Creations with us
on Social Media to be Featured on
#ACPthrowback Third Thursday

June 18 is our next THIRD THURSDAY... THIS WEEK and this is your chance to be featured. Post your creations to our Facebook pagePinterest, and on Twitter! We'll be on the hunt for your projects with the hashtag #ACPThrowBack, (you can even go back into your past pins and add this pin to help us find you!) and share ALL your projects using the hashtag #AmazingCastingProducts!!

• • • • • • • • • • • • • •

Don't forget to subscribe to our blog on the right side bar:
Twitter at AmazingCrafting | Facebook at AmazingMoldPutty | YouTube at AmazingMoldPutty

Monday, June 15

#Cre8time Layers of Movie Magic ... #MakeThings! with a Movie Theme #ACPthrowback


Hello Amazing Crafters – it's a brand new week and there's a new Make Things! Craft Challenge. Our AMAZING creative friend Katie Smith of Punk Projects is hosting a fun craft challenge for the summer and Amazing Casting Products is proud to be one of the sponsors. Play along for your chance to win weekly prizes and a grand prize at the end!


This week's "Make Things!" theme is... INSPIRED by a MOVIE! So to give you some inspiration we are sharing an AMAZING #ACPthrowback project of EPIC proportions using Amazing Casting Products.

Ode to a Giant of the Silver Screen...


Sandra Strait created this one-of-a-keepsake for her hubs – a painting of his favorite movie "Godzilla"; brought to life in layers of Amazing Clear Cast Resin sheets for an AMAZING 3D effect.

CLICK HERE to jump to
Sandra's full how-to.

Want to see more of what Sandra is up to?
Follow her on her blog Life Imitates Doodles HERE!

• • • • • • • • • • • • • •

Share Your Creations with us
on Social Media to be Featured on
#ACPthrowback Third Thursday

June 18 is another THIRD THURSDAY... THIS WEEK and this is your chance to be featured. Post your creations to our Facebook pagePinterest, and on Twitter! We'll be on the hunt for your projects with the hashtag #ACPThrowBack, (you can even go back into your past pins and add this pin to help us find you!) and share ALL your projects using the hashtag #AmazingCastingProducts!!

• • • • • • • • • • • • • •

Don't forget to subscribe to our blog on the right side bar:
Twitter at AmazingCrafting | Facebook at AmazingMoldPutty | YouTube at AmazingMoldPutty
Related Posts Plugin for WordPress, Blogger...