Showing posts with label Amazing Clear Cast Resin. Show all posts

Tuesday, April 24

#Cre8time Explorations... DIY Butterflies with Michele Kosciolek

Hello friends! Michele here... I am in spring cleaning mode in my craft room and came across a butterfly knob that I stashed away to mold on a rainy day. Well since I found it and it happened to be raining, I got busy molding and casting.


I used Amazing Mold Putty to mold the knob.


I sized my mold putty just a tad smaller than the knob.


Because when you push item into
the Amazing Mold Putty it will spread.
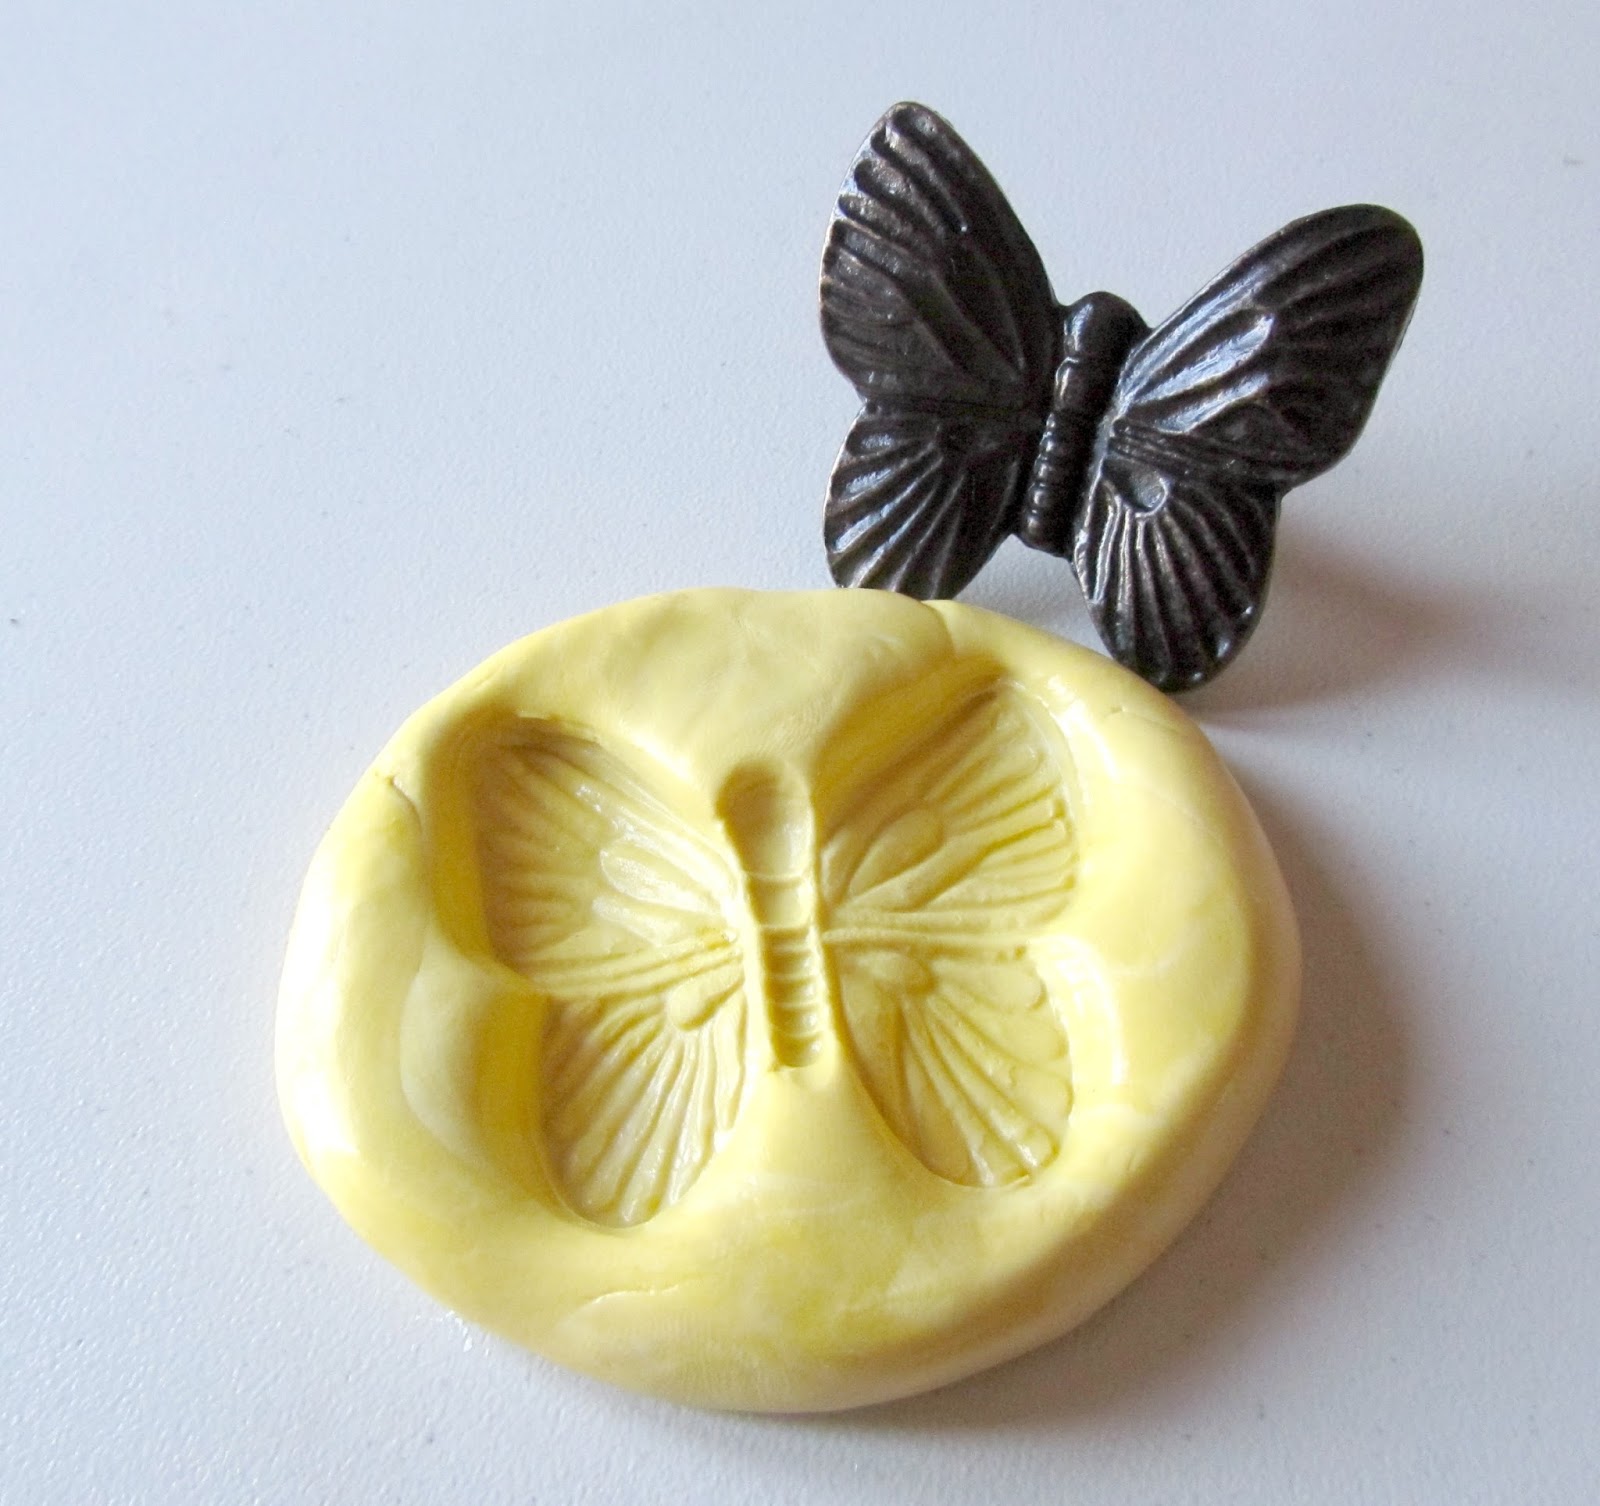

Just look at all the detail! This mold can be used a couple of ways, to mold the entire butterfly or just the wings.


Next I cast with Amazing Clear Cast Resin, but first I painted some Alumilite Pearlescent Powder in the mold.


First the pearlescent on the wings, and then
a little bronze metallic powder on the body.


I mixed the Amazing Clear Cast Resin and poured into the mold – right over the powder.


I had a bit of the resin left so I grabbed a dictionary page that I want to use as a page in a book I will be making at a workshop this month... never waste leftovers!!


For the next casting, I used Amazing Casting Resin mixed with brown Alumilite DyeI wanted it to look like Bronze so first I used the Bronze Metallic Powder in the mold.


These two casts from the same mold turned out so different!!


The Amazing Clear Cast Resin with powder...


and the Amazing Casting Resin with the metallic powder and dye.


I am really looking forward to seeing how using
 just the wings works out too. What a versatile mold!


Be on the look out for these on future projects!!

What found objects would
you mold for Cre8time play?

Thanks for sharing part of you day with us!!!
Until next time... Michele

For more projects and inspiration please visit my blog "Stuff by Belle"
or follow on Facebook: https://www.facebook.com/michele.kosciolek

• • • • • • • • • • • • 

Don't forget to subscribe to our blog on the right side bar:
Twitter at AmazingCasting | Facebook at AmazingMoldPutty | YouTube at AmazingMoldPutty

Friday, March 30

There are no "BAD" Eggs... Amazing Inspiration by Tracy Krueger


I'm baaaack! It's Tracy here and I'm going to share a couple of "bad" eggs... ideas that were in my mind, though didn't necessarily come to fruition. Believe me when I say, I will keep on trying these until they work out just how I want them – LOL!


My first egg was trying to get Amazing Casting Resin to look like a cracked egg. First I used Amazing Mold Rubber to mold a plastic egg. Then I mixed up equal parts of Amazing Casting Resin and gently poured it into the mold. As it was curing, I "rolled" the mold back and forth to get it to coat just the sides and bottom.


Even though it didn't quite turn out like I imagined – I wanted to decorate it somehow.  So I mixed up a couple of small batches of Amazing Clear Cast Resin colored them with blue and violet Alumilite Dye. I turned the faux cracked egg upside down and drizzled the resin over the egg.


After everything cured, it created an interesting piece.


My second and third try was to create a clear egg with swirls of color. I used the same egg mold that I created, mixed equal parts of Amazing Clear Cast Resin and poured it into the mold. I then mixed up a couple of smaller batches of Amazing Clear Cast again and colored them with blue and violet Alumilite Dye.

In one of the tries: I poured a little of the colored resin on the top and took a popsicle stick and gently swirled the color around (trying not to "mix" it up).


Since this didn't give me the effect I was going for... I gave it another try – this time I mixed up Amazing Clear Cast Resin, and only filled the mold 1/2 way. Then I added and swirled in the colored resin, then filled it up with more clear resin. It still didn't give me what I was looking for, but it is pretty.

I'll keep trying! Where there is a will, there is a way....

What kind of resin projects
are you working on?

Have fun creating! ~ Tracy

You can find more of my work on my Blog:
http://tracykrueger-nine.blogspot.com/2017/

• • • • • • • • • • • • • • • • •


Don't forget to subscribe to our blog on the right side bar:
Twitter at AmazingCasting | Facebook at AmazingMoldPutty | YouTube at AmazingMoldPutty

Friday, March 23

VIVA LA VIDA... #Cre8time Inspired by Frida Kahlo with Maria Soto


Hi there! Maria here with a project I've been wanting to share with everyone. I love the artist Frida Kahlo, and after looking up some of her many quotes, I was inspired to create with these in mind. 

I created this piece inpspired by a short but very strong phrase, "Viva la Vida" which means "Live Life". I feel that we need to embrace life, live to the fullest, try to overlook all the negativity we see around us and just scream these words out to remind ourselves that life matters, that we should do our best to make the most of it today, to leave the past behind us and live life now. 

During one of my many visits at Michaels, I purchased several wood pieces and these cute little frames already have a cute cut-outs on the corners. I noticed they also have a small frame that fits over them, so I also purchased several of those too.


I sketched an image of Frida, then took out my Walnut Hollow burning tool from and began to trace around the image.


I love burning images on wood. For this piece, I decided to add shading too. Whenever I draw or paint I have to add shading and details, though this is the first time I tried it on wood – and it will not be the last because I really loved how this turned out.


I used Plaid acrylic paints to add color to the piece, then I stamped the quote using black ink. As you can see the hair was left alone, as I didn't want to cover all the shading I had done. I used wood glue to put together the two pieces.


I used gold paint to paint the sides and the back of the finished frame.


Then I coiled some colored wire over a paintbrush, added some beads and wrapped it around the cut outs on the top corners. I also added beads to make her earring, and finished with some swarovski clear crystals. 

To finish off this piece I decided to add a layer of Amazing Clear Cast Resin. Not only would this resin give it a glass-like finish, but the colors would be brighter too.

I gathered these supplies in preparation: parchment paper, wipes, measuring cups, a mixing stick, and Amazing Clear Cast Resin.


Using Amazing Clear Cast Resin is pretty easy. First you measure out equal amounts of parts "A" and "B" {please CLICK HERE to view mixing instructions}. 


Add part "A" to part "B" and mix the resin slowly. When completely mixed, let it sit for a few minutes for the bubbles to go away. Now the resin is ready to apply to the piece. I gently spread a thin layer of resin around using the mixing stick.


She looks AMAZING and love it!

I think I will do a collection of "Frida" inspired frames like this one.


The photos don't do this piece justice at all –
photographing the clear resin is not easy. 


I hope you like my piece – please feel free to leave a comment.

A simple quote inspired me to create this piece...
What inspires you to create?

Thanks for visiting! I invite you to stop over to my blog, "What is Creativity"
 at http://chuy-creativity.blogspot.com to see more of my creations. ~ Maria Soto


• • • • • • • • • • • • • • • • •

Don't forget to subscribe to our blog on the right side bar:
Twitter at AmazingCasting | Facebook at AmazingMoldPutty | YouTube at AmazingMoldPutty

Thursday, March 22

#MixedMedia Easter EGG-spiration... by Michele Kosciolek

Hello fellow creatives! Michele here – with Easter right around the corner I have a little EGG-spiration for you today!!

I've decoupaged some craft eggs with tissue paper stamped with Viva Las VegaStamps!, then sprayed with Distress Sprays. Now, I have had these eggs for quite some time and have wanted to decorate them for Easter for just as long... I am so glad I finally did and took things one AWESOME step further!

I gave these eggs a coating of Amazing Clear Cast Resin – OMG – that was just what it needed to make these eggs POP!

Here they are!!


I decided to turn these into hanging eggs.


This one is hanging on May Arts silk ribbon
with a couple of hand blown glass beads.


This one is hanging on copper wire with
a couple of handmade Tibetan glass beads.


I love how these eggs shine and already have
them hanging with my Easter decorations!

How are you decorating for Easter??

Thanks for sharing part of you day with us!!!
Until next time... get creating!! Michele

For more projects and inspiration please visit my blog "Stuff by Belle"
or follow on Facebook: https://www.facebook.com/michele.kosciolek

• • • • • • • • • • • • 


Don't forget to subscribe to our blog on the right side bar:
Twitter at AmazingCasting | Facebook at AmazingMoldPutty | YouTube at AmazingMoldPutty

Monday, March 5

WOODen it be #Cre8time Lovely... 3 Resin and Wood Projects by Cat Kerr


Hello Amazing Makers! What WOOD you do with Amazing Clear Cast Resin in your Cre8time?! Today mixed-media artist Cat Kerr shares a few easy ways to use resin in your craft projects combined with a variety of wood and natural items.

Sit back and enjoy viewing this video from Cat Kerr featuring "3 Resin and Wood Projects". We hope you are inspired to add a POP of Amazing Clear Cast Resin to your creations!


If you are having trouble viewing video, please click HERE.

Thank you so much for watching!! If you love these resin techniques and would like to learn more... please check out Cat Kerr's "3 Resin and Wire Project Ideas" video by clicking HERE.

What are you creating today
with wood and resin?

To see more of Cat's work, we encourage you to take time to visit CatKerr.com or her blog and see what other amazing things she is up to.


• • • • • • • • • • • • • • • • •

Don't forget to subscribe to our blog on the right side bar:
Twitter at AmazingCasting | Facebook at AmazingMoldPutty | YouTube at AmazingMoldPutty

Wednesday, February 28

Memorabilia of #Cre8time Family... DIY Keepsake by Tracy Krueger


Hello everyone! It's Tracy here and I wanted to share with you today a project I created that holds some memorabilia pieces. A few months back I purchased some wood pieces at an antique market that used to hold watch parts. I knew I wanted to use these with Amazing Clear Cast Resin at some point... easily transforming one into a keepsake.


I decided to join my parents, my in-laws, my husband and I in a hanging with some pieces that either belonged to them or had some special meaning. I gathered some pins, a jewelry charm, tigers eye, shells and a silver heart. I also made some clay hearts that I painted red and wrote the initials of each of us on them. I played around laying them in different spots until I found the way I wanted them.


I mixed up a small batch of equal parts of Amazing Clear Cast Resin and mixed it with some fine glitter {CLICK HERE to view mixing/preparation}. I filled up the small outside circles and the top one.


After letting cure for at least 24 hours, I mixed up another small batch of Amazing Clear Cast Resin with some gold glass glitter, then filling the bottom half of each of the center sections.


I wanted the resin to be cured, but not fully hardened so that I could lay each piece of memorabilia into the resin and it would "settle" and not move around when I add the final resin layer. I set aside to let resin completely harden.


Then I mixed up my final batch of Amazing Clear Cast Resin and filled each of the center sections to the top... covering the keepsakes in each.


After the resin is fully cured, this is ready to hang! I drill small holes in the top sides and screwed in small screws. I opened my stash of sari ribbon and tied a piece of cream sari ribbon to the top to hang it by.


I hope you enjoyed my little piece of family history.
See you again soon!

What ideas do you have
to preserve family history?

Stay tuned for more... ~ Tracy

You can find more of my work on my Blog: http://tracykrueger-nine.blogspot.com/2017/

• • • • • • • • • • • • • • • • •

Don't forget to subscribe to our blog on the right side bar:
Twitter at AmazingCasting | Facebook at AmazingMoldPutty | YouTube at AmazingMoldPutty
Related Posts Plugin for WordPress, Blogger...