Showing posts with label LynzCraftz. Show all posts

Monday, March 19

#Cre8time Transformations... Mixed-Media Easter Eggs with Lyn Gill


Hi everyone! Lyn here again this time with some Amazing Inspiration... Patina and Rust Easter Eggs!


These altered eggs were so fun and easy – created with some foil duct tape, texture paste and acrylic paints over plastic Easter Eggs with some Amazing Casting Resin embellishments.


What will you create using
and some plastic Easter Eggs?

Well that all for this now on the Amazing Casting Products blog – CLICK HERE to see more springtime inspiration.
Till Next Time! Lyn

You can find more of my work on my blog LynzCraftz
or on YouTube LynzCraftz, or my Facebook page LynzCraftz.


• • • • • • • • • • • • • • • • •

Don't forget to subscribe to our blog on the right side bar:
Twitter at AmazingCasting | Facebook at AmazingMoldPutty | YouTube at AmazingMoldPutty

Wednesday, February 14

Like Honey to a #Cre8time Bee... DIY Valentine's Crown by Lyn Gill


Hi everyone! Lyn here again and this time I've got a really cute project to share using Amazing Casting Products just in time for Valentine's Day! 


It started out with this 5" x 6" crown shaped chipboard
"canvas" for lack of a better term.


Now first I started off with this vintage Chalkware Salt Shaker that I picked up at a thrift store a few years ago – cute isn't he? Well I needed him to be flat on the back and light enough to use on the project... so out came the Amazing Mold Putty

I quickly molded him making sure the Amazing Mold Putty covered him at least half way up the sides, then layed him down on the table to flatten the back of the putty so I could pour him "level" when filling with resin. 


Once cured, I removed the salt shaker from the mold and then mixed some Amazing Casting Resin and also made a couple of bees using another mold from a previous project. These resin castings are ready to use in about 10 minutes.


Using a honeycomb stencil and some modeling paste, I added some texture to the background. Then I decided on the placement of the handmade elements for my design.


I glued down the elements then added some graphite texture paste around them and around the edges and let it all dry.


Then I covered the entire piece with some Gesso
to give a uniform surface to paint on.


Now the fun begins! I painted the entire piece with some yellow acrylic paint, followed by some orange acrylic paint, and then spritzed the entire piece with some water and let it run down the "canvas". I finished it off with a little spray with some pearl shimmer and some Silver Spark Metallic Luster.


Now for the finishing touch! I mixed up some Amazing Clear Cast Resin with a bit of Alumilite Dye (yellow with the tiniest touch of orange), and let it set in the mixing cup for roughly an hour to thicken up – I needed it to to be thick and not runny for this step. 


I placed "drips" of this "honey" in some strategic places and the tilted the "canvas" at an angle so the "honey" would "drip". You need the resin to be thick in order for it not to run off your piece and not level out.


Cute isn't it?! I think so...

what will you make for your Valentine?

Hope you have a sweet Valentine's Day!
Till Next Time! Lyn

You can find more of my work on my blog LynzCraftz
or on YouTube LynzCraftz, or my Facebook page LynzCraftz.

• • • • • • • • • • • • • • • • •

Don't forget to subscribe to our blog on the right side bar:
Twitter at AmazingCasting | Facebook at AmazingMoldPutty | YouTube at AmazingMoldPutty

Monday, February 12

#Cre8time Underwater Treasures... AMAZING Inspiration from Lyn Gill


Hi everyone! Lyn here again... this time with some Underwater Inspiration. I'm so ready for warmer weather and I KNOW you are too – so I created this fun piece to inspire you.


Can you believe this is created from a recycle processed cheese box?! LOL... I just love to recycle cardboard boxes! The first thing I did was to cover the box completely with brown craft paper {which I also recycled from other packaging}. I glued it down with some matte medium and then let it dry for about an hour.


With some texture paste and a couple of stencils, I added some texture to the background. I'm kind of crazy for texture... LOL! I set aside to dry again for about an hour.


I took one of those dollar bin frames from the craft store and a bunch of Amazing Casting Resin cast pieces from over pours (I have a lot of these in my stash), and glued them down with matte medium. When dried I covered the whole thing with black gesso... and again set aside to let dry.

Now comes the fun part... I painted the entire piece with some metallic acrylic paints in blues and greens, and then dry brushed on a bit of silver to bring up some of the details.


Underwater Treasure (front) 


Underwater Treasure (back) 

I am so in love with this piece {the photos really don't do it justice}! The colors and textures are so rich and positively dreamy. OK, well maybe I'm just dreaming of Summer... LOL!

What are you dreaming of using

Well that's all for now... Till Next Time! Lyn

As usual, you can find more of my work on my blog LynzCraftz
or on YouTube LynzCraftz, or my Facebook page LynzCraftz.

• • • • • • • • • • • • • • • • •

Don't forget to subscribe to our blog on the right side bar:
Twitter at AmazingCasting | Facebook at AmazingMoldPutty | YouTube at AmazingMoldPutty

Wednesday, December 20

How #Cre8time Charming... AMAZING Inspiration by Lyn Gill


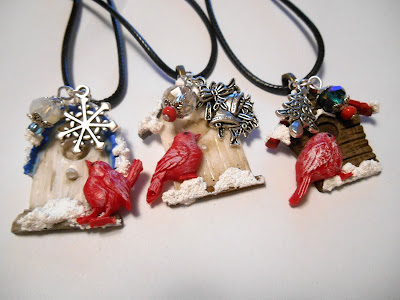
Happy Holidays everyone! Lyn here to share a bit of Christmas inspiration... cute little Winter Birdhouse Charms accented with a few feathered friends made with Amazing Casting Resin.


Using some tiny cast birds from Amazing Casting Resin and red Alumilite Dye, combined with some beads/findings, metal Christmas charms, acrylic paint and Snow Tex (available at most craft stores) –  I created these tiny Birdhouse Charms just in time for the Holidays. How cute are they? They'll be perfect Holiday gifts for loved ones!

What gifts will you create this season 

Well that's all for now... Till Next Time! Lyn

As always you can find more of my work on my blog LynzCraftz
or on YouTube LynzCraftz, or my Facebook page LynzCraftz.

• • • • • • • • • • • • • • • • •

Don't forget to subscribe to our blog on the right side bar:
Twitter at AmazingCasting | Facebook at AmazingMoldPutty | YouTube at AmazingMoldPutty

Thursday, November 30

#Cre8time Transformations... Lizard Pin/Brooch REDUX by Lyn Gill


Hi everyone! Lyn here again with a fun Lizard Fall brooch/pin project for you that's full of sparkle. I originally created this pin years ago – back when Southwest design was all the rage... so the 80s...LOL! The last time I wore it the back leg broke off. 


Now it's only made of Shrink Plastic so it's not very thick, it's kinda curved, and very textured. I've glued the leg back, but it may break off again. I decided I need to make a mold of it – so out comes the Amazing Mold Putty! It's perfect for getting the detail and I can add some depth to the pin at the same time. 


After mixing up equal portions of the 2-part Amazing Mold Putty, I pressed it out on my glass desktop to a pretty thin layer (1/4" or so), then I "rocked" the pin back a forth so that the whole pin made contact with the putty. I did it this way because I wanted the mold to be level and flat. I let this cure (it only takes 10-20 minutes). CLICK HERE to view mixing/preparation.


Now for the resin! Here I used Amazing Casting Resin with a drop of Alumilite Dye in Brown so the final colors would really pop (CLICK HERE to view mixing and preparation). I always have molds on stand-by to fill with "left-over" resin when I mix more than needed. I set aside to cure (again 10-20 minutes depending on the weather).


It worked! The finished Amazing Casting Resin Lizard is still thin but thick enough to be rigid. So it shouldn't snap like the original did.


I glued a pin back to the back with a bit of E-6000® and let that cure for at least 30 minutes – but I let it set an hour just to be sure.

Now comes the FUN part! Using some Metallic Acrylic Paints, I "dry-brushed" the pieces starting with Gold, then Bronze and then Copper (you could use any colors). The paint dries really quick so in just a few minutes, you're ready for the next step... Rhinestones! Yep, Rhinestones!!! I have some of them in several sizes and colors. So I chose some Clear Aurora Boreallis – these reflect the colors perfectly (again, you could use any color). A bit of Black Acrylic Paint for the eyes and my fun, sparkly Fall rhinestone lizard brooch is done!


This would make a great gift for the Holidays!
So glad I didn't throw that little pin away when it broke... LOL.

What broken object could you mold
then cast in Amazing Casting Resin?

Well that's all for now... Till Next Time! Lyn

As usual, you can find more of my work on my blog LynzCraftz
or on YouTube LynzCraftz, or my Facebook page LynzCraftz.

• • • • • • • • • • • • • • • • •

Don't forget to subscribe to our blog on the right side bar:
Twitter at AmazingCasting | Facebook at AmazingMoldPutty | YouTube at AmazingMoldPutty

Monday, October 23

From the Witch's #Cre8time Cupboard... by Lyn Gill


Happy Halloween everyone! Lyn here again bringing you a fun Halloween charm just in time for your big event!


I crafted the original skull from Super Sculpey and baked it until cured (according to package directions). To prepare for molding I glued it down to the bottom of a disposable plastic cup with my hot glue gun. Then I mixed a small amount of Amazing Mold Rubber according to package directions (CLICK HERE to view mixing/preparation), and then slowly poured it into the cup – covering up the skull by about a 1/2''. I set aside to let cure overnight.


After de-molding my original it is ready to fill mold with some Amazing Casting Resin. After mixing equal amounts of Parts "A" and "B", stir until swirls and cloudiness are gone, then pour into the mold. Let this cure for 10 to 20 minutes before de-molding. CLICK HERE to view mixing/preparation.


While the molded resin piece is still "soft", I screwed in a screw eye to make a charm out of the skull. Then using some Black acrylic paint, I painted the whole skull and quickly (while it was still wet), wiped it back off – leaving it with an antiqued finish. 


I think it looks kinda creepy sitting on my handmade
ATC card (Artist Trading Card) and my Art Journal... 


What will you create to go
with your Halloween costume?

Well that's all for now... Till Next Time! Lyn

As usual, you can find more of my work on my blog LynzCraftz
or on YouTube LynzCraftz, or my Facebook page LynzCraftz.

• • • • • • • • • • • • • • • • •


• • • • • • • • • • • • • • • • •

Don't forget to subscribe to our blog on the right side bar:
Twitter at AmazingCasting | Facebook at AmazingMoldPutty | YouTube at AmazingMoldPutty

Monday, August 21

Singing a Whale Song of Summer... by Lyn Gill


Hi everyone! Lyn here with you today from LynzCraftz. It's no secret that I love Summer... the Ocean... the Beach... the sound of the waves and the salty sea air – so before Summer ends, I thought I would get in one last Summer project. I've named it "Whale Song" for obvious reasons...


I first started with a couple polymer clay whales that I sculpted from Super Sculpey (baked according to package directions). I left each whale flat on the back so I could glue them down. I glued each down into my mold box, then I poured over a batch of Amazing Mold Rubber to create the mold. CLICK HERE to view mixing/preparation.

In a few hours, the mold is cured! I removed the originals and it was time to pour some clear blue resin. For the whales I've mixed up Amazing Clear Cast Resin and Ocean Blue Alumilite Dye... aren't they cute?


Then using a wooden canvas I had purchased, I painted it with some acrylic paints. Just a basic underwater type background which will get mostly covered up.


Here comes the fun part... I mixed up some Amazing Clear Cast Resin and divided it into 5 small cups; adding Alumidust to each cup in similar colors to my painted background in 4 of them. In the fifth one, I added a bit of White Alumilite Dye.


Carefully pouring each of the four colors on their corresponding color area (kinda like a paint by number... LOL), I used a stir stick to help move the colors around. I placed the two original polymer whales along with the blue cast whales into the wet resin on the background and left it to cure for 3-4 hours before continuing.


The final step was to mix just a touch (the tip of my pallet knife) of the Alumilite Pearlescent Metallic Powder into another batch of Amazing Clear Cast Resin, then pour this mixture over the entire piece – whales and all.


After letting this cure overnight,
the results are well... AMAZING! 


You can see the sparkle from the tiny bit of Pearlescent powder that I added to the final layer of Amazing Clear Cast Resin – it's so pretty! A little bit of work but well worth it in the end.

What end of Summer projects
do you have planned?

Well that's the end for now – thank you so much for stopping by... 
Till Next Time! Lyn

As usual, you can find more of my work on my blog LynzCraftz
or on YouTube LynzCraftz, or my Facebook page LynzCraftz.

• • • • • • • • • • • • • • • • •

Don't forget to subscribe to our blog on the right side bar:
Twitter at AmazingCasting | Facebook at AmazingMoldPutty | YouTube at AmazingMoldPutty

Friday, July 14

Voyage Beneath the #Cre8time Waves! DIY Trinket Box by Lyn Gill


Hi everyone! It's Lyn here again from LynzCraftz – join me on a Cre8time journey beneath the waves with this super fun project. My "Voyage Beneath the Waves" trinket box started out as an old aquarium embellishment that had ceased to function.


I molded the underwater explorer with Amazing Mold Putty and then filled with Amazing Casting Resin and set aside to cure. CLICK HERE to view how to create a mold with Amazing Mold Putty, and CLICK HERE to view mixing/preparation for the quick and easy-to-use Amazing Casting Resin.


After de-molding, I painted him with acrylic paints. 
He turned out nice – I think!


Anyway... I took a small wooden hinged box (from the craft store) and began to set the scene. I painted the box blue and added some stenciling with texture paste in the form of bubbles.


Then the box got a few more layers of acrylic paint in some underwater colors. I finished off the box with hand sculpted seaweed {using Super Sculpey }, some pearls, rhinestones, and sand mixed with an acrylic matte medium. 


What an underwater scene! This makes a great little jewelry box or gift box for something special! Amazing Mold Putty is so easy-to-use, and you can mold almost anything you can think of! Then use some Amazing Casting Resin to make something fun to use in your next project!

What will you mold next?

Well that's it for today – thank you so much for stopping by... 
Till Next Time! Lyn

As usual, you can find more of my work on my blog LynzCraftz
or on YouTube LynzCraftz, or my Facebook page LynzCraftz.

• • • • • • • • • • • • • • • • •

Don't forget to subscribe to our blog on the right side bar:
Twitter at AmazingCasting | Facebook at AmazingMoldPutty | YouTube at AmazingMoldPutty
Related Posts Plugin for WordPress, Blogger...