Showing posts with label transform. Show all posts

Thursday, November 30

#Cre8time Transformations... Lizard Pin/Brooch REDUX by Lyn Gill


Hi everyone! Lyn here again with a fun Lizard Fall brooch/pin project for you that's full of sparkle. I originally created this pin years ago – back when Southwest design was all the rage... so the 80s...LOL! The last time I wore it the back leg broke off. 


Now it's only made of Shrink Plastic so it's not very thick, it's kinda curved, and very textured. I've glued the leg back, but it may break off again. I decided I need to make a mold of it – so out comes the Amazing Mold Putty! It's perfect for getting the detail and I can add some depth to the pin at the same time. 


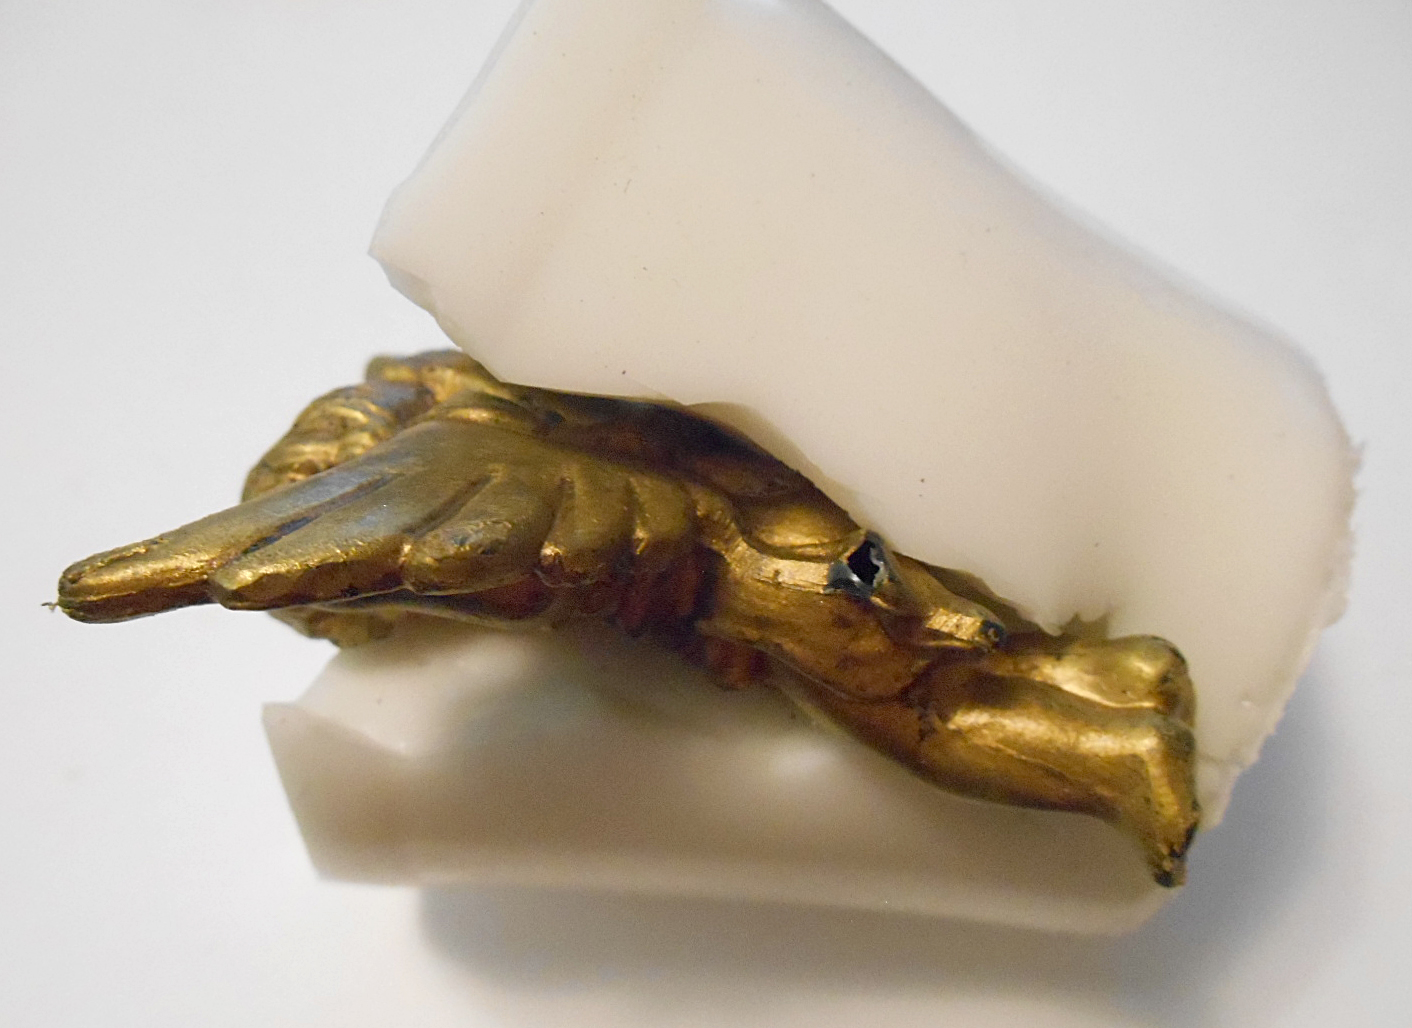
After mixing up equal portions of the 2-part Amazing Mold Putty, I pressed it out on my glass desktop to a pretty thin layer (1/4" or so), then I "rocked" the pin back a forth so that the whole pin made contact with the putty. I did it this way because I wanted the mold to be level and flat. I let this cure (it only takes 10-20 minutes). CLICK HERE to view mixing/preparation.


Now for the resin! Here I used Amazing Casting Resin with a drop of Alumilite Dye in Brown so the final colors would really pop (CLICK HERE to view mixing and preparation). I always have molds on stand-by to fill with "left-over" resin when I mix more than needed. I set aside to cure (again 10-20 minutes depending on the weather).


It worked! The finished Amazing Casting Resin Lizard is still thin but thick enough to be rigid. So it shouldn't snap like the original did.


I glued a pin back to the back with a bit of E-6000® and let that cure for at least 30 minutes – but I let it set an hour just to be sure.

Now comes the FUN part! Using some Metallic Acrylic Paints, I "dry-brushed" the pieces starting with Gold, then Bronze and then Copper (you could use any colors). The paint dries really quick so in just a few minutes, you're ready for the next step... Rhinestones! Yep, Rhinestones!!! I have some of them in several sizes and colors. So I chose some Clear Aurora Boreallis – these reflect the colors perfectly (again, you could use any color). A bit of Black Acrylic Paint for the eyes and my fun, sparkly Fall rhinestone lizard brooch is done!


This would make a great gift for the Holidays!
So glad I didn't throw that little pin away when it broke... LOL.

What broken object could you mold
then cast in Amazing Casting Resin?

Well that's all for now... Till Next Time! Lyn

As usual, you can find more of my work on my blog LynzCraftz
or on YouTube LynzCraftz, or my Facebook page LynzCraftz.

• • • • • • • • • • • • • • • • •

Don't forget to subscribe to our blog on the right side bar:
Twitter at AmazingCasting | Facebook at AmazingMoldPutty | YouTube at AmazingMoldPutty

Friday, July 21

Happy Bird-day!! An Amazing #Cre8time Transformation by Maria Soto


Hi there! Happy BIRD-day! Maria here today to start off the weekend with a fun Cre8time project! You never know when or where inspiration will strike – this project was hatched from Easter!

Some time ago after Easter, I went shopping and noticed these cute tin bird containers that were on clearance. They were filled with some type of hard candy, but all I could think about is how I wanted to make a mold out of the container!!! So I bought two and went home with lots of tasty Easter candy.


I used Amazing Mold Putty for making a mold of my fun bird tin.
CLICK HERE to view instructions for making a mold.


In about 10-15 minutes, my mold is ready to use! Amazing Mold Putty is truly amazing – it works fast and it captures lots of detail, too!


I plan on hand-painting this birdie, so I decided to use Amazing Casting Resin to make my first piece. Follow the easy 1:1 instructions for mixing this resin -AND- keep in mind that it begins to cure very quickly {CLICK HERE to view mixing/preparation}.

**A TIP** This is a fairly large mold, and with larger volumes you will feel it getting hot faster... so make sure your mold is ready for it. Larger pours of Amazing Casting Resin cure quicker than smaller ones will. Keep an extra mold on hand in case you mixed too much resin – you don't want to waste this product.


I used a pencil to draw some patterns to get an idea of what designs I wanted. I could just ink these lines in with a black, gold or silver permanent pen and this would make a lovely ornament. But I plan to add some color!


I always like to paint my pieces with white acrylic first. I find it allows me to use any type of paints I want on top afterward.


For this project, I used an assortment of DecoArt Patio Paints;
simply because I love the bright colors.


Now the fun starts – I get to paint, paint, paint! First I painted the base coat, all green. I just had too much fun painting this little birdie! Once I got started I got carried away, then suddenly all the painting was done {sorry I don't have any photos to share}. 


Then I added some little clear acrylic drops to add more dimension, then used pens to add detail to the bird – giving a bit more color, illusion of dimension to the piece.


Here's a close-up of the head and tail to show the transparency
of the drops – they make the colors underneath POP.


I felt this little bird needed something else, so I glued some green ribbon to the back for hanging. Since I had all these small pieces of foil paper from Rinea, I thought, "why not give this pretty bird a fun party hat"... and here I give you the finished piece!

You are a little party animal,
you little birdie!


I hope I have inspired you to have "FUN" with these amazing products. I always do, they allow me to get really creative, they allow me to imagine and create!

What would you reimagine using
these Amazing products? 

Thanks for visiting! I invite you to stop over to my blog, "What is Creativity"
 at http://chuy-creativity.blogspot.com to see more of my creations. ~ Maria Soto

• • • • • • • • • • • • • • • • •

Don't forget to subscribe to our blog on the right side bar:
Twitter at AmazingCasting | Facebook at AmazingMoldPutty | YouTube at AmazingMoldPutty

Wednesday, March 29

Quench your #Cre8time Thirst... AMAZING Inspiration from Kristie Taylor


Hello crafty friends! Kristie here today to share some AMAZING inspiration with you – some DIY custom hardware I've fashioned out of Amazing Casting Products.

Sometimes you need a pipe... a rusty pipe that is. After some failed attempts I decided to make my own using Amazing Mold Putty and Amazing Casting Resin!

Can you believe I turned this... into THIS?!


I was amazed at how easy it is to turn a bendy straw into a rusty pipedream! All it takes is a few simple steps with Amazing Casting Products and a little rusty paint to create a beautiful art journal cover like this...

Steampunk Dream!


To see how I created the hardware I needed for this project, including all the yummy textured details... CLICK HERE to jump over to my blog The Scrapinator.


What amazing things will you create
with bendy soda straws??!

Thank you so much for stopping by today! Kristie

To see more of my work, please visit my blog, "The Scrapinater", 
over on my YouTube Channel or on Instagram.

• • • • • • • • • • • • • • • • •

Don't forget to subscribe to our blog on the right side bar:
Twitter at AmazingCasting | Facebook at AmazingMoldPutty | YouTube at AmazingMoldPutty

Thursday, September 8

Tis the Season for #Cre8time... Christmas Tree Ornament REDUX by Lyn Gill


Hi All! Lyn Gill here again with an Amazing Mold Rubber project for you. First of all I know it's not quite time to start Christmas projects, but I always wait till the last minute to think about how I'm going to decorate my tree. This year I decided to start early... LOL! 

I started with an old hollow decoration from a wreath I had dismantled. He's cute but I wasn't too wild about the color. I needed to make many of them so Amazing Mold Rubber was the answer. 


In a disposable plastic cup I molded the little cherub with the Amazing Mold Rubber and let it set up. CLICK HERE to view mixing/preparation.


As you can see I sliced the side of the mold to aid in release. Before pouring resin, I wrapped a rubber band around outside of mold to keep mold closed tight. I filled the mold with Amazing Casting Resin and let it set up. He turned out so cute! I was actually shocked when I de-molded him!


Original...


Amazing!

Now he's adorable isn't he?! I painted him a lovely Turquoise color then added some crackle glaze and a bit of clear glitter on the wings. 

What will you mold with
The possibilities are endless!

Well thanks so much for stopping by today... 
Till Next Time! ~ Lyn

You can also find me on my Blog LynzCraftz
on my  Facebook page LynzCraftz
or on my YouTube channel LynzCraftz.

• • • • • • • • • • • • • • • • •

Don't forget to subscribe to our blog on the right side bar:
Twitter at AmazingCasting | Facebook at AmazingMoldPutty | YouTube at AmazingMoldPutty

Thursday, February 25

#Cre8time Alterations... DIY Thrift Store Frame Redux by Lyn Gill


Hi all! Lyn Gill here again for with a DIY project – an Altered Framed Owl. I bought this frame at the thrift storeand it was a worn, scratched yellow color, and very unattractive. By just using some Amazing Casting Resin, black Gesso, crackle glaze and metallic acrylic paint I was able to completely transform it.


I decided to use some Amazing Casting Resin to create the Owl using an Amazing Mold Putty mold I created for a previous project... Oooo I can see it coming along nicely.

I used the black Gesso and Crackle Glaze in it as well as some Gold Leaf Flakes & the Metallic Acrylic Paint... WOW did it transform this thrift store frame!


I can't wait to hang it in my Craft Studio!
I do have a love for all things metallic... LOL.

What kinds of thrift store finds could
you alter with Amazing Casting Resin?

Well thank you so much for joining me today
with Amazing Casting Products... Till Next Time! ~ Lyn

You can find more of my work on Facebook Page LynzCraftz,
on YouTube atLynzCraftz, as well as my blog LynzCraftz.

• • • • • • • • • • • • 

Don't forget to subscribe to our blog on the right side bar:
Twitter at AmazingCasting | Facebook at AmazingMoldPutty | YouTube at AmazingMoldPutty

Tuesday, December 1

Address your Home Digits... 12 Days of Home Decor #ACPthrowback


Hello Amazing Crafters! For day two of our 12 Days of Amazing Home Decor we revisit a project by creative Lonnie Sexton. We are always thinking about how to improve things inside the home... and Lonnie has come up with a creative way to customize and light up the numbers on his home.


Lightbulb moment!!! With Amazing Casting Products Lonnie had an idea to address the outside of his home and make a plaque for his house that lights up at night. Since he only needs to cast one finished project, creating a permanent rubber mold really isn't necessary. Enter Amazing Remelt – a one step, easy-to-use molding product that's reusable... and a great option for one-off casting projects! CLICK HERE to view how it works.


Using Amazing Clear Cast Resin and Amazing RemeltLonnie created this custom address plaque that he backed with a solar yard light. This is so lovely in clear, but think of the possibilities by adding color with Alumilite Dyes or Metallic Powders!

What would you cast in Amazing Remelt
for updating your home decor?

• • • • • • •

Share your creations using Amazing Casting Products for
our next #ACPthrowback Third Thursday on December 17.


Post them to our Facebook page, or tag us on Instagram, Pinterest, and on Twitter to be featured here on our blog. We'll be looking for your projects with the hashtag #AmazingCastingProducts.

• • • • • • •

Don't forget to subscribe to our blog on the right side bar:
Twitter at AmazingCasting | Facebook at AmazingMoldPutty | YouTube at AmazingMoldPutty

Thursday, December 11

From TCHOTCHKE to Functional - Holiday Edition... by Tanya Ruffin


I frequent the local dollar store and on a recent visit I saw badly painted excuse for a nativity. Which inspired today's edition of "From Tchotchke to Functional" using Amazing Casting Products!


So of course I had to grab it up to see what I could make of it.


Using Amazing Mold Putty I made a mold. The original was more cone shaped and I knew the mold would give me a flat back. This was perfect because my plan was to glue two castings back to back!


After casting 2 pieces with Amazing Casting Resin, I painted both with black acrylic paint and then went over them with silver Rub 'n Buff®.


I then glued the lower half of the two pieces back to back with E6000® adhesive and placed a rubber band around the bottom to secure overnight.


Once it was dry you can slide a photo or, in this case, a card into the slot.

Now it looks nothing like the original piece!


What do you see when you
look at tchotchkes?

Good Luck and Craft Your Own Way! ~ Tanya


Tanya Ruffin with Create Studios

Please visit my site to see more of my inspiring creations at www.tanyaRuffin.com


Tanya Ruffin for tanyaruffin,com

Create Studios Baton Rouge

• • • • • • • • • • • • • •

Don't forget to subscribe to our blog on the right side bar:
Twitter at AmazingCrafting | Facebook at AmazingMoldPutty | YouTube at AmazingMoldPutty
Related Posts Plugin for WordPress, Blogger...