Showing posts with label Creative Paperclay. Show all posts

Saturday, May 28

#Cre8time Garden Play... Teeny Tiny Fairy Doors by Maria Soto


Hi there! I want to share a cute little project I made... it reminded me how much I love getting my hands dirty as I create fun crafty items.

I joined a swap group a few years ago, we always do jewelry, but this time I was asked if I wanted to take part of the fairy garden swap and I accepted the invitation. CLICK HERE to jump over to see my owl charms, and HERE for the Star Wars themed charms I made for previous swaps.


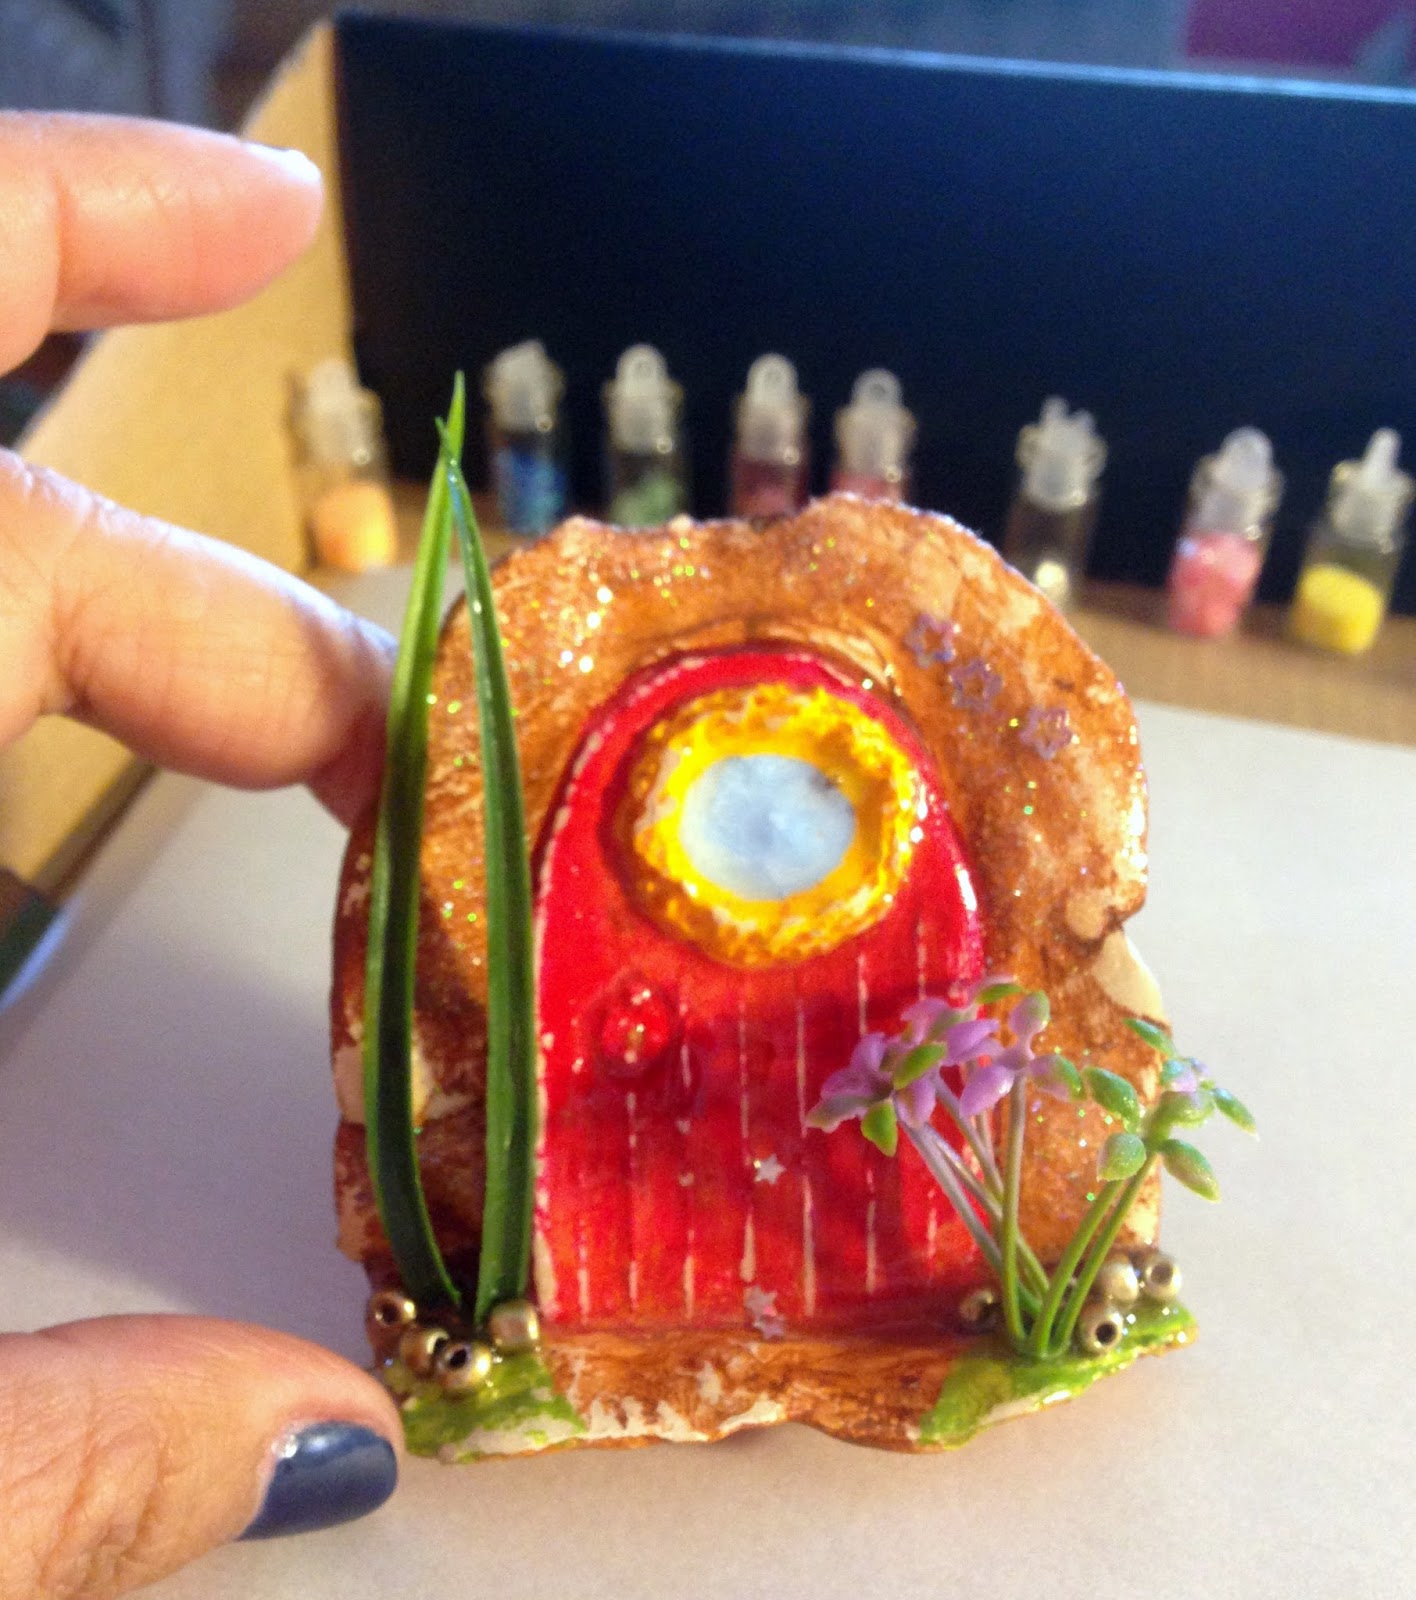
We had to make tiny doors and a window. I decided to make the door with a window, just didn't know how. After a lot of thinking and a few craft fails, I went to the craft store and I found a section of tiny miniatures for fairy gardens. I had no idea they had these available, so I purchased a door. I decided to use Creative Paperclay® to make an impression of the door only – and then I added the remaining details by hand.

The door I purchased had a tiny butterfly on it, it was cute but I decided to add a window in it's place. Once the doors were done with their new windows it was time to let the clay dry over night. Next I hand painted each with acrylic paints. To finish them up, I added some sparkle and a bit of flowers to decorate each tiny door.

I also had to make these safe for outdoor use, so I used Amazing Clear Cast Resin to seal the paper clay... and at the same time used it as glue to add all the glitter, beads and tiny plants/flowers. Just a little bit of resin was enough to finish up these tiny houses – I love how glossy they look thanks to the resin.


Here you can see one of the tiny doors all painted,
ready for the final embellishments.


I applied the resin all over the piece and then added beads
to serve as tiny rocks around the plant and flowers.


Here are the finished doors, all ready to go to their new homes.
It's great when you have a product that you can use in so many different ways.


I really like these tiny little doors – adding the trim on the doors, and the tiny windows to make each door different and unique. I loved how the Amazing Clear Cast Resin not only allowed me to make these outdoor safe, but I think the glossy finish makes the texture, the color, and the little details really POP.

What would you create for your fairy garden?

I hope I have inspired you to find new ways to use this amazing resin, the more I play with it the more creative fun I have. These little doors are ready to welcome some fun fairies. Share your ideas with us, we'd love to see how creative you are with Amazing Casting Products.

Thanks for visiting! I invite you to stop over to my blog, "What is Creativity"
 at http://chuy-creativity.blogspot.com to see more of my creations. ~ Maria Soto

• • • • • • • • • • • • • • • • •

Don't forget to subscribe to our blog on the right side bar:
Twitter at AmazingCasting | Facebook at AmazingMoldPutty | YouTube at AmazingMoldPutty

Monday, November 16

PIN IT! or ZIP IT! May the #Cre8time Force be with You... by Maria Soto


Hi there! Today I want to share some fun jewelry I made. With the Star Wars movie coming up soon, I'm participating in a charm swap that is all about this movie. We were asked to create anything related to this movie. I was at Michael's getting some art supplies for my son, and I noticed a sticker book about Star Wars... and then the idea came! Why not make some pins – hey you can wear them on your clothes, jackets, book bag, hat, scarf, you name it. 


I decided to use a mold I previously made using Amazing Mold Rubber. I like the shapes of this mold because it was the perfect size for the stickers and for charms to wear. You can CLICK HERE to see how the mold was created from a recycled item.

This time around I used the Amazing Clear Cast Resin to make my pins. I really like how the size of the stickers and the molds were a perfect match. Follow the directions on the box or CLICK HERE to see how to mix and use Amazing Clear Cast Resin. 


After mixing a small amount of the clear cast resin, I added just a tiny amount of resin to the bottom of each mold using the mixing stick, then tore up a piece of black tissue paper that had gold glitter, thought it was perfect to give them a look of a dark galaxy sky/background, it was not intended to cover the entire bottom of the molds, I still wanted for the resin to be visible from the back. Next I covered the tissue paper with a bit of resin again, waited just a few minutes, added the stickers, and poured resin all the way to the top of the mold. 

I had these tiny little watch parts I had purchased a long, long time ago, to try and make some Steampunk projects but I never did – so I thought why not add a few tiny pieces to the front of the pins. Before the resin cured completely, I added the tiny clock pieces to each pin, then left them alone until the next evening, when I got home from work. 


The resin has cured completely. What I love the most about Amazing Mold Rubber is the flexibility – it makes removing your resin pieces from the molds so easy. I mixed up a very small amount of Amazing Clear Cast Resin – to use it as glue to add the pins to the back of my resin pieces. There's no better product for me to secure my jewelry than with Amazing Clear Cast Resin, as it creates a permanent bond. With the pins added to my resin castings... I'm just waiting for the resin to cure over night and the pins will be ready to be worn. 


The top row shows the front of the pins – see how the tissue paper is only in some areas, and you can still see the clear resin, which is what I wanted. Look at the fun clock parts on the front side of the pins! You can also see the backs of the pins. These are so cute and so light and they will be fun to wear. I have a few extra that I'm going to send to my brother – he loves Star Wars and I know he would love to get a couple of these pins. 


I wanted to add an extra piece so I made some zipper pull using more stickers. These are fun too as they are double sided. I took some Creative Paperclay® to make the circles by hand – they are not perfect, which is what I wanted. I could have made molds and then add the clay and so on, but I loved getting my hands dirty... plus I also used this product to create my ATC's so my hands were already dirty. Once the paper clay was dry, I added the stickers on both sides painted the paper clay, and then I took some of the Amazing Clear Cast Resin to seal the paint and the stickers. A fun and simple project idea that I hope everyone likes.


I love how the resin on these zipper pull charms makes the colors of the paint brighter... and I love the shiny effect that almost makes you think they are encased in glass, and they are also very light. 


I really hope everyone likes these fun resin charms and pins, I know I loved making them, I think I'm going to have to make some Holiday charms like these to give to my nephews and niece as gifts. 

What charming things do you

Share your projects with us, we love to see what
everyone creates with Amazing Casting Products.

Thanks for visiting! I invite you to stop over to my blog, "What is Creativityat http://chuy-creativity.blogspot.com to see more of my creations. Maria Soto

• • • • • • • • • • • • • • • • •

Don't forget to subscribe to our blog on the right side bar:
Twitter at AmazingCasting | Facebook at AmazingMoldPutty | YouTube at AmazingMoldPutty

Wednesday, December 24

I'm #Cre8time Dreaming of a White Christmas... or an AMAZING Melting Snowman by Rachel Whetzel

Hello, Amazing Creatives! Rachel Whetzel here... :::sigh::: with my LAST 'How To' post here on the Amazing Casting Products blog for a while!! Susan has asked me sneak on here and there when I have something to share with you, but I won't be posting regularly. I'm taking a break from a couple of my design teams to spend HUGE amounts of time watching and keeping books for basketball, and otherwise being suuuuuper busy. I appreciate all the love and support that you all give to the designers here! Of course, I won't stop creating, farming and generally misbehaving. If you'd like to keep up with me on my other interweb haunts, I would love that. There are links to help you do that at the end of this post, BUT FIRST!! 

You might think that something as simple as a melted snowman would be just that. Simple, right? Oh ho ho ho no!! It's totally NOT as simple as I thought, but it's definitely something I want to do again, and now that I have done it, I can share with you what I learned so that YOU can learn from my mistakes, and your project WILL be simple! How's that for a Christmas present!? 


HERE'S WHAT YOU'LL NEED
TO MAKE A MELTED SNOWMAN:

  • Amazing Casting Resin
  • Amazing Mold Putty curing mat (I made mine by rolling some Amazing Mold Putty thinly, and allowing it to cure). Please CLICK HERE for more detailed instructions on how to mix Amazing Mold Putty.
  • Multiple mixing cups and stir sticks because each layer of resin you pour will require a fresh set. If you wanted to, you could make a cup out of Amazing Mold Putty, and pop your cured resin out between batches. This would mean you only needed a new stir stick. Unless you made one of those too! 
  • Paints 
  • Fake Berries (I got mine at the Dollar Tree) 
  • Ribbon for a scarf
  • Glue
  • Glitter

To get started, you need to assemble all the pieces of your snowman! I guess I could have sculpted some arms for my snowman, but I really wanted some really stick looking arms, so I used a piece of a branch of berries that I bought at the Dollar Tree.


I pulled the berries off of the branches, 


cut them off of the main piece to make two "branches" and spray painted them black. 


Then I got to work making the top hat, eyes and mouth, and carrot nose from Creative Paperclay®. I used a toothpick to add texture to the teeeeeeny tiny balls for rocks, and to add lines to the carrot nose. When they were all dry, I sanded the hat to perfect it's shape, and painted them all with craft paint. I also frayed the ends of my ribbon to make it look like a scarf. 

Once all my snowman bits were ready, I mixed small batches of Amazing Casting Resin, which cures white. I poured it out in layers, and had to work EXREMELY quickly for each layer, so I could not get photos of the process, but I will do my best to explain what I did. 

THE PROCESS...

  1. Make sure that your work surface will release from your cured resin. I have made a simple mat out of Amazing Mold Putty for this purpose. 
  2. Mix your first batch of Amazing Casting Resin
  3. Stir your resin, and as it gets how, you will also see it start to get thicker. This process takes only a few minutes, because stirring speeds up the cure. As your resin starts to get warm, pour a puddle onto your mat. 
  4. Keep stirring, and as your resin gets hotter and thicker, pour another bit onto the top of your first puddle. This layer will set up faster than the first, and be slightly raised. 
  5. Repeat this process to build out your "melty" base shape. 
  6. You'll probably notice that there are some lumps and bumps in your layers that don't look particularly melty. (You can see an example of this in my photo near my snowman's left "arm") Don't worry about them too much. Our last layer will be different than how I actually did my piece, and this will fix some of the issues I had with my snowman, and make YOUR snowman much easier. 
  7. Get ALL your pieces ready to place onto your last layer of resin.
  8. Mix up one last batch of resin, and pour it when it just starts to get warm in your mixing vessel. Pour it in a thin layer over the top of your entire piece, and get to work placing your snowman bits onto the uncured resin. 
  9. Allow this last layer to flow over the edges of your base layers, to create the most realistic melted look. 
  10. BEFORE YOU LAST LAYER CURES: Quickly place the eyes and mouth first, then your hat and arms, and then your scarf.* Dribble some resin atop your hat if you'd like, to create a melting snow effect on your hat. Allow everything to cure in place. *If you run out of time for this step, and your resin has cured before you can finish, another layer of resin VERY thinly over the top of your piece will give you the time you need. 
  11. Once your piece has cured, use some glue and glitter around the piece to create a frosty look!
  12. Peel everything off of your curing mat.  

Now you have a melted snowman that will last much longer than the real thing! This little guy would go great with a cute saying like, "Some people are worth melting for..."


Thank you for reading! Want to keep up with me on the interwebs?
Visit me on PINTEREST and INSTAGRAM, or like MY PAGE on Facebook!
Thanks for stopping by! ~ rachel

• • • • • • • • • • • • • • • • •

Don't forget to subscribe to our blog on the right side bar:
Twitter at AmazingCrafting | Facebook at AmazingMoldPutty | YouTube at AmazingMoldPutty

Saturday, November 2

Fall Breezes Welcome in the Holiday Season... AMAZING Inspiration from Susan M. Brown {sbartist}


Welcome to November! Susan here to share some inspiration today. Now that Halloween is over, I am moving ahead to Thanksgiving and Christmas crafts. This winter wonderland tag is made using the same techniques as my Halloween Tag from a few days ago... just using a different a color scheme and elements... and of course some Amazing Mold Putty too!


I needed a frame I didn't have one on hand... BUT... I do have a Viva Las VegaStamps! lacy oval frame stamp (Doily #18849) that would be perfect. So I'm got out my Amazing Mold Putty and made a border mold with my stamp.

**WARNING**

You need to thoroughly cover your stamp with petroleum jelly to protect your stamp - the rubber of the stamps and Amazing Mold Putty touching are reactive with each other. Watch closely and limit the time of stamp in contact with mold putty and remove it as soon as curing is completed.


As you can see here with stamp removed from mold. Some of the Amazing Mold Putty has stuck to stamp, which I cleaned off with soap and water immediately so the detail of my stamp is not clogged up and to stop any reaction the two compounds may have.


Now with a mold of my decorative border stamp - I filled it with Creative Paperclay® and let it cure. When paperclay is dried I inked and covered with Ranger Embossing Ink and heat embossable glue powder; then dredged in Antique Linen Distress Glitter. I went back with Vintage Photo and Broken China Distress Inks to add some depth and color to the edges.

Welcome to a Winter Wonderland...


Layered on a collaged background using several of Viva Las VegaStamps! images; stamped glittered snowflakes and matching icicle chipboard... all tied off on top with a sheer organza ribbon hanger!

What are you Molding and Casting
for use on Holiday Projects?

If you would like to see more of my creations,
please visit my blog sbartist : painting in the dark by clicking here.

Thanks for stopping by and have a fantastic day! ~ Susan :)
.................................

Don't miss a single post!
Please subscribe to our blog on the right side bar:
Twitter at @AmazingCrafting | Facebook at AmazingMoldPutty | YouTube at AmazingMoldPutty

Monday, July 29

AMAZING Inspiration You've Never Thought Of...
by Rachel Whetzel

Hello, AMAZING people!! Rachel Whetzel, here again to show you my latest inspired piece! I am a farmer. I have milking goats, and I make cheese and butter with their milk. I also have a registered herd name, that uses a monster that my husband and his brother imagined up when they were kids. They called it a MigMog, and when our own kids were little, Uncle Trever was kind enough to terrorize our middle son with thoughts of the terrifying beast. Eventually, we decided that MigMogs weren't really so terrible, and that they behaved like mischievous kids, and smelled like stinky farts. When he was about 6, our middle son drew a picture of what he imagined the MigMog to look like, so when we named our farm MigMog Acres, I decided to design my logo using my son's picture.


Then I got the idea to create my own custom butter and cheese stamp with that logo on it, using Creative Paperclay® to sculpt the logo, and then make a mold/stamp with the FOOD SAFE Amazing Mold Putty!! Here's a picture of what my butter looks like imprinted with the stamp I made!


What food safe products have YOU made using
Amazing Crafting Products?

Please share your projects in the comments below! If you create something inspired by my idea, please leave a comment with a link here, so I can come and visit to see! I would love for you to visit me at my "house" too!! Thank you so much for reading!! ~ rachel

.................................

Don't miss a single post!
Please subscribe to our blog via email on the right side bar:
Twitter at @AmazingCrafting | Facebook at AmazingMoldPutty | YouTube at AmazingMoldPutty

Monday, May 27

AMAZING Inspiration from Sandra Strait... Fisherman's Paradise Brush Holder

Happy Memorial Day all! Sandra here today to bring you some out-of-the-box inspiration today. I take daily vitamins, which means, every month I end up with a cool container of a goodly size, perfect for crafting!

I've been piling them up (or giving them away) waiting for inspiration to strike, and when I saw these Mylar sheets in a local craft store, inspiration struck! BANG!!! So, I glued the Mylar sheets onto the containers.

Then I cut illustration board and a textured shelf-liner into the shapes of three fish. When I cast them in Amazing Casting Resin, I used a mixture of Alumilite Metallic Powders dusted into my molds, so I'd have a clutch of colorful fishies.


My tip for today: Illustration board makes a good base for a shallow mold. If you have an object too thin to mold by itself or want to create your own object, cut the illustration board into the shape you want and glue or tape thin objects to it. Shelf liner, drywall tape, micro-marbles – the list of items that can add texture is endless! Then just press it into your Amazing Mold Putty.


I always keep the bits and pieces of resin that overflow my molds, and I used these to create the ripples of water and added lace at top and bottom to finish off the container. 

Voilà, I had a Fisherman's Paradise brush holder!


For more of my work in Amazing Mold Putty, zentangle-inspired art, and daily links to tangles, tutorials, and giveaways please visit my "Life Imitates Doodles" blog.
~ Sandra Strait
.................................
__________________________________________

Don't forget!! We have a COUPON to shop at the Amazing Mold Putty
website HERE and receive 20% OFF your purchase.
Please use coupon code " amazingmay " {no quotations}.
Coupon expires May 31, 2013.
__________________________________________
.................................

Want to SOCIALize? Please follow Amazing Crafting Products on Twitter at@AmazingCrafting and on Pinterest HERE -or- join us on our Facebook page.

Thursday, May 9

Molding a Button Fairy – a Mixed-Media Fantasy Masterpiece by Guest Designer Sandra Strait


Greetings! Sandra here today with a fun and whimsical project with a Steampunk twist. Last month there was a call for a button fairy swap hosted by Viva Las VegaStamps! When joining this swap, I knew I wanted to create a 3D button fairy. The technique of watercolor painting with rice paper glazes also beckoned. And the translucence of Amazing Clear Cast Resin provided a perfect way to combine the two. I'm sharing all the creative details so hang on tight for the creative journey ahead!


Supplies:

Amazing Mold PuttyAmazing Clear Cast Resin; Stamps from Viva Las VegaStamps! used – Steampunk Dog Face - Item 18669, Tall Tree - item 14917, Whimsical Cloud - Item 19091Creative Paperclay®; May Arts Ribbon; 140 lb .watercolor 8x20 inches; Silk tissue Rice Paper-Natural; Unryu Paper-Natural and Brown; Illustration Board; 9" x 12" 300 lb. watercolor paper; Faber-Castell gel sticks – Lt Blue, Black, Sienna, Orange, Yellow, Green; Acrylic Paint – Metallic Copper, Metallic Crystal Green, Metallic Black Pearl; Krylon Pale Gold Leafing Pen; 5 Buttons of various sizes; Sakura Gellyroll – Metallic Gold, White; Lyra Rembrandt Polycolor Colored Pencils – Lt. Blue, Lemon Cadmium, Canary Yellow, Dark Sepia, Prussian Blue, Gold Ochre; Scissors; Thin wire; StazOn Inkpad – Jet Black, Saddle Brown; Golden Soft Gel Matte and Heavy Gel Medium Matte; and E6000 adhesive.

The Molds


First I stamped the image I wanted for my wings onto a piece of illustration board. Then I flipped the stamp over and stamped the back. I wasn't interested in the detail, just the shape. I stuck a piece of sticky drywall tape over the images for some texture, cut them out, and created a mold.

Amazing Mold Putty comes in two parts, Part "A", which is a white putty, and Part "B", which is yellow putty. I took enough of each to allow for a mold that would hold both wings and mixed the two parts together until the whole ball turned yellow and then pressed my wing pieces into the putty.


I also used molds I had already made, one from rolled paper roses, a star-shaped piece from a shower curtain embellishment, and a machine piece that I found lying around. What it is I do not know, LOL!

The Casting


Amazing Clear Cast Resin also has a Part "A" and Part "B". Equal amounts of both are poured out and then mixed together. For detailed instructions on mixing Amazing Mold Putty and Amazing Clear Cast Resin please CLICK HERE.

My wing mold was so shallow that I didn't even attempt mixing a specific amount. Rather, I lined up all the molds I would be using, plus a couple intended for other projects and mixed a rather generous amount. I filled all the molds needed for my button fairy, and had a casting of some dried fungus left over. I trimmed off all the excess resin overflow and set it aside to be used as foliage for my flowers. 

The Background


Using my gel sticks (which are the cheaper version of Gelatos), I swiped color onto the watercolor paper, and spread the color with generous amounts of water. I added more color, then more water, smearing with both brush and finger until I was happy with the result. 

With the StazOn Saddle Brown Ink, I stamped the Tall Tree image several times across the page, re-inking after every 2 or 3 stampings. Then I smeared a little more green gel stick around the foliage.

I tore a few strips of the Unryu paper and decoupaged it with Soft Gel where I most wanted to lighten (natural) or darken (brown) the color. It's a bit thicker than the silk tissue paper, and also has these thick threads that create really cool patterns when you add the gel medium.

I repeated the process with the silk tissue rice paper building up texture and a glaze that gives the piece a hazy, mystical look. 

Once all the soft gel had dried, I added more gel stick where I wanted to increase the intensity of the color, and to highlight some of the threads from the Unryu paper (It's pronounced Oon-Roo or Oon-Doo).

Matte gel was used rather than glossy because I wanted to photograph the piece, and glossy shine is hard to do. I was happy with the matte though, because it gave a softer, mistier look.

The Button Fairy and Flowers


I stamped the Steampunk Dog Face onto a piece of Unryu Paper, cut it out and colored it with colored pencils and gel pens. Then after rolling some Creative Paperclay® to a thin layer about the same thickness as my resin wings, I took the same stamp and pushed it into the paperclay, then trimmed around it. 

When the paperclay had cured, I used Soft Gel to adhere the Unryu image over the paperclay. I painted the resin wings with acrylic paint, and picked out the drywall tape texture with the gold leafing pen.

To assemble the button tail, first, I wove a piece of thin wire through the buttonholes to make it stiff. Then I wove ribbon through, using it to tie the tail to the paperclay fairy. I used heavy gel to stick on the wings, and then adhered the entire fairy to the background.


Detail of the corner embellishments.


I used a touch of acrylic paint to color the flower castings. I wanted to keep the translucency, so I just brushed on enough paint to add a bit of color. 

Putting it Together

I laid my button fairy and flowers on the watercolor painting and moved them around until I knew where I wanted them to go. I realized immediately that my painting wasn't large enough. I wanted a stiffer support anyway, so I painted up a 9" x 12" 300 lb. piece of watercolor paper with metallic black pearl.

Heavy gel medium was used to adhere the Button Fairy because of the weight. Because the flowers were resin, I used E6000 to adhere them. I went back to the Heavy gel medium to adhere the whole piece to the 300 lb. watercolor paper.

Voilà! I have a whimsical button fairy
flying across a mystical landscape!

Thanks for visiting today! For more of my work in Amazing Mold Putty, zentangle-inspired art, and daily links to tangles, tutorials, and giveaways please visit my "Life Imitates Doodles" blog.  ~ Sandra Strait
.................................
__________________________________________
.................................

For both written and video instructions showing how to create Amazing Mold Putty molds, and cast resin objects, please visit the Amazing Crafting Products library.

Tuesday, May 7

Fabulous Faux Enamel Feather Earrings with
Guest Designer Brenda Burfeind


Good day! Brenda here and I want thank Susan for inviting me back to show off some projects I've been making since leaving the Amazing Mold Putty Design Team. I was one of the original designers for Amazing Crafting Products and loved every minute of it.


Since leaving the team, I still continued to use Amazing Crafting Products because these products are ultimately the best. I love the fact that I can create almost anything I want. The molding putty is my all time favorite and of course I love using the Amazing Casting Resin and the Amazing Clear Cast Resin to create those embellishments. 

So today I wanted to create some feather earrings that I had seen on Pinterest a while back. I started out with some Creative Paperclay®. I cut the clay in a oval type shape and using a bamboo skewer I added some lines to create those feather like looks. Press your bamboo skewer into the clay to make those veins. It really has great dimension. Once the piece is dry, you can use a nail file to smooth out the edges if you want or need to.

Once the piece dried I then prepared the feather to be encased in Amazing Mold Putty to create the mold. I added some vaseline to the paperclay "feather" as a release to make sure it would not stick to the mold putty. Better safe than sorry I always say.


I took two equal parts of the mold putty and blended them making sure there were no white streaks showing. You have a couple of minutes to get it good and blended. Then I pressed the clay feather piece into the mold putty and let it sit for about 10 minutes. I usually press my fingers slightly into the edge of the mold to make sure it's really good and hard and then I slowly pulled the clay piece out of the mold. Be very careful as the clay piece could break when taking it out of the mold. I will use the clay piece in a scrapbook layout or maybe for embellishing a card.


I created the earrings with the Amazing Casting Resin and Gold Alumilite Metallic Powder. Add your Alumilite powder to your part "A" and mix well. Then pour your part "B" into your part "A" and mix again. You only have a few minutes before it wants to set up, so make sure you do this quickly.

After the pieces were cast, I added some black rub and buff to tone down the gold. I also sealed the pieces with some Sakura 3-D Crystal Lacquer and placed a few iridescent pearls to the "feathers". Now I have two perfectly matched feathers. I used my Crop-A-Dile to create the holes for the earring wires, it goes through the resin piece very easy. I added a couple of jump rings and the earring wires and now I have a great pair of earrings.


Thank you for stopping by today. I hope you've enjoyed my feather earrings tutorial and I cannot wait to share my next project! You can always find me here to see what else I create.  ~ Brenda Burfeind

.................................
__________________________________________
.................................

For both written and video instructions showing how to create Amazing Mold Putty molds, and cast resin objects, please visit the Amazing Crafting Products library.

Sunday, April 21

AMAZING Inspiration from Sandra Strait...

I’m so excited to be a guest designer for the Amazing Crafting Products Creative Team! I was asked to do an inspiration post, so I’m going to try and make you as excited about these products as I am.

For my sister-in-law’s birthday, I wanted to give her something practical that was still a work of art. I happened on a spiral-bound notebook of window envelopes. Merri’s always looking for things to put her papers in, so I knew this was perfect for my project.

A magazine page from an old quilting magazine, a layer of Amate woven bark paper, and oh, so many objects-watch parts, screws, shower rings, beaded bracelets, plastic packaging – all molded in Amazing Mold Putty and created with Creative Paperclay®. Twine, fiber paste and drywall tape were added for contrast and this functional book of envelopes looks like a treasure trove washed up on a sandy beach. Now I just have to decorate each envelope with tangle patterns, and she’ll have artful inspiration for every day.


Now the great thing is that I can easily recreate this cover and make similar gifts for other people! I like that. Inspiration gets stretched around Christmas time and I love ideas I can retread.

My tip for today: If you are looking for something to mold (and once you start, you’ll keep looking!), consider breaking something you don’t need. Seriously. I don’t recommend breaking glass or items that splinter, but pop open those old watches, break off a piece of coconut shell, tear up that old crafting project and mold those rolled paper roses you made long ago. Look beneath the surface and you’ll find textures, and objects that you never dreamed were there.

For more of my work in Amazing Mold Putty, zentangle-inspired art, and daily links to tangles, tutorials, and giveaways please visit my "Life Imitates Doodles" blog.   ~ Sandra Strait
.................................
__________________________________________
.................................

Want to SOCIALize? Please follow Amazing Crafting Products on Twitter at @AmazingCrafting and on Pinterest HERE -or- join us on our Facebook page.


Friday, September 28

Amazing Mold Putty will Light Up my Halloween Party!


Happy FRIDAY!!! Susan here with another "AMAZING" adventure with Amazing Mold Putty. As September comes to a close everyone is in a Halloween creating frenzy. So today, I am making some spooky decor for the Holiday - AND - I have a TRICK and a TREAT to share.


What do you do with a blank light switch plate and some of last year's leftover Halloween party favors??? You create a spooky lightswitch plate using Amazing Mold Putty...of course!!!


The TRICK...cast a light switch plate using Amazing Mold Putty and cast in Creative Paperclay. The TREAT: at the end of this post there's a special coupon for Amazing Crafting Products...enjoy!!!

Supplies needed: a light switch plate, hot glue gun, your choice of halloween favors {I'm using skull rings and spiders, masking tape, Amazing Mold Putty and Creative Paperclay®.


I wrapped torn pieces of masking tape onto the light switch plate to add texture, making sure to wrap around the backside and burnish edges. I cut off the rings sections on the skulls, then using hot glue, I adhered skulls to the corners and finished off with a plastic spider. ** A TIP ** Be careful when applying hot glue to these plastic parts...it's very easy to melt them.

Now for the FUN to BEGIN! I got out my Amazing Mold PuttyIf you would like to see a more in depth how-to of mixing Amazing Mold Putty please click here. 


I begin by taking equal parts of Amazing Mold Putty parts "A" and "B" and gently mix together both parts, working quickly so that the colors are evenly mixed together with no striping. Then I press the Amazing Mold Putty around the switch plate gently pressing it around the item and sides. I let the mold sit and cure for about 15 minutes until it's no longer warm and then I'm ready to use my mold.


NOW FOR THE CASTING!
Today I am molding with a fun product called Creative Paperclay®


Creative Paperclay® is an air dry modeling material that can be sanded,
painted and also cast in Amazing Mold Putty.


I pressed the paperclay into my mold and leveled it out flat to meet the edges of the mold. I let the mold dry overnight before attempting to remove. Then I gently removed from mold to let paperclay finish drying out {which can take 2-3 days depending on temperature and humidity}.


I really love the distressed plaster texture that you get from the paperclay. I'm getting an early start on making these, too. I have to make several of these blanks to be decorated by my nieces and their friends at their annual Halloween birthday bash. Isn't that a fun idea!

Want to see how I've completed this?


Tomorrow, myself along with the entire Amazing Mold Putty Design Team will join the Creative Paperclay® Team for ... 


Please CLICK HERE... This Bloghop begins at the Creative Paperclay® blog and will feature even MORE HALLOWEEN inspiration using Amazing Crafting Products and Creative Paperclay® - even prizes. Check it out on Saturday to see how I've finished this ghoulish lightswitch plate!

HERE'S Your Halloween TREAT!!!


Use coupon code AMP20 to receive 20% off your order.
Coupon expires - Sept 30, 2012

I hope you enjoyed today's project and all of the projects I have created during my time with the Amazing Mold Putty Design Team. I have had a wonderful year creating with Amazing Crafting Products and I look forward to what the new Design Team dreams up. Amazing Mold Putty has changed my creative life and I will continue to use it in my toolbox forever! If you would like to continue to keep up with me and my creative adventures - please visit my blog sbartist : painting in the dark by clicking here.

Have a fabulously creative day! Sb : ) 
Related Posts Plugin for WordPress, Blogger...