Showing posts with label Winter. Show all posts

Sunday, December 24

Frosty in a #Cre8time Winter Wonderland... by Michele Kosciolek


Holiday crafting is my FAVORITE! And in Michigan winter is a holiday! Michele here today to share some wintery molding fun!


I used Amazing Mold Rubber and Amazing Casting Resin for the snowman in this festive lantern. I started with a ceramic ornament and molded it in Amazing Mold Rubber. First, I need to build a moldbox...


I hot glued him to the lid of the rubber container.


Next, I used some cardboard from a box I received some crafty goodness in to create my mold box. I created a cylinder shape and secured with tape – leaving at least 1/4" around all sides of the snowman original.


Make sure you seal completely around the bottom. 
I used hot glue to seal the box to the lid.


Mix container of Amazing Mold Rubber according to the directions {CLICK HERE to view mixing/preparation}.


And pour until whatever you are casting is completely covered. Set aside to cure.


After the rubber is cured, gently peel away the mold box.


Pull item from mold. If needed, carefully slit down the side of the mold with a blade so you can remove what you molded.


To prepare mold for resin casting, I used rubber bands
around the mold to make sure I had a good seal.


Then filled with Amazing Casting Resin
{CLICK HERE to view mixing/preparation}.


In about 15 minutes the snowman is cured and ready to remove from mold! Can you see all that texture??!


I used my Copic markers to do some coloring.


Add a little snow and a tree with lights...
and a cute little deer to complete the scene.


And viola! A cute wintery scene!


A perfect little place for Frosty to spend the winter!!!

How do you decorate for the holidays?

Thanks for joining us today. Until next time... 
Happy Holidays!! ~ Michele

For more projects and inspiration please visit my blog "Stuff by Belle"
or follow on Facebook: https://www.facebook.com/michele.kosciolek

• • • • • • • • • • • • 

Don't forget to subscribe to our blog on the right side bar:
Twitter at AmazingCasting | Facebook at AmazingMoldPutty | YouTube at AmazingMoldPutty

Wednesday, December 20

How #Cre8time Charming... AMAZING Inspiration by Lyn Gill


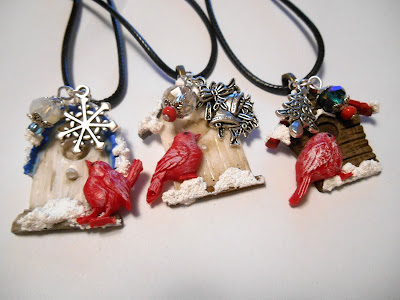
Happy Holidays everyone! Lyn here to share a bit of Christmas inspiration... cute little Winter Birdhouse Charms accented with a few feathered friends made with Amazing Casting Resin.


Using some tiny cast birds from Amazing Casting Resin and red Alumilite Dye, combined with some beads/findings, metal Christmas charms, acrylic paint and Snow Tex (available at most craft stores) –  I created these tiny Birdhouse Charms just in time for the Holidays. How cute are they? They'll be perfect Holiday gifts for loved ones!

What gifts will you create this season 

Well that's all for now... Till Next Time! Lyn

As always you can find more of my work on my blog LynzCraftz
or on YouTube LynzCraftz, or my Facebook page LynzCraftz.

• • • • • • • • • • • • • • • • •

Don't forget to subscribe to our blog on the right side bar:
Twitter at AmazingCasting | Facebook at AmazingMoldPutty | YouTube at AmazingMoldPutty

Thursday, September 15

#Cre8time Seaside Dreams... an AMAZING Remelt tutorial by Tracy Alden


Hello! Tracy here with another Amazing Casting Products tutorial! I recently started to change the decor in one of my bathrooms, going with sea life, drift wood and glass themes in shades of blue, white, gray and brown. I noticed that one of the walls was missing a little something. With the help of Amazing Remelt it was easy to mold some of the sea shells and glass bobbles I already had as decorations in the room to create that final decoration!

Supplies: 


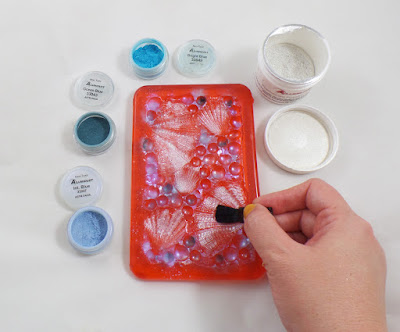
Using a plastic lunch tray as my mold box, I carefully placed sea shells and glass marbles on the bottom layer of the tray, making sure none of the pieces reached the top lip of the tray.


I heated the Amazing Remelt in the microwave, in the container it comes in. I poured the heated Remelt into the plastic lunch tray with the shells and glass pieces from a 12 -15 inch distance – the distance gives the Remelt a chance to release more bubbles before cooling. A few of the shells floated, because of trapped air bubbles, all I had to do was push the shells back down with a stir stick and the air bubbles rose to the surface of the still-liquid Remelt.


I let the Amazing Remelt cool until no longer tacky or warm – putting the tray in a refrigerator can speed up this process. Once the mold was cool and no longer tacky, I carefully removed the Remelt from the tray and flexed the mold until the glass pieces popped out.

Some of the Remelt had gone between the glass pieces and shells – requiring me to cut and remove the excess Remelt with sharp crafting scissors. I trimmed the uneven edges and made sure there was no loose or over hanging Remelt.


Using a small cosmetic brush I dusted the inside of the mold with Bright Blue, Ocean Blue, Interferance Blue and Pearl Alumidust


I mixed up a small portion of Amazing Clear Cast Resin, making sure to slowly stir to reduce air bubbles and let it sit for 5 minutes. Using a toothpick, I put a tiny drop of Blue Alumilite Dye into a small mixing cup and poured a portion of the pre-mixed resin in it. I poured un-tinted Amazing Clear Cast Resin in the mold and used a toothpick to drop in small portions of blue tinted resin in different areas to create visual contrast.


Once Amazing Clear Cast Resin was cured I carefully removed it from the Amazing Remelt mold and trimmed any uneven edges.


Using a plain gesso covered canvas I applied Viva Decor Inka Gold Metalic Rub, Silver and StazOn Blue Hawaii Ink with a Cosmetic Sponge.


I glued on the casted resin piece to the canvas with Beacon Gem-Tac Adhesive and let dry. I added some Liquitex Gloss Varnish over and around the edges of the resin and sprinkled on Stampendous Crystal Snow White Glitter.


With as easy as I found this to do I am now looking at what other decor items I can create with Amazing Remelt!

What AMAZING arts and crafts can you create?

Please share them on the user GALLERY on the Amazing Crafting Products Website!

Visit my blog Art Resurrected for more craft tutorials!

Until next time, safe travels! ~ Tracy

• • • • • • • • • • • • • • • • •

Don't forget to subscribe to our blog on the right side bar:
Twitter at AmazingCasting | Facebook at AmazingMoldPutty | YouTube at AmazingMoldPutty

Thursday, December 24

#Cre8time Family Traditions... AMAZING Inspiration by Lyn Gill


Happy Holidays and family Traditions go hand in hand... my family is no different. Lyn Gill here again to share some of my families traditions with all of you. 40+ years ago my grandfather started this tradition where he would carve wooden pins/brooches or pendants for all of us. He was a wonderful woodcarver. It is a tradition I've felt compelled to continue.

So this year I chose Santa Hat pins for everyone. I created the original from Sculpey clay and then made an Amazing Mold Rubber mold of it. Then the sky was the limit! I had so much fun combining colors, finishes and glitters to make these fun pins.

I used Amazing Casting Resin, Amazing Clear Cast Resin, Alumilite Dyes, Alumilite Metallic Powders and some craft glitters from my own stash to create these Santa Hats for my Family.

So what are some of your
favorite family traditions?

For more of my fun projects please check out my blog LynCraftz,
my YouTube Channel at LynzCraftz, or Facebook Page LynzCraftz.

• • • • • • • • • • • • 

Don't forget to subscribe to our blog on the right side bar:
Twitter at AmazingCasting | Facebook at AmazingMoldPutty | YouTube at AmazingMoldPutty

Saturday, December 5

It was a Winter to #Cre8time Remember... #12DaysofHomeDecor #ACPthrowback


Hello Amazing Crafters... welcome to day five of our 12 Days of Amazing Home Decor! Today we revisit an #ACPthrowback project by Amazing Creative Brenda Burfeind. With winter fast approaching, today's project may inspire you to look at a snow day in a whole new Cre8time way!


After an ice storm, that lasted for days with power outages and downed branches... she found some beauty in the icy stillness that remained. Brenda captured photos of the winter wonderland and wanted to remember this in a special way – not just with pictures winding up in a photo album. 


With a little help from her husband, Amazing Mold PuttyAmazing Clear Cast Resin, and some glittery goodness from her scrapbooking stash, she made a beautiful plaque to commemorate the event that her family can reminisce for years to come.


A moment in time encapsulated upon a slice
of a branch from the tree from which it fell.


CLICK HERE to jump to
Brenda's full how-to.

Want to see more of what Brenda is up to?
Follow her on her blog "Creativity is a State of Mind"!

• • • • • • •

Share your creations using Amazing Casting Products for
our next #ACPthrowback Third Thursday on December 17.

Post them to our Facebook page, or tag us on Instagram, Pinterest, and on Twitter to be featured here on our blog. We'll be looking for your projects with the hashtag #AmazingCastingProducts.

• • • • • • •

Don't forget to subscribe to our blog on the right side bar:
Twitter at AmazingCasting | Facebook at AmazingMoldPutty | YouTube at AmazingMoldPutty

Wednesday, November 19

#Cre8time Fall Fun with AMAZING REMELT by Rachel Whetzel

Hello, Amazingland! Rachel Whetzel here... I've got some FALL inspiration for you, just in time for the Thanksgiving holiday!


This post is actually three fold. In the first part, I will show you how I made the decoration you see above. In the second, I have an idea for an alternative use of the first project! Last, I will show you an idea I had in the middle of making my first decoration.

WHAT YOU WILL NEED TO CREATE
YOUR OWN FALL LEAF PROJECTS 


Here is the inspiration for both the pieces/ideas I'm sharing with you today. The Diphylleia Grayi flower, whose petals look like ice when they get wet, and the cute stamped/impressed clay tags and ornaments floating around the interwebs and Pinterest this time of year.


To begin, find a leaf that is in good shape, and fairly flat. 


I wanted to use the leaf for a variety of molding projects, but because of it's thinness, I needed a way to bulk up the leaf, and support it for molding. To achieve this, I decided to cover the back of the leaf with a layer of Creative Paperclay®.


Be sure to extend the edge of the clay beyond the edges of your leaf. 


While your clay is still wet, cut the edges close to the leaf,
and press the clay closer with your fingers. 


To ensure a uniform dry piece, I put the leaf and clay between two heat safe plates, in the oven on a low heat setting. The plates will keep the clay from curling as it dries. 


When the piece was dry, I mixed up some Amazing Mold Putty, and pressed the piece into the mold. Once the mold was cured, I pulled out the original, sprayed it with mold release, and poured Amazing Remelt into the mold. To help speed up the cure, I placed the mold with Amazing Remelt into the freezer. 


Once the Amazing Remelt was cool again, it was set at a nice, sturdy rubbery texture. Here it is, before I trimmed the edges on the backside of the piece. Amazing Remelt is very easily cut with scissors at this thickness, so trimming up excess and over pour is a cinch! 


Once I trimmed the excess, I pressed the Amazing Remelt into some fresh Creative Paperclay® that I rolled out, and trimmed into a circle. 


Finally, I pressed a stamp from the For Every Occasion Close to My Heart stamp set that said 'Thanks' over the clay. I haven't decided if I want to put a hole in the piece to make it a tag or ornament... I kind of like it just like it is! 

ALTERNATIVE IDEAS FOR THIS PIECE:

Because Amazing Remelt is another of Amazing Crafting Products FOOD SAFE products, the remelt mold can be used to "stamp" leaf imprints on fondant! Imagine a beautiful white cake, with oak leaf impressions scattered around it... you can also use the Amazing Mold Putty (also food safe) mold for making stand alone leaves in fondant or molding chocolate! 


For the last idea, you will need:

When I was making the first piece, I realized how pretty the leaf would look in resin, and then I saw the photo of the Diphylleia Grayi flower, and everything just kind of clicked. I poured Amazing Clear Cast Resin into the mold I made, and waited for it to set up, When it was set, but still flexible, I took the resin out of the mold, and trimmed up the edges, and sanded them. Once the edges were finished, I turned the piece over, so the shiny back side of the molded resin would be on top. The result, is that you can see all the great leaf detail, and the top of the leaf is slick and icy looking!! I love the way the piece turned out, and I can't wait to make some more to decorate a mantle or table top with. 


Does the idea of playing with AMAZING Crafting Products get you in the mood to try some new things!? 

Amazing Crafting Products and the Alumilite company are looking for Creative Team Members!! You can check out the details of our call HERE!


Thank you for reading! Want to see more of what I'm up to?
Visit me on PINTEREST and INSTAGRAM, or like MY PAGE on Facebook!
Thanks for stopping by! ~ rachel

• • • • • • • • • • • • • •

Don't forget to subscribe to our blog on the right side bar:
Twitter at AmazingCrafting | Facebook at AmazingMoldPutty | YouTube at AmazingMoldPutty

Thursday, November 14

What's Pasta Have to Do with It? DIY Medallion or Christmas Ornaments by Tanya Ruffin


Using Amazing Mold Putty and fimo (sculpey) I created a custom Mardi Gras Medallion for a friend's Mardi Gras party. These would also be great for creating your own custom a Christmas ornament!

Supplies:


The mascot of the Baton Rouge Spanish Town Mardi Gras Parade is a flamingo, so I sculpted a flamingo for the center of the design. I then cut out a long piece of flat clay and created a banner for the top. On your ornament you can press anything into the clay! You could use chipboard pieces, charms, or even draw something with puff paint (just let it dry over night).

Take out your alphabet pasta (thanks for the idea from a design team member!) and sort your letters. These are the perfect size. Press in your letters and yes they have numbers! You can use them as a stamp for an impression or leave them in the clay for a raised letter (which is what I did). If you have air dry clay – let dry. If it is oven bake clay, follow the directions on the clay and bake.

After the clay is baked: you may need to glue in some of the pasta pieces (if they pop out). Let that dry and then using Amazing Mold Putty make a mold of your ornament. Don't forget to add a loop to the top for your ribbon!


I love using the Amazing Casting Resin... I'm impatient and like immediate results... so the Amazing Casting Resin is perfect. 

This resin cures an opaque white so you can either add powder to the mold or paint the ornament later. If you choose to use the powders, you will need to brush this inside the mold before you pour the resin. If you choose dye, you will mix it into part "A" of the resin. Since Amazing Casting Resin only takes a small amount of time to cure (about 10 minutes), you can knock a lot out in a short amount of time!


As pink as my ornaments are, I only used the Pearl Ex powder! Enjoy!

What can you make with pasta


I'd love to hear what kind of ornaments you would create
with Amazing Crafting Products! Please leave a comment below :)

Please visit my site to see more of my inspiring creations. Thanks for visiting! ~ Tanya


...........................................

Don't miss a single post!
Please subscribe to our blog on the right side bar:
Twitter at @AmazingCrafting | Facebook at AmazingMoldPutty | YouTube at AmazingMoldPutty
Related Posts Plugin for WordPress, Blogger...