Showing posts with label Lara Hjorthoy. Show all posts

Monday, August 14

#Cre8time Transformations... Fabulous FAUX Stained Glass by Lara Hjorthoy

Hello Fellow Artists! It's Lara here with a project I've been dreaming to make for some time – too long in fact! But finally I have managed to make it all work... and am so thrilled to share it with you all!

Who wants to make some stained glass?! 

I have actually completed a version of this a while ago, but was mighty unsuccessful in the end. So I needed to rethink my strategy for the second round and apparently, the time to think paid off! We have amazing faux Stained Glass!


To start this project off... and in my usual fashion these days, I wanted to find a way to reuse a frame that I had acquired. So I cleaned the frame and got some plexiglass for the "glass".  I glued this into the frame itself so that I could call it a "window" of sorts!


I used a relief paint by Pebeo that was the colour of lead, so it looked just like I had leaded it myself. I actually did a couple of layers of it, so I used a lot. My first go round, I had all the resin colours bleed together – so this time I made sure I was slow and deliberate and that there would be no holes whatsoever. To make this pattern, I printed a picture of a brick wall with a pattern I liked, placed behind the glass, and just followed it with the lead!

I left this to dry, well truthfully... for a long time! But I would no matter what, for at least a week, just to be safe.  

Next up! The resin!  


I mixed up he first batch of Amazing Clear Cast Resin using Alumilite dyes, different shades of blue and purple and even added some sparkle to the resin with Alumilite Pearlescent Powder.


Using a popscicle stick, I slowly added resin to each of the squares, focusing on one colour at a time. 


You can use the stick to push the resin up to the edges
of each square, which helps prevent overpouring.
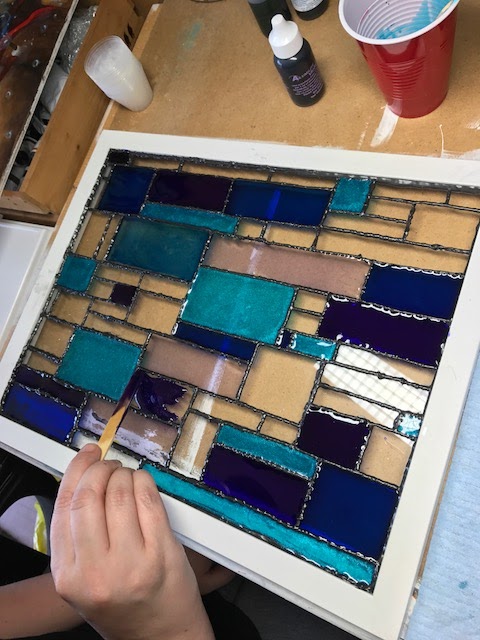

And I took my time. Which in the end produced a great piece, though it meant that my resin started to cure in the cups I mixed them in. I was able to get the pour done, but next time, I would only mix and apply one colour at a time. 


Which is exactly what I did for the Alumilite Silver Metallic Powder and the clear pearlescent resin I added later to complete the piece. I covered it up and let it cure overnight.


Add hanging hardware and ribbon and it now hangs lovely in our window!
I couldn't be happier with it! Can't wait to add different colours to the collection!

What type of stained glass would you make?

Hope you enjoyed this project, I have another big one coming up soon!

Stay Inspired!
~ Lara

Check out my website at www.larahjorthoy.com and YourToyCreations.etsy.com. You can follow my day to day creations on Facebook and Instagram, look for YourToy Creations!

• • • • • • • • • • • • • •

Don't forget to subscribe to our blog on the right side bar:
Twitter at AmazingCasting | Facebook at AmazingMoldPutty | YouTube at AmazingMoldPutty

Wednesday, February 15

A Nightmare AFTER Christmas... AMAZING Inspiration from Lara Hjorthoy


Hi Friends! It's Lara here to share some inspiration with you... how about a Nightmare Before (or is it, after?) Christmas themed art?!!!

I am super excited to share this with you! I have a show coming up in a Gallery in Portugal, called Penumbra Gallery. And being such a fan of Nightmare, as I know all the Amazing Ladies of Amazing Casting Products Team are, I was thrilled to be accepted into the "A Night at the Movies" show! 

I sculpted my version of Zero in Sculpey {polymer clay} and then cast a mold of him in Amazing Mold Rubber, then used Amazing Clear Cast Resin to cast up my sculpture of Zero, wth a bit of PearlEx Iridescent Blue Powder added into the mix. I painted him up using oil paint, and of course added a glow-in-the-dark Sculpey nose! Presto! A glittery, translucent, ghostly Zero, heading out on a long journey to Portugal! Have a safe trip Zero! 

Have you made any fan art using Resin?

Be Safe out there this winter and
Stay Inspired Friends! ~ Lara

Check out my website at www.larahjorthoy.com and YourToyCreation.etsy.com. You can follow my day to day creations on Facebook and Instagram, look for YourToy Creations!

• • • • • • • • • • • • • •

Don't forget to subscribe to our blog on the right side bar:
Twitter at AmazingCasting | Facebook at AmazingMoldPutty | YouTube at AmazingMoldPutty

Thursday, December 22

A #Cre8time Rain Dance... AMAZING DIY Light Sculpture by Lara Hjorthoy


Hi Friends! It's Lara here to share my latest creation. Well this little how-to project has proven to be quite the undertaking!

I'm so thrilled to get to share with you what all the fuss has been! If you've been following me on Instagram and/or Facebook, you know I've had a project in the works for a few weeks... and I'm finally able to unveil it!!!

So without further ado...
a Rain Dance!


So I've been inspired as of late, by our nearly apocalyptic amount of rain that Vancouver has treated us to since the beginning of October! On last count, I think we had three days of sun... and every other day has been rain! 

But unlike a lot of people, I don't mind the rain... and with Amazing Casting Products, I made the rain even MORE beautiful! 


Using Super Sculpey, I first sculpted four orginal "raindrop" shapes in different sizes! Then using Amazing Mold Putty, I molded the raindrops twice – to get a series of eight "drops" that could be cast at once! The Mold Putty is so easy to use and it sets up so quickly... I was able to get all the molds made within a couple of hours! 

Next with Amazing Clear Cast Resin, I mixed a batch of resin, using Alumilite Blue Dye and made my first set of blue raindrops! These took up to 2 days to cure, as it became suddenly very cold here in Vancouver. So I let them set to cure fully for 2 days – then over the next few days, made two more batches of raindrops, using smaller and smaller amounts of Alumilite Blue Dye in the resin mixture. That way, there is a variety of shades to play with when I constructing my project!


After all the drops were completed, Hubby and I spent an evening drilling holes into the top of each drop with a Dremel tool. We wet sanded the heck out of them too... to make them suuuuuper smooth to the touch!


Once they were smooth, I let them dry overnight. I took them outside on a cold winter day and sprayed the heck out of them with Krylon Triple Thick Clear Coat. That gave them this beautiful wet-like look! It was love!


Then began the slow and long construction process. For this, I gathered a foam wreath form from a dollar store and a set of LED lights (that were supposed to flicker), then wrapped the wreath with the lights and some wire – so that I had a "skeleton" of sorts to use for tying later. Then I formed some fluffy cotton stuffing around the wreath, to make my CLOUD! 


Then I began stringing the drops with silver elastic cord and added small beads for decoration. This took a couple of days to complete... a bit hard on the back! LOL!


But finally, I used an old frilly ribbon to hang
the cloud from... and presto! It's COMPLETED!


Think how pretty something like this would be... GLOWING in YOUR home! Sure makes the rain something I actually want to being into my home! 


What light feature could 
you make for your home?

Hope you enjoyed this tutorial as much as I enjoyed making it for you! 

Stay Inspired Friends! ~ Lara

Check out my website at www.larahjorthoy.com and YourToyCreation.etsy.com. You can follow my day to day creations on Facebook and Instagram, look for YourToy Creations!

• • • • • • • • • • • • • •

Don't forget to subscribe to our blog on the right side bar:
Twitter at AmazingCasting | Facebook at AmazingMoldPutty | YouTube at AmazingMoldPutty

Tuesday, November 29

#Cre8time Finishing Touches... AMAZING Inspiration by Lara Hjorthoy


Hey Friends! Lara here to share a little inspiration on how I'm using Amazing Clear Cast Resin today! I'm putting the finishing touches on my Mars Attacks, Alien lady – while I work on creating my second sculpt for Penumbra Gallery's, movie-themed extravaganza this March... in Portugal! I'm adding eyelashes and high gloss to her eyes!

I've added the Clear Cast resin to her eyes. I prepared a small batch and let it sit for a bit to get thicker, then dolloped a smidge into her eyes... and let that sit and cure. Now her eyes are glistening and bright – which is lovely for an Alien about to take part in destroying the world! 

What finishing touches do you

Stay Inspired Friends! ~ Lara

Check out my website at www.larahjorthoy.com and YourToyCreation.etsy.com. You can follow my day to day creations at Facebook and Instagram, look for YourToy Creations!

• • • • • • • • • • • • • •

Don't forget to subscribe to our blog on the right side bar:
Twitter at AmazingCasting | Facebook at AmazingMoldPutty | YouTube at AmazingMoldPutty

Thursday, October 20

Mirror, Mirror on the #Cre8time Wall... SpOoky Frame REDUX by Lara Hjorthoy

Hello Artists! Lara here and its my personal favorite time of the year... changing leaves, fall storms, rainy sweater weather, my birthday and of course – HALLOWEEN!!!

So, what have I got in store?
How about this!!!


I wanted to make a different sort of decoration for this Halloween, since my "living room" is largely my studio these days, I wanted something I could sit on my desk to get me in the Halloween spirit!


My steps for this project began with finding a worthy skull! I scoured the thrift shops around town and eventually found a small plastic skull that I thought would be a delicious mold, using the Amazing Mold Putty!


I wanted this skull to glow for this project and have a spooky vibe to it, so I used the Alumilite dye in violet for some colour, but mixed in some Alumilite Phosphorescent powder as well. I mixed a small amount of Amazing Clear Cast Resin and added both of those products to it and mixed well!


I waited a little bit to allow the bubbles to pop a bit and then poured it into my mold – with a very thin stream to make sure any additional bubbles popped along the way!


While I waited, I prepped my found frame! This is also a great find from the same Thrift Store! I wanted something that was a bit ornate and sprayed the frame a matte black! It looked so cool all painted up! This particular frame has a backing attached to it and was perfect as there is quite the depth between the back and the front, so it has lots of room to pour more resin! 

I glued the backing using Gorilla glue and let that dry, making sure that there was no holes along the seam. I want my resin to pool in the center!


Once the skull had cured, and the frame had sealed I added the skull into the centre of the frame, and mixed up another batch of Amazing Clear Cast Resin and added more Violet dye. I made it a bit darker this time as I wanted to it to look dark and spooky and poured the resin into the frame! Here it is wet and starting to cure {sorry for the reflection}!

After the proper drying time... THIS is what happened! 


 My spooky skull desk picture! That glows in the dark! 


I have more Halloween Inspired projects coming up and I know my fellow Creatives have some great projects in store as well! Make sure you follow the Amazing Casting Products Blog to see all the cool projects that come to life!

What will you make for your Halloween!?

Until next time, have a spooooooooooky day!!!!!

Stay Inspired ~ Lara

Check out my website at www.larahjorthoy.com and YourToyCreation.etsy.com. You can follow my day to day creations at Facebook and Instagram, look for YourToy Creations!

• • • • • • • • • • • • • • • • •

Today we are hopping along with the artists of the Designer Crafts Connection who has taken on the challenge of creating with Amazing Casting Products.


For this challenge, Amazing Casting Products provided each of the Designer Craft Connection designers with Amazing Mold Putty and Amazing Clear Cast Resin. You want to pop over to the beginning of the bloghop HERE where you can enter to win what you see in the photo above... an Amazing Clear Cast Resin and a 3lb. kit of Amazing Mold Putty {which is 1 1/2 lbs of each part of this magical goodness}. An artist's dream PRIZE!!!

• • • • • • • • • • • • • • • • •

Don't forget to subscribe to our blog on the right side bar:
Twitter at AmazingCasting | Facebook at AmazingMoldPutty | YouTube at AmazingMoldPutty

Friday, September 2

#Cre8time Explorations... Amazing Resin Painted Galaxies by Lara Hjorthoy


Hi Friends! Lara here with a "How-To" project this week – something a wee bit different! I decided with all these great frames I've been collecting... I needed to put some of them to use!

I love skies, and galaxies and stars! I often paint these scenes and they're beautiful when I do. To my delight Amazing Casting Products has all these beautiful colored dyes and one of my favourite products, the Alumilite Pearlescent Powder. So, I decided this week to try CASTING my own galaxies!


I first started out with a small 5" x 7" frame that I spray painted in a lovely semi-flat black. Then attached the piece of glass to the inside of the frame with superglue. That I allowed to set overnight just to make sure there would be no weird reaction with the resin.


I added to 6 different cups a tiny amount of black, blue, violet, yellow, green and white dyes as well as a tiny amount of the pearlescent powder to each cup.

I mixed up a batch of Amazing Clear Cast Resin and after allowing the bubbles to settle for a bit, I poured a small amount of the resin to each cup – mixing each again, very thoroughly! The Pearlescent is so-o-o-o-o beautiful in all the colors! It adds just the right amount of sparkle, or in this case, STARS!!!


Upside down, right after pouring!

I poured each color separately into the frame, allowing them to mix together a bit. I used a popsicle stick to push around the resin colors that I wanted to shape a bit more. Then sat back and allowed this to cure! Here in Vancouver, the curing time wasn't long, and I was able to see the results within 4 hours.

I flipped the piece over and boy was I surprised! The pearlescent powder had settled ever so on the glass that the resin was poured onto, and I ended up achieving a crazy sparkly effect! It's gorgeous!


Since this was so reflective and hard to capture in a photo, here's a little video capturing the full sparkly effect! If you have trouble viewing video, please CLICK HERE.

Now to do larger galaxies!!!! I can't wait to make more of these... as it was so easy to make. What a dramatic piece of art to add to your wall!


Hope you enjoyed this little How-To this week!

What out of this world resin
paintings would you create???

Stay Inspired ~ Lara

Check out my website at www.larahjorthoy.com and YourToyCreation.etsy.com. You can follow my day to day creations at Facebook and Instagram, look for YourToy Creations!

• • • • • • • • • • • • • •

Don't forget to subscribe to our blog on the right side bar:
Twitter at AmazingCasting | Facebook at AmazingMoldPutty | YouTube at AmazingMoldPutty

Friday, August 26

Chasing #Cre8time Rainbows... AMAZING Inspiration from Lara Hjorthoy


Hi Friends! I'm gonna share a little Rainbow inspiration with you folks today! I decided to make some new wings for a Monster of mine, Pedi...


But for this round I wanted to play with the Alumilite Dyes, and see just what they will do... so I mixed up a small batch of the Amazing Clear Cast Resin and poured into my shiny mold (created with Amazing Mold Rubber). Then using suuuuuper tiny amounts of rainbow colors, on the tip of popsicle sticks, I swirled them into the resin, and let it cure. I'm super thrilled with the results and can't wait to make a new Pedi to match! 

However, now that it's been done, I'm thinking these lovely wings could be drilled for earrings or maybe hooked together for a necklace!!!! I have soooo many ideas now for this process! These dyes are so versatile!!! 

What wonderful creations
can you make
with this swirly effect???

Hope all your summers are great!
Stay Inspired ~ Lara

Check out my website at www.larahjorthoy.com and YourToyCreation.etsy.com. You can follow my day to day creations at Facebook and Instagram, look for YourToy Creations!

• • • • • • • • • • • • • •

Don't forget to subscribe to our blog on the right side bar:
Twitter at AmazingCasting | Facebook at AmazingMoldPutty | YouTube at AmazingMoldPutty

Friday, July 22

Splish-Splash with Amazing Clear Cast!!! Having a #Cre8time Pool Party with Lara Hjorthoy

Hi Friends! So this week for my inspiration post, I'd like to share a project I've waited on for almost a year now... a summertime inspired, project! 

We all know a couple of happy old ladies, who wouldn't be happier than sunning in a pool! However, these two ladies have perhaps had a bit too much sun!


For this project, I used a cradled wood panel and a picture frame and created the pool, by painting the inside of the panel, trompe-l'oeil style. Then attached a piece of plexiglass between the frame and the painted panel. After sealing the sides, I used our Amazing Clear Cast Resin tinted ever so slightly and poured it over the entire plexiglass surface! Placing the ladies directly into the wet resin. Once it all dried, overnight, I added a couple layers of heavy gel medium for texture and... boom! 

Ladies in a pool!


After all this work, I'm jealous I'm not in there too! How about you?

What pool related goodies will you
come up with this summer?

Hope you enjoyed this week's inspiration! Join me soon for another how to. 
Have fun, stay sunburn free Lara

Check out my website at www.larahjorthoy.com and YourToyCreation.etsy.com. You can follow my day to day creations at Facebook and Instagram, look for YourToy Creations!

• • • • • • • • • • • • • •

Don't forget to subscribe to our blog on the right side bar:
Twitter at AmazingCasting | Facebook at AmazingMoldPutty | YouTube at AmazingMoldPutty

Monday, June 27

#Cre8time Beachcombing... Preserve Seaside Keepsakes in Miniature Tide Pools by Lara Hjorthoy

Hi Artists! Today's "how-to" is inspired by an artist I ran into recently. He creates these stunning glass and concrete sculptures, where the glass looks like water... just gorgeous! I wanted to try my hand at what resin could do!

So for today, I'm making Personal Tidal Pools!


As a Girl from Vancouver, BC, the West Coast of Canada sports some seriously beautiful beaches, and my goal for these little pools was to capture some of that!

So to start off with I found myself a fairly generic silicone muffin "tin". I got one from a local cooking shop as the ones I found in the thrift store looked a little worse for wear, and I really wanted a smooth cast!

Next, Hubbs and I went to the beach!!! I collected handfuls of dry sand, handfuls of cool rocks, used shells and bits of interesting wood! 


When I got home, and before I went too far, I decided to sculpt some mini starfish and barnacles out of Sculpey, and then mold those with Amazing Mold Putty! Since they were so tiny, I just pressed the putty out wide and flat and in no time I had a great mold! Later I cast all these guys using Amazing Casting Resin and some glow in the dark powder!

I think it's important to explain the mistakes that happened – I would hate for anyone to think I hit pay dirt right off the bat!

So what I did, was mix up some of the sand I collected with acrylic polymer medium, and THAT I wouldn't do again. Main reason? I don't think the medium was a strong enough bond with the sand and eventually the resin, so it got flaky and fell apart in the end. ALSO, I didn't leave this step long enough -or- it might have been that my rocks were not completely dried out inside which may have introduced moisture back into the sand. Next time, if I go the sand route again, I will try something different. So even though my resin eventually set super fast, the sand didn't, which was the contributing factor to the whole, falling apart thing.

Anywho... I WAS successful eventually, so bare with me!


***here is a pic of the rocks, laid into the sand in the mold.***


I did let this stage set for 24 hours and when I touched the top it appeared hard and set, so I went ahead a mixed up the Amazing Clear Cast Resin. I wanted a slight tint to the resin, as I thought it might be a cooler look then simply just clear, and here is my second mistake! Using a drop of blue and two drops of fluorescent green into my resin part "A", the dye was SOOOO DARK!!!


Alumilite dyes are so powerful and such a very very little is actually needed! Lesson learned, so the top three in photo are the super dark dye, they didn't work – unless I was going for a tide pool at night. The two up front used the last of the dye in the container and I didn't add any more to it. It was a lovely light blue. Those were mostly successful!

After letting them set for another 24 hours, I finally removed them from the mold. The resin popped out beautifully. However the sand didn't set properly in these and kind of fell apart a bit. Bit of a bummer but left me thinking....

So my last try, I skipped the sand, used some flatter rocks to create a "bed" in the bottom of one mold, added some nice shaped and interesting colored rocks, some bits of wood, my glow in the dark casts of starfish and barnacles. Made sure when I poured the resin this time, I used a teeeeeeensy tiny amount of dye and poured.


After a day, here is the final result! A successful Personal Tide Pool – and it glows in the dark... so cool!!! The back two pictured are the not super successful ones from my first try. But they weren't terrible either, so they deserved a look!


Here is my final Tidal Pool – 
the one I would like to keep on making! 


How do you create a water effect?

I hope you enjoyed this How-To! Have a great week Friends.
Stay Inspired ~ Lara

Check out my website at www.larahjorthoy.com and YourToyCreation.etsy.com. You can follow my day to day creations at Facebook and Instagram, look for YourToy Creations!

• • • • • • • • • • • • • •

Don't forget to subscribe to our blog on the right side bar:
Twitter at AmazingCasting | Facebook at AmazingMoldPutty | YouTube at AmazingMoldPutty
Related Posts Plugin for WordPress, Blogger...