Showing posts with label Michelle Frae Cummings. Show all posts

Friday, June 26

Your #Cre8time is PATRIOTIC! #ACPThrowback #MakeThings

Hello Amazing Crafters! As you are well aware you can create anything you can imagine with Amazing Casting Products... and also customize them in any color you desire. Today we are sharing some #ACPthrowback creations to inspire you for the official start of summer – the 4th of July!

Celebrating our Red, White and Blue...


CLICK HERE to view more
details on Tanya's scarf-lace.

Want to see more of what Tanya is up to?
Follow her on her website HERE!


• • • • • • • • • • • • • •


CLICK HERE to view more details
on Rachel's 4th of July BBQ invitations.

Want to see more of what Aimée is up to?
Follow her on her website HERE!

• • • • • • • • • • • • • •


CLICK HERE to view more
details on Michelle's handcast bowl.

Want to see more of what Aimée is up to?
Follow her on her website HERE!

• • • • • • • • • • • • • •

Share Your Creations with us
on Social Media to be Featured here
on #ACPthrowback Third Thursday

July 16 is our next THIRD THURSDAY... this is your chance to be featured. Post your creations to our Facebook pagePinterest, and on Twitter! We'll be on the hunt for your projects with the hashtag #ACPThrowBack, (you can even go back into your past pins and add this pin to help us find you!) and share ALL your projects using the hashtag #AmazingCastingProducts!!

• • • • • • • • • • • • • •


Our AMAZING creative friend Katie Smith, of Punk Projects is hosting a fun craft challenge for the summer and ACP is proud to be one of the sponsors. Play along for your chance to win weekly prizes and a grand prize at the end! Today is the last day of this fourth challenge - did you MAKE someTHING??!


Tomorrow begins a brand new "Make Things!"challenge... 
so please drop by and check it out!

Wednesday, September 25

Make a Smart Phone STAND on its HEAD!!!
AMAZING Inspiration by Michelle Frae Cummings


I have had my iPhone 4S for less than a year. And in this short time I have searched high and low for a suitable holder/stand on line and in retail stores.

They do exist, but unfortunately, they only work for phones with out their protective case.

So I have suffered as I am unwilling to leave my phone un-protectcted.

I wanted something so I could snap-photos and video with ease on a steady surface.

I wanted something that would allow me to listen to music effortlessly or watch instructional videos while I worked on a project.


I tried to cut a slit in the lid of a Tupperware container to hold the phone. Fail.

I tried to make a wire stand out of large paper clips. Fail. 

I tried to make a (awkward) holder of wire, chunky beads and duct tape to shoot video... Epic fail!

Then recently I searched for tips on how to take better selfies with the iPhone. In reading the article, the writer suggested placing the phone in play dough to hold it up. At first I was horrified that anyone would use play dough, that can't be good for the phone, right?

Then BAM! 

A light bulb went off and I thought of Amazing Mold Putty!


I simply covered the bottom portion of my phone with press and seal. Then I mixed equal amounts of Amazing Mold Putty parts "A" and "B", using half of each container. I made a nice solid round ball, pressed lightly onto a hard surface, then pressed in the bottom of the phone to about half way into the ball. I pressed the putty around the phone and held in place with my fingers until the putty began to harden. 


After it was set, I trimmed out a small piece on each side of the base so the holder could accommodate the phone upright and side ways. 

Now I have a perfectly stable holder that will not leave a mark or a scratch on my phone and will work anywhere, any time.... Thanks to Amazing Mold Putty and Amazing Crafting Products!

What AMAZING solution will
Amazing Mold Putty provide for you?


Thanks for coming by! Please visit my blog, Faerie Dust Dreams 
for more creative inspiration. ~ Michelle Frae Cummings

...........................................

How about a 20% Coupon to shop
Use coupon code { celebrate } at

Coupon Expires September 30, 2013.
...........................................

Don't miss a single post!
Please subscribe to our blog via email or bloglovin' on the right side bar:
Twitter at @AmazingCrafting | Facebook at AmazingMoldPutty | YouTube at AmazingMoldPutty

Saturday, September 14

EYES are WATCHING! DIY Googly Eye Light Switch Plate Cover by Michelle Frae Cummings


Hi everyone! Michelle here with another great tutorial that you can use for Halloween or just for fun!

Products used:


Mix ample, but equal amounts of the the Amazing Mold Putty until no white streaks appear. Flatten out to a rectangle shape and a add a small ball of putty in the center for where the plates holes are. Press plate in place, pushing the extra putty out through the holes. Let set about 10 minutes. Remove plate and patch up any rough spots with extra mixed putty (this also adds textures for the resin colors). Trim where needed and stick your wire into the putty for the screws. You'll want to build up those holes with a little extra putty as shown. Add some coils of putty to the walls of the mold and press in place with the popsicle stick provided from the resin mix. Let harden completely before adding resin. 


Using the measuring cups and popsicle stick provided, mix thoroughly 1 Tablespoon each of parts "A" and "B" of the Amazing Casting Resin and 5 drops of the Alumilite Fluorescent Orange Dye. Pour into the mold. Most of the resin will spill into the sides and only cover parts of the plate. This is OK. 


Let the first color set while you mix the next color.

For the green, mix thoroughly 1 dram (alternate measurement on measuring cups provided with resin) each of parts "A" and "B" of the Amazing Casting Resin and 3 drops of Alumilite Fluorescent Green Dye

Carefully pour, drip by drip onto the areas not covered by the orange resin. 


Quickly place your googly eyes onto the tacky resin before it cures. I put a little bit of adhesive on the end of a wooden skewer to use as a googly-eye-picker-upper. :)


Next mix thoroughly 2 Tablespoons each parts "A" and "B" of Amazing Clear Cast Resin and fill in the mold, making sure to cover every googly eye. Let this set at least 8 hours in a undisturbed spot. Remove from mold and trim off any sharp points.

Find a place in your house where it can be used often enjoyed!

What kind of Spooky Lightswitch Plate will you
cast and mold using Amazing Casting Products?


Thanks for coming by! Please visit my blog, Faerie Dust Dreams 
for more creative inspiration. ~ Michelle Frae Cummings

...........................................

How about a 20% Coupon to shop
Use coupon code { celebrate } at

Coupon Expires September 30, 2013.
...........................................

Don't miss a single post!
Please subscribe to our blog via email or bloglovin' on the right side bar:
Twitter at @AmazingCrafting | Facebook at AmazingMoldPutty | YouTube at AmazingMoldPutty

Tuesday, August 27

Make the Walls Your SCRAPBOOK... AMAZING Family Wall Plaque by Michelle Frae Cummings


Have you had the chance to try the "NEW" Amazing Mold Rubber?

It allows you to create the perfect mold the first time with out having to make it in sections which can leave to imperfections. It is especially clever when you have something with fine detail or a large shape, such as this porcelain plaque. 

To make the above Family Wall Plaque, I used the following:


Secure your plaque in the clean container face up. I used very strong double stick tape.

Next mix the Amazing Mold Rubber according to the package and mix very thoroughly, scraping the sides as you mix. Make sure you are in a well ventilated area as it can be quite aromatic before it sets. 

Pour around the outside of the plaque inside the container and then fill the inside. Don't worry about any bubbles. 


The Amazing Mold Rubber will start to turn solid with in 15 minutes, so make sure you have it on a flat surface. To fully cure, it may take anywhere from 4-10 hours to set. I left mine alone over night.

When it was not sticky to touch, I trimmed down my container so I could start to separate the mold from the plastic. 


I carefully pulled the plaque from the rubber, making sure not to disturb the columns for the holes; then trimmed around where any silicone leaked under the tape. 


I poured equal amounts of the Amazing Casting Resin in the cups provided and added 2 drops of the Brown Alumilite Dye to the part "A" of the resin. I mixed thoroughly before adding a bit of both Gold and Copper Alumilite Metallic powders. I mixed again, added the resin part "B" and quickly mixed, scraping the sides and bottom of the cup before pouring into the rubber mold.


It took approximately 15-20 minutes for the Amazing Casting Resin to harden. While it was still a little warm and slightly soft, I pulled it from the mold and trimmed off any jagged edges.


What you will LOVE about this type of mold, is that all parts of the resin, what was in the mold or not, will remain shiny and smooth as if you had finished it with coat of Amazing Clear Cast Resin


I simply added my photo, dew drops and ribbon
to make a nice happy Family Wall Plaque


What would you mold to create your own
family plaque using Amazing Crafting Products?


Thanks for coming by! Please visit my blog, Faerie Dust Dreams 
for more creative inspiration. ~ Michelle Frae Cummings
.................................

Don't miss a single post!
Please subscribe to our blog via email or bloglovin' on the right side bar:
Twitter at @AmazingCrafting | Facebook at AmazingMoldPutty | YouTube at AmazingMoldPutty

Tuesday, August 20

HOOT - HOOT! Add some Character to your Message Board... AMAZING Inspiration by Michelle Frae Cummings


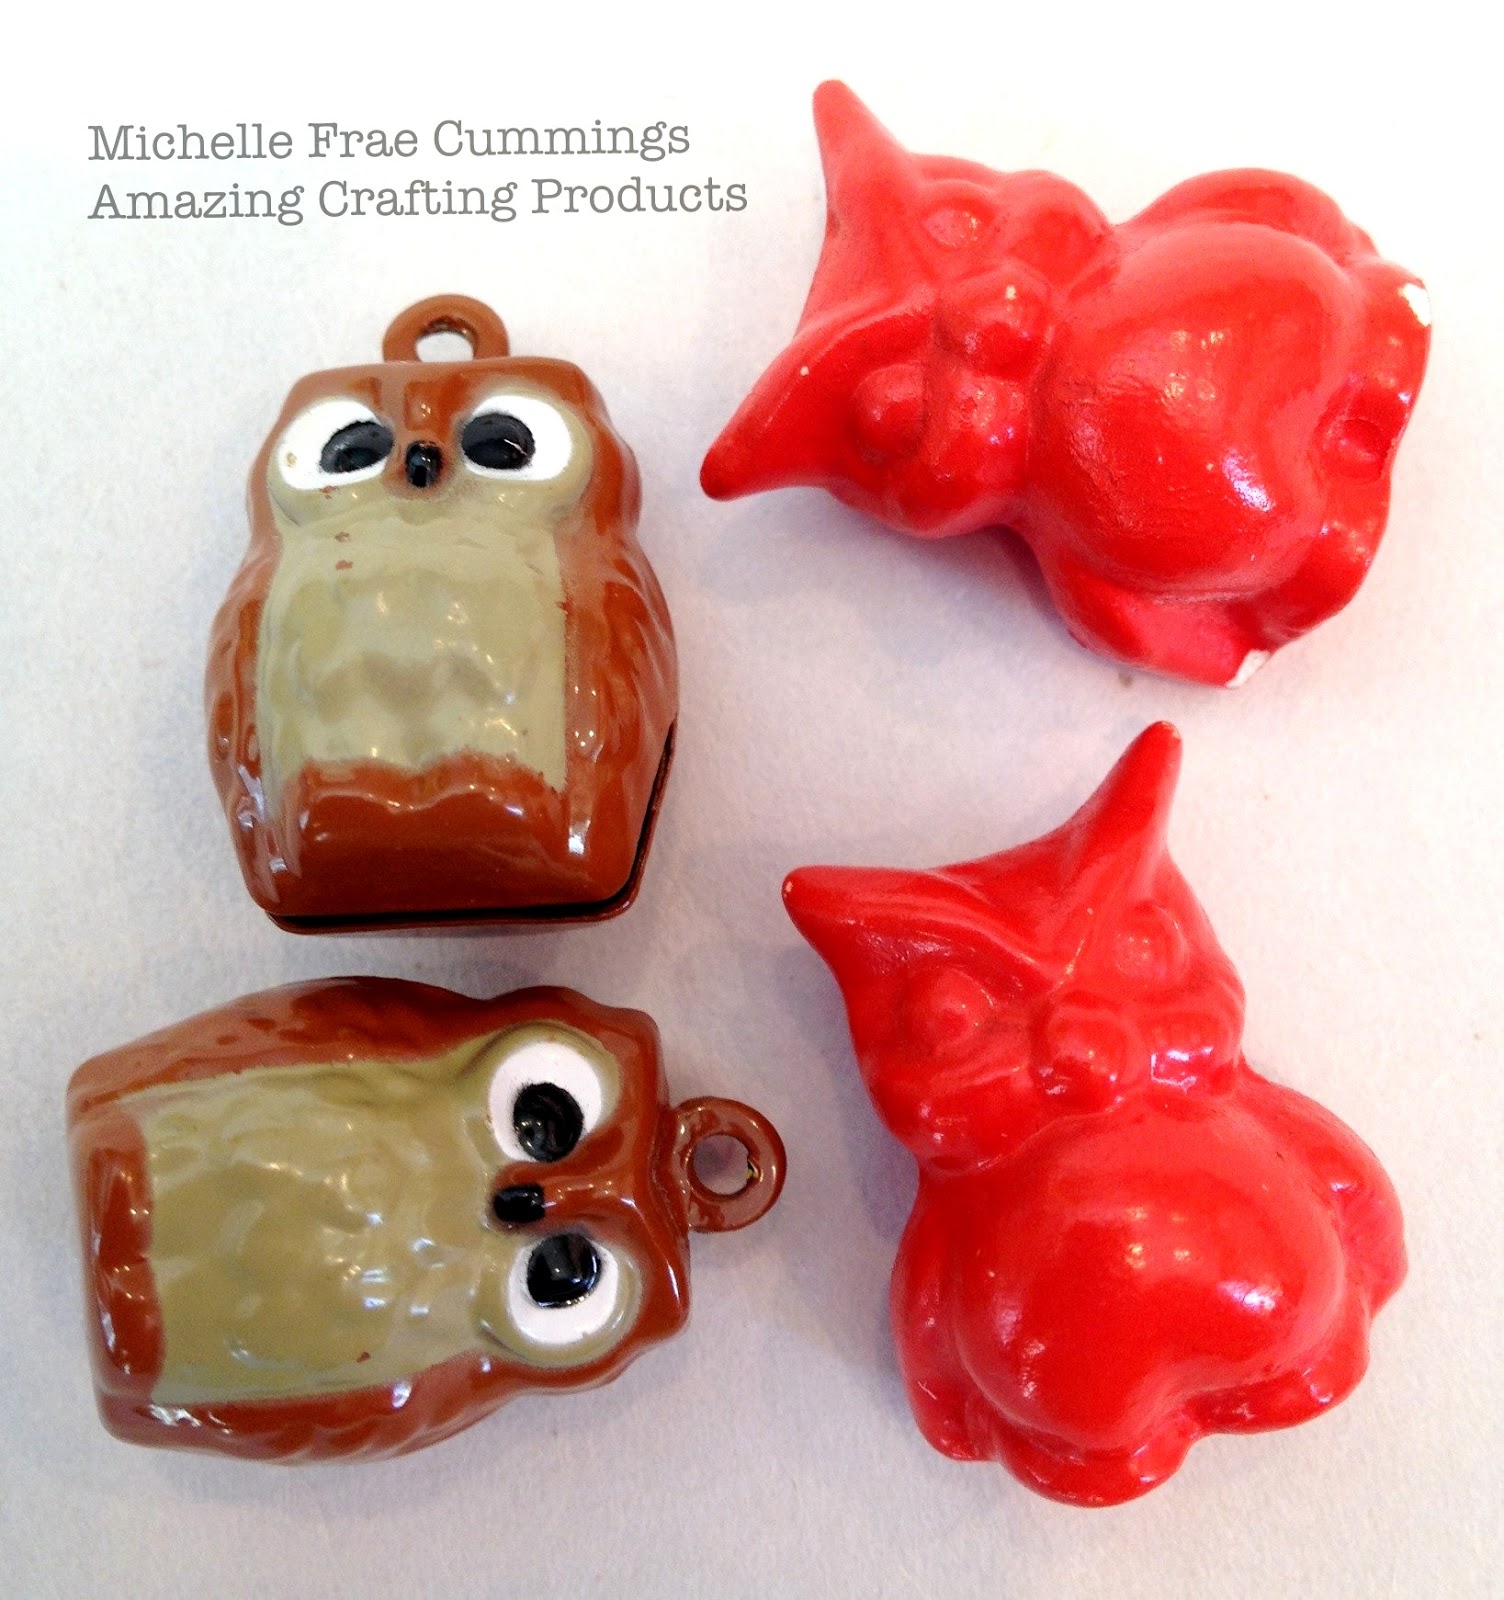
Have you ever wished that you had something more exciting for push pins? Some thing just as pretty to look at as the art you are pinning? I did! I love owls and was bored with my plain flat push pins.


So I made up some push pins from some small vintage owl keepsakes.


Small vintage owls like these bells and figurines work nicely. 

I used Amazing Mold PuttyAmazing Casting Resin, and the new Violet, fluorescent green and fluorescent orange Alumilite Dyes. From start to finish, making these owl push pins took no more than 30 minutes! After the resin owls were cured, I simply glued the flat part of the push pins onto the backs of the owls with E-6000.

So easy!


How would you customize your pushpins

Thanks for coming by! Please visit my blog, Faerie Dust Dreams 
for more creative inspiration. ~ Michelle Frae Cummings
.................................

Don't miss a single post!
Please subscribe to our blog via email or bloglovin' on the right side bar:
Twitter at @AmazingCrafting | Facebook at AmazingMoldPutty | YouTube at AmazingMoldPutty

Friday, July 26

DON'T Be a PLAIN JANE... Make a Resin Decorated Compact Mirror with this AMAZING tutorial by
Michelle Frae Cummings


The other day I was browsing the $2 bins at my local craft store and found some great compact mirrors. While the design on the compacts was pretty... it was not enough for a Artist like me, know what I mean? :)

So I thought it would be fun to decorate them with resin.

Let me show you how.


Supplies:


First begin by coloring over the top of the mirror with your alcohol pen. Add 2-3 layers of colors because the adhesive with remove some of it as you set the dew drops.


Then apply a thin layer of glue and begin placing your dew drops, trying not to overlap the compacts edge. The glue will keep the dew drops from shifting during the resin process.


Wrap your duct tape completely around the outside of the compact as shown. Press firmly onto all undecorated edges, even the bottom. 


Once you are sure the tape is secure, then you can begin mixing the Amazing Clear Cast Resin.

You'll want to combine a small amount of equal parts "A" with "B" and slowly pour into the duct tape cavity. Use the stir stick provided to guide the resin into the small places. 


When you have filled your cavity, then can you add your embellishments.

Here, I added micro and seed beads. Let your resin cure at least 10 hours. You want it to be hard to touch but still in that soft stage for trimming off any jagged edges.

While you pull away the duct tape, you might find that some of the resin has leaked onto the sides or hinge of the compact. Don't worry, with the help of a paper piercer, you can remove the unwanted resin easily. 


Finish your compact by gilding the edges with a silver leafing pen.

Here is another compact I made. I glued down some of my favorite jewelry charms.


What objects would you adorn
to customize your compact mirror?

Thanks for coming by! Please visit my blog, Faerie Dust Dreams for more creative inspiration.


.................................

Don't miss a single post!
Please subscribe to our blog via email on the right side bar:
Twitter at @AmazingCrafting | Facebook at AmazingMoldPutty | YouTube at AmazingMoldPutty

Thursday, July 11

Thanks with a Capital "T"... AMAZING Inspiration by Michelle Frae Cummings


Hi Everyone! Michelle here to show you that you can easily accent a bright and cheery card with a "Big" Thanks! I simply die cut a capital letter "T" from chipboard and made a mold from it with some mixed Amazing Mold Putty.

Then I mixed some Black Alumilite Dye with equal portions of Amazing Casting Resin and poured into the mold. About 10 minutes later I popped out my "T", trimmed the edges with scissors and placed on the card. 

So easy, and so much fun! 


Thank you so much for coming by to see my Inspiration. Please feel free to visit my blog for more idea's! ~ Michelle Frae Cummings

.................................

Want to SOCIALize? Please follow Amazing Crafting Products on
Twitter @AmazingCrafting and on Pinterest HERE -or- join us on our Facebook page.

Wednesday, June 26

AMAZING Made in The U.S.A Inspired Bowl...
by Michelle Frae Cummings


Hi Everyone! Michelle here to show you that if you took the layering technique from these bangles and incorporated it into this resin bowl tutorial, you could find yourself making a pretty neat Patriotic resin bowl to hold your favorite American trinkets!


For me, I love vintage keys.

Especially if they are "Made in The USA" - Just like Amazing Crafting Products!


Thank you so much for coming by to see my Inspiration. Please feel free to visit my blog for more idea's! ~ Michelle Frae Cummings

.................................
__________________________________________

Use this COUPON to shop at the Amazing Mold Putty
website HERE and receive 25% OFF your purchase.
Please use coupon code " summerhaus " {no quotations}.
Coupon expires June 30, 2013.
__________________________________________
.................................

Want to SOCIALize? Please follow Amazing Crafting Products on
Twitter @AmazingCrafting and on Pinterest HERE -or- join us on our Facebook page.

Thursday, June 13

Multi-Colored Resin Bangles... by Michelle Frae Cummings


Now that School is out and Summer is "officially" here, I knew I needed to spruce up my jewelry collection so I made up some fun colorful bangles!

To start, I mixed up some Amazing Mold Putty, and pressed it on the outside of a old plastic bangle mold that I found at a garage sale. The inside of the mold had someone's resin mishap and was unusable. Then I added some more mixed putty to the inside of the mold. 


Before letting set completely, I flipped it over to look
for any creases or air pockets I could fix. 


After about 10 minutes, the mold was ready for resin.

Using the measuring cups provided, I poured "A" and "B" Amazing Casting Resin. Then I added about 3 drops of Alumilite dye to the "A" resin. I do this because once you mix "A" and "B", you have a short window to thoroughly mix and pour before the resin begins to set. I mix the resin and dye with the popsicle stick provided, scraping the sides as I work. Then I quickly pour both into a paper dixie cup, again mixing quickly, before creasing the corner of the cup to serve as a spout.


I pour as close to the molds opening to avoid resin drips. If dripping occurs, quickly change sides. Make sure to leave room in the molds to add colors. Let each color set before adding a new color. I clean each cup out quickly with a baby wipe and then a dry napkin.

Then I'm ready for the next color batch. 

It takes approximately 15 minutes for each color to set. 


When your molds are filled and the resin is hard to touch, you may pop them out and begin carving off the rough edges with the the open blade of precision scissors. This is easiest to do when your bangles are fresh from the mold because the resin is still not completely cured. Hold the scissors the same way you would curl ribbon for a present. Go all around, inside and out until you have a smooth edge. If you have waited too long and the resin is much harder, keep working at it with the scissors, it will just take a bit longer. 


Once you have finished with all your bangles, place them on a bit of wire mesh or a old baking rack outside. Spray evenly on  both sides with a gloss sealer/finisher. Let dry until it's no longer tacky. 


Then enjoy your bangles and have a colorful summer!


For these bangles I used Red, Yellow, Blue and Green Alumilite Dye.

To achieve the white, I simply left the Amazing Casting Resin to set, uncolored.


Thanks for coming by!

You can see more INSPIRATION using Amazing Crafting Products by Alumilite Corporation on my blog: Faerie Dust Dreams.

~ Michelle Frae Cummings


.................................
__________________________________________

Use this COUPON to shop at the Amazing Mold Putty
website HERE and receive 25% OFF your purchase.
Please use coupon code " summerhaus " {no quotations}.
Coupon expires June 30, 2013.
__________________________________________
.................................

Thanks for stopping by and have a great day!

Don't forget to subscribe to our blog on the right side bar:
Twitter at AmazingCrafting | Facebook at AmazingMoldPutty | YouTube at AmazingMoldPutty
Related Posts Plugin for WordPress, Blogger...