Showing posts with label Alumilite Metallic Powders. Show all posts

Monday, August 21

Singing a Whale Song of Summer... by Lyn Gill


Hi everyone! Lyn here with you today from LynzCraftz. It's no secret that I love Summer... the Ocean... the Beach... the sound of the waves and the salty sea air – so before Summer ends, I thought I would get in one last Summer project. I've named it "Whale Song" for obvious reasons...


I first started with a couple polymer clay whales that I sculpted from Super Sculpey (baked according to package directions). I left each whale flat on the back so I could glue them down. I glued each down into my mold box, then I poured over a batch of Amazing Mold Rubber to create the mold. CLICK HERE to view mixing/preparation.

In a few hours, the mold is cured! I removed the originals and it was time to pour some clear blue resin. For the whales I've mixed up Amazing Clear Cast Resin and Ocean Blue Alumilite Dye... aren't they cute?


Then using a wooden canvas I had purchased, I painted it with some acrylic paints. Just a basic underwater type background which will get mostly covered up.


Here comes the fun part... I mixed up some Amazing Clear Cast Resin and divided it into 5 small cups; adding Alumidust to each cup in similar colors to my painted background in 4 of them. In the fifth one, I added a bit of White Alumilite Dye.


Carefully pouring each of the four colors on their corresponding color area (kinda like a paint by number... LOL), I used a stir stick to help move the colors around. I placed the two original polymer whales along with the blue cast whales into the wet resin on the background and left it to cure for 3-4 hours before continuing.


The final step was to mix just a touch (the tip of my pallet knife) of the Alumilite Pearlescent Metallic Powder into another batch of Amazing Clear Cast Resin, then pour this mixture over the entire piece – whales and all.


After letting this cure overnight,
the results are well... AMAZING! 


You can see the sparkle from the tiny bit of Pearlescent powder that I added to the final layer of Amazing Clear Cast Resin – it's so pretty! A little bit of work but well worth it in the end.

What end of Summer projects
do you have planned?

Well that's the end for now – thank you so much for stopping by... 
Till Next Time! Lyn

As usual, you can find more of my work on my blog LynzCraftz
or on YouTube LynzCraftz, or my Facebook page LynzCraftz.

• • • • • • • • • • • • • • • • •

Don't forget to subscribe to our blog on the right side bar:
Twitter at AmazingCasting | Facebook at AmazingMoldPutty | YouTube at AmazingMoldPutty

Monday, August 14

#Cre8time Transformations... Fabulous FAUX Stained Glass by Lara Hjorthoy

Hello Fellow Artists! It's Lara here with a project I've been dreaming to make for some time – too long in fact! But finally I have managed to make it all work... and am so thrilled to share it with you all!

Who wants to make some stained glass?! 

I have actually completed a version of this a while ago, but was mighty unsuccessful in the end. So I needed to rethink my strategy for the second round and apparently, the time to think paid off! We have amazing faux Stained Glass!


To start this project off... and in my usual fashion these days, I wanted to find a way to reuse a frame that I had acquired. So I cleaned the frame and got some plexiglass for the "glass".  I glued this into the frame itself so that I could call it a "window" of sorts!


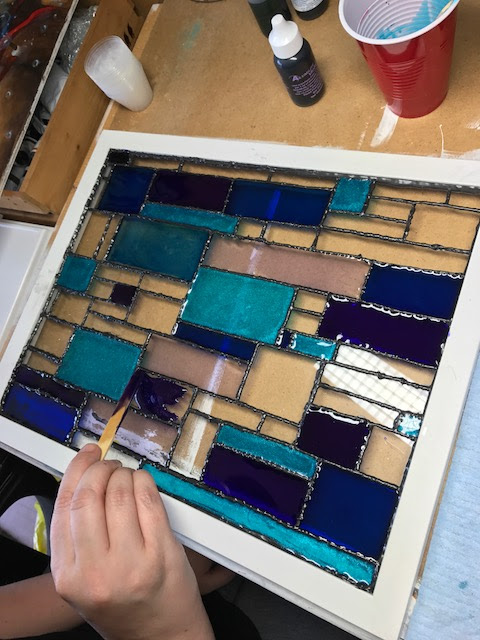
I used a relief paint by Pebeo that was the colour of lead, so it looked just like I had leaded it myself. I actually did a couple of layers of it, so I used a lot. My first go round, I had all the resin colours bleed together – so this time I made sure I was slow and deliberate and that there would be no holes whatsoever. To make this pattern, I printed a picture of a brick wall with a pattern I liked, placed behind the glass, and just followed it with the lead!

I left this to dry, well truthfully... for a long time! But I would no matter what, for at least a week, just to be safe.  

Next up! The resin!  


I mixed up he first batch of Amazing Clear Cast Resin using Alumilite dyes, different shades of blue and purple and even added some sparkle to the resin with Alumilite Pearlescent Powder.


Using a popscicle stick, I slowly added resin to each of the squares, focusing on one colour at a time. 


You can use the stick to push the resin up to the edges
of each square, which helps prevent overpouring.


And I took my time. Which in the end produced a great piece, though it meant that my resin started to cure in the cups I mixed them in. I was able to get the pour done, but next time, I would only mix and apply one colour at a time. 


Which is exactly what I did for the Alumilite Silver Metallic Powder and the clear pearlescent resin I added later to complete the piece. I covered it up and let it cure overnight.


Add hanging hardware and ribbon and it now hangs lovely in our window!
I couldn't be happier with it! Can't wait to add different colours to the collection!

What type of stained glass would you make?

Hope you enjoyed this project, I have another big one coming up soon!

Stay Inspired!
~ Lara

Check out my website at www.larahjorthoy.com and YourToyCreations.etsy.com. You can follow my day to day creations on Facebook and Instagram, look for YourToy Creations!

• • • • • • • • • • • • • •

Don't forget to subscribe to our blog on the right side bar:
Twitter at AmazingCasting | Facebook at AmazingMoldPutty | YouTube at AmazingMoldPutty

Sunday, July 31

#Cre8time Explorations... Radiating Copper by Kristie Taylor


Greetings! We welcome back our Guest Creative, Kristie Taylor who has joined us this month on the Amazing Casting Products blog... and today she's created a masterpiece radiating with movement and dimension. That's right folks – all this luscious color is resin! Follow along as she shows you how to paint with Amazing Clear Cast Resin

• • • • • • • • •

I am so in love with the way the Amazing Clear Cast Resin looks. I wanted to use it to decorate a canvas and highlight the way the resin moves and flows. This resin is perfect for mixed media type of applications and can be used in so many ways!

So I used Alumilite Copper Metallic Powder and Alumilite Dyes to color the clear cast resin – and used as I would with paint to create dimensional layers.


For this project I used a square wooden block as my canvas. I placed the block on something so that the resin can drip over the edges.


Mix equal parts of Amazing Clear Cast Resin
add Violet Dye and stir until mixed.


Add Copper Metallic Powder to mixture, stir and pour over canvas. Use a popsicle stick to "stir" in circular pattern and move color around. 


Just look at all that awesome color! Tilt the block to allow Amazing Clear Cast Resin to move and flow over the sides. Let this sit until it gels slightly {about 30 minutes}.


Mix another batch of Amazing Clear Cast Resin and Red Dye with Copper Metallic Powder {I used three drops of dye and a popsicle stick scoop of metallic powder}, and stir until mixed. 


Pour mixture over canvas in a circular pattern. Allow this red layer to move around for a few minutes, then allow this layer to gel slightly.


Mix another batch of Amazing Clear Cast Resin with only Copper Metallic Powder and pour over slightly gelled blue layer allowing resin to run off edges. 


Move color around and use a stick to draw in spirals.


Allow resin to cure overnight.


I rubbed Vintage Photo Distress Stain 
on the edges to finish off the raw wood.


Mix a batch of Amazing Clear Cast Resin and Yellow Dye and Copper Metallic Powder. Pour yellow mixture in a spiral pattern over dried red layer. 


Use tweezers to place bugle beads into the wet resin,
forming a sun shape in the center. 


I used the popsicle stick to draw "rays" into
the yellow layer. Allow resin to cure over night.


To finish off I added a metal finding to the center,
and filigree corners layered with copper wire.

"Radiating Copper"


How would you paint with resin?

I hope you have enjoyed this project and that I have
given you some inspiration to try something new!


• • • • • • • • •

Thanks so much for dropping by! We would like to give a huge thank you to Kristie for sharing her amazing talents with us this month. Please take time to visit her blog, "The Scrapinaterand also follow Kristie over on her YouTube Channel and on Instagram.


• • • • • • • • • • • • 

Don't forget to subscribe to our blog on the right side bar:
Twitter at AmazingCrafting | Facebook at AmazingMoldPutty | YouTube at AmazingMoldPutty

Monday, July 11

Ohh... the AMAZING Possibilities!


Beauty is in the eye of the beholder... or in something as simplistic as a pen. Did you know Amazing Clear Cast Resin is used for creating unique and beautiful turned pieces of art such as these pens??!

The barrels of the pens were created from poured cured blocks of Amazing Clear Cast Resin and Alumilite Metallic Powders and Dyes, then turned on a lathe and polished to expose a beautiful organic swirled design.

Watch to see more of this amazing process...


If you have trouble viewing video, please CLICK HERE.


This technique can be varied with additives to create casting blanks for pens, handles, bird calls, knife scales, vessels and more.


What would you embellish with resin?

Thanks for visiting! You can see more beautiful resin turned
creations at http://www.alumilite.com/wood-turning.

• • • • • • • • • • • • • • • • •

Don't forget to subscribe to our blog on the right side bar:
Twitter at AmazingCasting | Facebook at AmazingMoldPutty | YouTube at AmazingMoldPutty

Tuesday, June 21

Handmade Earrings with #Cre8time Charm...
by Lara Hjorthoy


Hi Artists! With this being the first couple of days of summer, I decided my jewelery collection needed something a little fun! Plus I wanted to use the metallic powders by Alumilite and create something EXTRA special! So after making a couple of teensy tiny flowers in clay, I molded them with the always amazing, Amazing Mold Putty!

When they cured I happily spread silver metallic powder into the mold and then mixed up some Amazing Casting Resin and dropped a couple of drops of black dye into the resin. I mixed it up good and proper, poured and after a little bit of time, out popped my tiny little flowers! They're so pretty! Added some sparkly touches and some hooks and bam! Brand new earrings! In waaaaay less the time it would have taken to go to the mall, shop around and find ones that MIGHT have been as good! 

Gotta love this stuff!

Share with me your summer jewelry creations,
I'd love to see what you do!

Cheers! ~ Lara

Check out my website at www.larahjorthoy.com and YourToyCreation.etsy.com. You can follow my day to day creations at Facebook and Instagram, look for YourToy Creations!

• • • • • • • • • • • • • •

Don't forget to subscribe to our blog on the right side bar:
Twitter at AmazingCasting | Facebook at AmazingMoldPutty | YouTube at AmazingMoldPutty

Thursday, May 12

#Cre8time Practice Makes Perfect... Amazing Clear Cast Tips and Tricks by Tracy Alden


Hello! Tracy here with another Amazing Casting Products inspiration post! I spend a lot of time working out ideas and testing out craft supplies to see what might be possible with future projects. Some don't work out, some are happy accidents and others a success. Here is a few of my tests using Amazing Clear Cast Resin!


Often I have to work through resin mishaps thanks to my impatience. I love working with Alumilite Dyes, but when I first started working with them sometimes I would add too much dye into my Amazing Clear Cast Resin. I learned quickly a little dye goes a long way! 

Another lesson in patience was to remember to let each layer of resin to cure at least to a tacky set before adding in embellishments. In my resin pieces above not only is the dye-to-resin ratio a bit off but the glitter floated around in unpredictable manners because I was in a rush. 


Now I when I mix up a small portion of Amazing Clear Cast Resin to be used for pouring into molds, I make sure to slowly stir to reduce air bubbles and let it sit for 10-20 minutes. By letting the resin rest before pouring, the resin will be thicker, holding embellishments in place. To create really dynamic effects – I will add some Alumilite Metallic Powder to a separate batch of Amazing Clear Cast to drop by toothpick and swirl carefully in untinted resin to create lovely organic movement.


If I pour a thin clear layer of Amazing Clear Cast Resin, let it cure to a tacky set, then add glitter, flowers and/or paper I can carefully trap them in place with a second layer of clear resin. The final layer of resin can be tinted with different Alumilite Dyes and/or Alumilite Metallic Powders to create dynamic eye popping contrast or subtle glows.


One of my most recent tests was using old eye shadow added to Amazing Clear Cast Resin and gently stirred with a toothpick. Dull old eye shadow was given a second life when it soaked up the resin and gave the resin a soft yet sparkling shimmer. If you use mica powders and artist pigments you can create a similar look. Just remember after adding and stirring the powders some air bubbles can form and use a craft heat gun to gently pop any air bubbles before the resin cures.


Amazing Clear Cast Resin can also be used to duplicate the look of enamel and antiquing on jewelry. The pendant on the left I felt the shape and general layout was nice it didn't highlight the details. I removed the small flower oval and rubbed on Clear Cast tinted with blue Alumilite Dye with my finger. I removed any excess with a baby wipe and added little pools of resin in the deeper recesses of the pendant and more rhinestones. My end result was the pendant on the right, looking like it came straight out of an exotic bazaar! 


With your imagination, craft supplies and a little help from Amazing Clear Cast Resin a wild assortment of jewels and baubles can be made!
What AMAZING arts and crafts can you create?

Please share them on the user GALLERY on the Amazing Crafting Products Website!

Visit my blog Art Resurrected for more craft tutorials!

Until next time, safe travels! ~ Tracy

• • • • • • • • • • • • • • • • •

Don't forget to subscribe to our blog on the right side bar:
Twitter at AmazingCasting | Facebook at AmazingMoldPutty | YouTube at AmazingMoldPutty
Related Posts Plugin for WordPress, Blogger...