Showing posts with label greencrafting. Show all posts

Thursday, December 31

Ring in the New Year with #Cre8time Recycling... by Maria Soto


Hi there! I decided to make a new bracelet to wear for the New Year's party. I had these empty duck tape rolls and decided to use one to make a quick and easy resin bangle. 


Now sometimes when I paint, I keep napkins handy to clean the brushes or spills. I'm very clumsy so it happens a lot. As I was working, I noticed all the pretty colors so I decided to use these decoupage a bangle... but instead of using glue, I used the Amazing Clear Cast Resin to add the napkins I used to clean up my paints.


It was so easy, I cut the empty roll in half. I gathered my supplies and went on to mix a small amount of Amazing Clear Cast Resin


Amazing Clear Cast Resin has easy to follow instructions on the box or CLICK HERE to view mixing/preparation. I mixed a small amount of resin and applied it to the outside of the empty roll a little bit at a time using the mixing stick, then applied sections of painted paper towels.


Once I was done covering the outside with the colored paper towel, I added a bit more Amazing Clear Cast Resin over all the tissue and let it dry overnight. I used a mold to hold the resin covered bangle and to make sure it would catch any excess resin.


It's all done and ready to wear! Now you can either do the same process to the inside of the bangle –or just paint it and then seal it with more resin.


I'm so ready to wear this for our New Year's party. Amazing Clear Cast Resin is one of my favorite crafting products... it can be used in so many different ways – not only to be used in mold making.

How do you use resin?
Any fun and creative ways?
Please do share with us by leaving a comment below.

Looking forwards to creating outside the box
in the coming year... Happy New Year to all!

Thanks for visiting! I invite you to stop over to my blog, "What is Creativityat http://chuy-creativity.blogspot.com to see more of my creations. Maria Soto

• • • • • • • • • • • • • • • • •

Don't forget to subscribe to our blog on the right side bar:
Twitter at AmazingCasting | Facebook at AmazingMoldPutty | YouTube at AmazingMoldPutty

Tuesday, December 15

#Cre8time Greencrafting... from Packaging to #Recycled Girly Frame by Maria Soto


Hi there, this is Maria and today I bring you a project I created because I wanted to recycle. I got this package in the mail that had several boxes inside and each box was kept in place with a cardboard frame. Well as I removed each box, I placed each cardboard frame over each other and that's when I noticed that if I joined all three I could create a frame. 


I played with the idea... sure I could just paint and embellish it a bit and add a photo, but I thought why not bring out one of my Amazing Mold Rubber frame molds –  I have several made from previous projects.


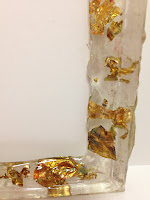
This time I decided to use Amazing Clear Cast Resin to cast the frame... to make it fun I added some gold foil into the frame. The process took a few days since I had to apply layers of the resin and the gold foil – I wanted the foil to look as if it was floating inside the frame.


Now the easy part was to make the resin frame. Once that was done, I had to decide on what colors to use on the cardboard frame.


I used acrylic paints – a mix of gold, silver and copper with a bit of shine to the mix. As I created the frames, I decided to use it to frame a photo of my daughter and my two nieces. I added add a bit of pink to break up the colors and make it girly.

I wanted a simple frame, so I added a pretty white flower to the side and added a hanger... now this recycled frame is all ready to go up on my wall at my office. I have tons of photos of all the kids in our family – it was time to add a photo with our newest addition, little Victoria, and her two older cousins.


Funny how sometimes you can be inspired to create with simple things like pieces of cardboard that just happened to create a frame when you place them on top of each other! Now I have a very pretty frame to decorate my office {or I just might keep it at home}, either way it's a nice home/office decoration.

I hope this project has inspired to look around to see what inspires you to create. 

Materials used:


What items do you save for greencrafting?

Thanks for visiting! I invite you to stop over to my blog, "What is Creativityat http://chuy-creativity.blogspot.com to see more of my creations. Maria Soto

• • • • • • • • • • • • • • • • •

Don't forget to subscribe to our blog on the right side bar:
Twitter at AmazingCasting | Facebook at AmazingMoldPutty | YouTube at AmazingMoldPutty

Tuesday, July 14

Summer Vacation Inspires #Cre8time Stars...
by Melissa Johnson


Hello everyone! Today I am sharing a beachy, upcycled home decor project featuring Amazing Casting Products. I like to engage in other mixed media projects from time to time, such as assemblage or making home decor. I was super excited to have the opportunity to work with the Sculpey Clay and the carver set to create some custom items for molding and casting in Amazing Casting Resin.

After our recent vacation at the beach, I was inspired to make something with a beach theme and the first thing I thought of when I got the clay was starfish! Since I normally have a wine bottle or three laying around, I thought it would be fun to upcycle it into a piece that could go on a shelf or be used as a centerpiece.


I created the starfish using the clay and a cookie cutter. I didn't want the star shape to be perfect, so I pulled and shaped the clay into a more "natural" shape. Using the carver set, I carved in the details. After curing the clay pieces, I created molds using Amazing Mold Putty and cast in Amazing Casting Resin. I painted the resin pieces with Golden Titan Buff, and brought out the detail with acrylic ink.


I've been trying to use more of what I have on hand, and luckily I found this awesome sea foam green spray paint in my stash. I used it on the wine bottle.

On to the details... I glued on the starfish using E6000® and added twine, dyed sea shells (graciously donated from my 7 year old daughter), a little bit of lace, a random strand of plastic pearls from my kids art stash, and my Viva pearl pens to create "beads".


Make something that makes you happy :) ~ Melissa Johnson
Please visit my BLOG to see more of my mixed media creations.

• • • • • • • • • • • • • •

Have you always wanted to be part of our team??
We have a call for guest creatives... CLICK HERE for details.
{deadline: July 15, 2015}

• • • • • • • • • • • • • •

Don't forget to subscribe to our blog on the right side bar:
Twitter at AmazingCrafting | Facebook at AmazingMoldPutty | YouTube at AmazingMoldPutty

Tuesday, June 16

Soar with a Little #Cre8time and REuse leftover Resin... by Aimée Wheaton


Forgive me for this brief little project but hopefully it will inspire you to "soar" with your creativity. Summer break has started which means both kids full time and no me time. I am ready for school to start again LOL. Anyways I came up with the idea to reuse leftover resin pieces and turn it into something nice. This could be a magnet, a pendant (pretty large), wall hanging, something pretty to look at on your desk or whatever else you can think of.

These leftover resin pieces I have are from new projects where I make too much resin and I have molds readily available to fill so I don't waste the resin. Let's just say I make too much resin and have a box full of goodies to use.


This came together quickly because the pieces were already cured. I hope you enjoy this simple project. All you need is Gel medium, paper, stamp pad, alphabet stamps, glue, paint and leftover resin pieces!!


Hope you like it!!!


To see how all of our AMAZING products can enhance your art,
please check out these AMAZING products!

Let's see what you can create

Feel free to stop by my FB page to see the latest with me. 
To see more of my work please visit my blog "Creative Flutters"
and also at the Aimée Wheaton Art and Design website.

Till next time! Xoxo Aimée

 • • • • • • • • • • • • • •

Don't forget to subscribe to our blog on the right side bar:
Twitter at AmazingCrafting | Facebook at AmazingMoldPutty | YouTube at AmazingMoldPutty

Friday, May 1

#Cre8time for AMAZING Upcycling! Mini Altoid Tin Resin Locket tutorial by Tanya Ruffin


I love my puppies, so I thought what better way to commemorate them than to create a Cairn Terrier locket out of a mini Altoids tin.

Supplies:


Steps:

  1. Sand a mini Altoids tin with a fingernail file, to rough up the surface for paint.
  2. Using a small bit, drill a small hole in the top and the bottom of the tin that will be used to hang from the necklace and to attach a beaded tassel later.
  3. Paint the tin black and accent with silver Rub n' Buff®.
  4. If you are making your own cameo, see steps below using Amazing Casting Products. If using a cameo you already have, cast your frame and glue pieces together.
  5. To make accordion booklet, cut sketch paper or cardstock 2" tall and about 12" long. Fold in an accordion manner every 1 1/2", alternating the direction of the fold... mountain, valley, mountain, valley... etc.
  6. Glue your images inside the booklet, fold up and place inside the tin.
  7. The booklet will fit snug inside so there is no need to glue it inside the tin.

Follow along with photos below...


Attach beads or beaded tassel to the bottom. Add to a chain and enjoy!


What would you customize and alter
with cast resin pieces into a locket?

Craft Your Own Way!


with 


Please visit my site to see more of my inspiring creations at www.tanyaRuffin.com

• • • • • • • • • • • • • •

Don't forget to subscribe to our blog on the right side bar:
Twitter at AmazingCrafting | Facebook at AmazingMoldPutty | YouTube at AmazingMoldPutty
Thursday, April 30

Sweet Treats lead to #Cre8time Greencrafting and a Mini Koi Pond... by Tracy Alden


Hello! Tracy here with another Amazing Casting Products inspired project! Though in all honestly it wasn't just resin that got me thinking; crème brûlée, the lack of sleep and The Simpsons also helped. Without sounding completely daft, let me try to explain...

A friend of mine served some crème brûlée one day while I was visiting, and she noted that the glass cups that the crème brûlée served in was sold pre-packaged. She wondered if I could find a use for them. Of course I took several to see what projects I could come up with. Next came not sleeping so well, but often in the middle of the night I get great art ideas.

One of those ideas was turning the crème brûlée cups into miniature ponds. However as lack of sleep is known to play funny tricks on the mind, instead of normal fish I thought of Koi fish looking like "Blinky the Three-Eyed Fish™" from The Simpsons swimming merrily in the ponds. With all this inspiration I just had to make them!

Supplies:


I started off making sure the crème brûlée cups were thoroughly cleaned and dried, making sure to not leave any fibers in the glass thanks to static electricity.


Next I applied the Grey Multi Suface Chalk Paint with a cosmetic sponge inside and out of the glass cups. They needed two coasts of paint to get a color shade similar to cement. I let the paint dry overnight.


To make the pebbles for the bottom of the pond I used Premo White clay that had dried out and crumbled. Using a Clay Craft Blade I cut up the clay into tiny little bits and then baked the clay as per the manufacturers instructions.


I mixed up some Amazing Clear Cast Resin and poured a thin layer of resin into the cups and sprinkled the now cured clay pebbles on top. I made sure to completely cover the bottom of the cup with the pebbles.


Before the bottom layer of resin started to set I mixed up another small batch of Amazing Clear Cast Resin and poured it on top of the clay pebbles to lock them in place.


I cut up little pieces of scrap plastic and stuck them in the wet resin to give the appearance of reeds in the pond. I was careful to make sure the plastic reeds were nestled in-between the clay pebbles. I let this cure completely sealing the pebbles and reeds in place.


I created polymer clay Three-Eyed Koi fish, lily pads and flower buds using Premo Polymer Clay and Alumilite's 4 Piece Carver Set. I poured a layer of resin into the cups and carefully placed the fish in the resin. I kept them in place by looping thread around their bodies and attaching the thread to pencils, suspending them in the resin. I let this layer of resin cure.


The finishing touch was to pour one more layer of resin, making the fish look like they were in water and floating the clay lily pads, flowers and flocking fiber on the surface of the resin.


Once the final layer of resin was cured the ponds were ready to be placed in any miniature scene I would like. :)

What AMAZING arts and crafts can you create?


Visit my blog Art Resurrected for more craft tutorials!

Until next time, safe travels! ~ Tracy

• • • • • • • • • • • • • • • • •

Don't forget to subscribe to our blog on the right side bar:
Twitter at AmazingCrafting | Facebook at AmazingMoldPutty | YouTube at AmazingMoldPutty

Thursday, April 23

#Cre8time meets #Recycling for AMAZING Resin Coasters... by Tracy Alden


Hello! Tracy here with another Amazing Casting Products tutorial! Many of my craft and art projects normally have some aspect of recycling or reuse, such as using old deli containers for mold boxes or shrink plastic projects, newspaper for papier-mâché, paper scraps for miniatures, cardboard for backing or odd shaped mold boxes, and food containers to store small craft supplies.

Which brings me to my inspiration for this project: After a somewhat madcap baking spree I had several clean plastic icing containers perfect for reuse. I noticed the inside of the lids were slightly bigger than most common cups, had no pattern and had a great circle grove, so flipped over it could make a quick coaster mold!

Supplies: 


I started with making sure the former icing canister lids were clean and lint free. I then sprayed a mold release on the lids to ensure the resin would come out easily once fully cured.


My first layer of Amazing Clear Cast Resin was a thin layer tinted with Black Alumilite Dye. I made sure the entire bottom of the lid was coated with resin.


Next I added some glitter to the black tinted resin layer, gold red and a homemade mix. The homemade mix comes from often spilling glitter but saving the glitter for later use. This is one of those times that a random glitter mix is perfect for a bit of simmer in the background!


I went through some of my scrap paper to find the perfect embellishments for the resin. Old catalogs, paper samples, leftovers from projects and salvaged pieces of paper are a perfect resource for wonderful snippets of color.


After embossing and texturing some of the paper I inked the paper scraps with the StazOn Solvent Ink to highlight and age the paper. At this point I picked the papers I wanted to use for this batch of coasters, saving the rest of the papers for my next set.


I then cut the different paper scraps into smaller pieces so that they would fit inside the molds. I sealed them with Liquitex Gloss Varnish coating the front and back of each piece and letting it dry.


Second thin layer of Amazing Clear Cast Resin was poured and carefully I floated some of the sealed papers on top of the resin. I let that cure until reaching a tacky set – about a few hours in warm weather before moving on to the next step.


The third layer I poured a little thicker than the last to give some visual depth between the layers of paper. I added some clean, used tin foil and more paper to this layer of resin. Once again I let the resin cure until reaching a tacky set before pouring the final thick layer of resin.


Once the final layer of resin was fulled cured I was able to remove the now complete coasters from their molds by carefully peeling the plastic lids from the resin.


With so many other papers and embellishments that can be placed into the resin, any variety of patterns and styles of coasters can be made! 

What AMAZING arts and crafts can you create?


Visit my blog Art Resurrected for more craft tutorials!

Until next time, safe travels! ~ Tracy

• • • • • • • • • • • • • • • • •

Don't forget to subscribe to our blog on the right side bar:
Twitter at AmazingCrafting | Facebook at AmazingMoldPutty | YouTube at AmazingMoldPutty
Related Posts Plugin for WordPress, Blogger...