Showing posts with label Jess B.. Show all posts

Wednesday, May 11

#Cre8time Garden Transformations... #ACPthrowback #FlowerPower


Hello Amazing Crafters! Ready for some more "FLOWER POWER" inspiration – our love of flowers combined with Amazing Casting Products. Today we revisit a couple of #ACPthrowback projects featuring flowers and Amazing Mold Putty!


Make a wearable statement with unique handmade jewelry made from molded lace. Amazing Creative Isabel Villarreal molds some beautiful sequined lace in Amazing Mold Putty and brings her colorful garden to life with Alumidust, glitter, Amazing Casting Resin and a few jewelry findings.

CLICK HERE to jump over
to how-to and to see
Isie's finished necklace.

Want to see more of what Isie is up to?
Follow her on her blog here!

• • • • • • •


The possibilities with Amazing Casting Products are endless! Combine your love for mixed media and shabby chic flowers. Designer Jess B. combines stamping and molded flowers captured in Amazing Casting Resin to create an amazing dimensional heart of gold and lace.

CLICK HERE to jump to
Jess B's how-to.

Want to see more of what Jess B. is up to?
Follow her on her blog here!

• • • • • • •

Share your creations using Amazing Casting Products for
our next #ACPthrowback Third Thursday on May 19th.


Post them to our Facebook page, or tag us on Instagram, Pinterest, and on Twitter to be featured here on our blog. We'll be looking for your projects with the hashtag #AmazingCastingProducts.

• • • • • • •

Don't forget to subscribe to our blog on the right side bar:
Twitter at AmazingCasting | Facebook at AmazingMoldPutty | YouTube at AmazingMoldPutty

Thursday, December 3

Serving Up Family Memories... #12DaysofHomeDecor #ACPthrowback


Hello Amazing Crafters! For day four of our 12 Days of Amazing Home Decor we revisit an #ACPthrowback project by creative Jess B. Time goes by so fast and the children are growing so quickly... what a better way to capture the good times – by embedding them in a decorative tray transformed into some Tres Chic Home Decor!


Combine your favorite photos with some feathers, beads, ephemera and found objects in a wooden tray... cover with a layer of Amazing Clear Cast Resin and you have some AMAZING home decor.

CLICK HERE to jump to
Jess B.'s full how-to.

Want to see more of what Jess B. is up to?
Follow her on her blog "That'z Uneek"!

• • • • • • •

Share your creations using Amazing Casting Products for
our next #ACPthrowback Third Thursday on December 17.


Post them to our Facebook page, or tag us on Instagram, Pinterest, and on Twitter to be featured here on our blog. We'll be looking for your projects with the hashtag #AmazingCastingProducts.

• • • • • • •

Don't forget to subscribe to our blog on the right side bar:
Twitter at AmazingCasting | Facebook at AmazingMoldPutty | YouTube at AmazingMoldPutty

Friday, August 2

Capture those "Good Times"... Mini Shadow Box
by Guest Designer Jess B.

Hi Everyone! Jessica here to show you another fun way to use Amazing Clear Cast Resin and Alumilite Dye. I wanted to create a gift that I know will put a life-long smile on my husband's face. 


As our children are growing so quickly, I want to cherish those Good Times. I am my moms only child... and will never understand what it is like to have a brother or sister. My kids can fight and argue all day but still manage to find comfort together. This picture was not staged or set up - I walked over casually to the living room and said "smile".


I started with a wooden shadow box by conditioning, painting and then let dry over night. I added a piece of scrap paper as my first layer. I prepared a batch of Amazing Clear Cast Resin, following the easy instructions {click here to view} and measured equal amounts of parts "A" and "B"; then stirred gently and thoroughly. I let it rest for a few minutes before pouring over the paper into the tray.


I used a lighter to remove any bubbles leftover from mixing. I set aside to cure for 24 hours.


The next day, I prepared and added another layer of Amazing Clear Cast Resin; then added mini bulbs from Hobby Lobby "Spare Parts" collection, some colorful beads and cello glitter. I repeated the same process for the first layer to remove remaining bubbles and let cure again for another 24 hours.


For a third and final layer - I added the photo and dropped in a few drops of Alumilite Red Dye inside creating swirls with a toothpick. I let this cure for another 24 hours... and it's DONE!


INGREDIENTS: Amazing Clear Cast ResinAlumilite Red Dye; wooden shadow box; scrap paper; photo; Recollections wood embellishments; miscellaneous beads; and Hobby Lobby - Paper Studio Spare Parts.

I am very happy with this project and have started my holiday gift giving.

What would you put inside your Shadow Box?

I would love to hear what your answer is and what you would LOVE to create with Amazing Mold Putty... please leave a comment below! To see more of my work, please CLICK HERE to visit my blog "thatzuneek".

Thanks for stopping by! 


.................................

Don't forget to subscribe to our blog on the right side bar:
Twitter at @AmazingCrafting | Facebook at AmazingMoldPutty | YouTube at AmazingMoldPutty

Tuesday, July 9

My Altered Journey Clock... by Guest Designer Jess B.


Hello Everyone! Jess B. here today with a fun and "TIMELY" project to share.


In my young adult age I was called "Touch-n-Go". I'd traveled constantly visiting friends and exploring their states when possible. I knew how to turn 2 weeks of vacation to 6 travels a year. I've traveled from Florida to California to Europe. 


Today I'm sharing an altered clock I purchased at the neighborhood thrift shop for $2.00. I used a mini hexagon ice mold from Outset and Unity Stamp Co - Life is a journey.


I prepared Amazing Casting Resin®. I put 3 drops of Alumilite Yellow and Black Dyes® into my mixing/pouring cup, pour in Part "A" with Popsicle stick provided and then added Part "B" and started to mix until there were no more swirls.


I poured the yellow resin into the flexible ice mold and I poured the black resin on top of the rubber stamp (sorry that I did not take a picture of this process). I wasn't sure if was going to be a failure or not but it came out beautiful. I removed the resin when cured and trimmed edges with scissors while it's still a little pliable.


When I do this again, I will mask off the edges of the stamp
with painter's tape to make a clean edge.


I used patterned paper from American Crafts - Travel
and arranged my resin pieces with E-6000 adhesive.


I reassembled the clock popped in a new battery
and it now hangs on my wall in my craft room.


This fun clock will always put a smile on my face
and inspire my children to travel the world.

Where do you want to travel?

I would love to hear what your answer is and what you would LOVE to create with Amazing Mold Putty... please leave a comment and your link below!


To see more of my work, please CLICK HERE to visit my blog "thatzuneek".

Thanks for stopping by! 


.................................

Don't forget to subscribe to our blog on the right side bar:
Twitter at @AmazingCrafting | Facebook at AmazingMoldPutty | YouTube at AmazingMoldPutty

Tuesday, June 18

AMAZING One-of-a-Kind Altered Phone Case...
by Guest Designer Jess B.

I've seen many versions of people who bling out their phone cases – and suggesting all types of adhesives to tack down their rhinestones and embellishments. 


What better way to make sure they stick but with Amazing Clear Cast Resin???


I bought the phone case from Marshall's for $4.99.


I prepped the phone case by using rubbing alcohol to remove all debris.


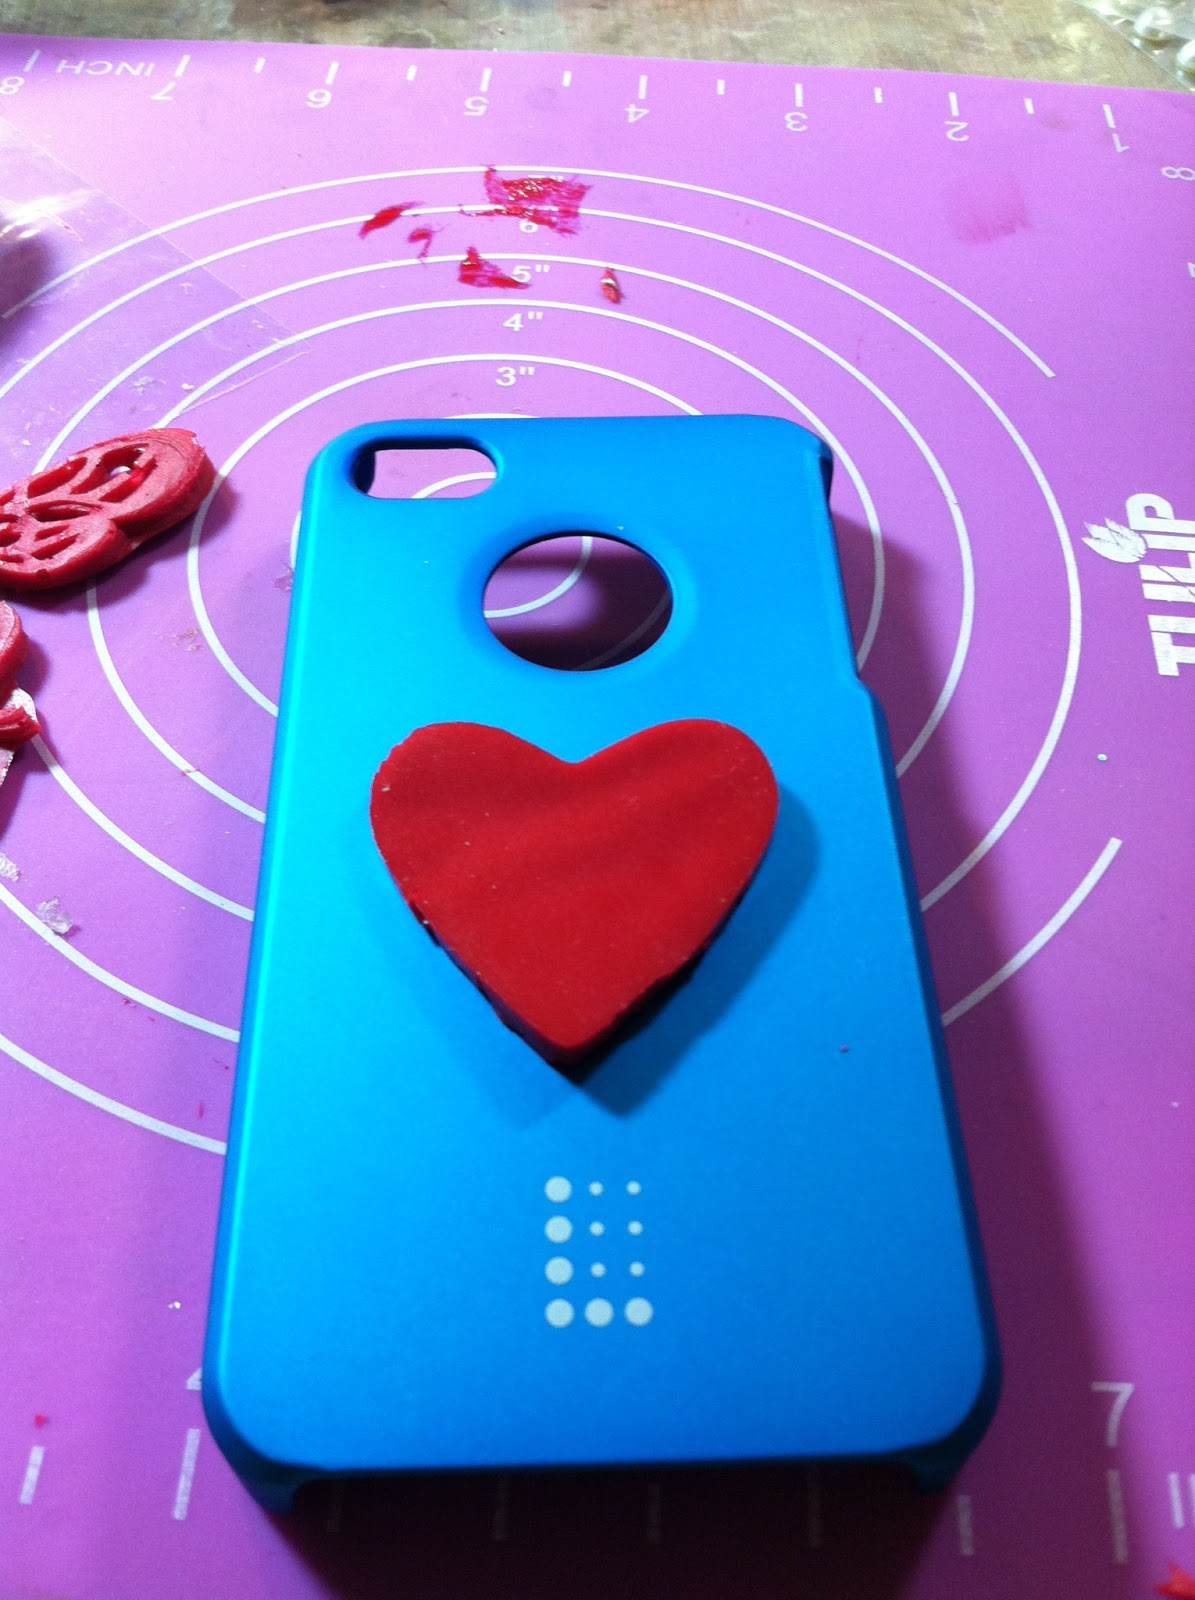
As it dried I started creating a heart embellishment using a Amazing Casting ResinRed Alumilite Dye, a heart-shaped cookie cutter and clear box tape.


I prepared and mixed Amazing Casting Resin
according to the easy-to-follow instructions.


Then I added about 3 drops of Red Alumilite Dye to part "A" of the resin; stirred completely; then combined with part "B". After stirring both parts together, I poured the resin into the heart cookie cutter. For full instructions on mixing Amazing Casting Resin, please CLICK HERE.


The resin heart cures in about 15 minutes...


Love the red vibrancy !


Now to add some bling. I used Ranger's Glossy Accents
to adhere all the embellishments in place.


My daughter lost one of her earrings. So I just clipped off the post
and added it to the center of the heart... and BAM! Total cuteness!!!


I let it sit for a little while for all the adhesive to dry completely. Then I added blue painters tape around edge of the phone cover to protect the edges and to make a retaining wall for for the Amazing Clear Cast Resin.


I mixed up a batch of for the Amazing Clear Cast Resin following the instructions; stirring completely and giving the resin a few minutes to rest and let bubbles dissipate. Please CLICK HERE to view how-to on mixing and preparing Amazing Clear Cast Resin.


I poured the Amazing Clear Cast Resin, covered and let it cure for 24 hours. 


I also added glitter on the sides of the case for that extra glitz.


After all was done - I was so excited to snap on my new case... then come to realize it wasn't my size. Ugh! Another day in the life of Jess B. – LOL! It will make a great gift!

So go ahead... have fun and create
your own one-of-a-kind phone case!


To see more of my work, please CLICK HERE to visit my blog "thatzuneek".

Thanks for stopping by! 


.................................
__________________________________________

Use this COUPON to shop at the Amazing Mold Putty
website HERE and receive 25% OFF your purchase.
Please use coupon code " summerhaus " {no quotations}.
Coupon expires June 30, 2013.
__________________________________________
.................................

Thanks for stopping by and have a great day!

Don't forget to subscribe to our blog on the right side bar:
Twitter at AmazingCrafting | Facebook at AmazingMoldPutty | YouTube at AmazingMoldPutty

Monday, June 10

Shelf Full of Memories... AMAZING Inspiration from Guest Designer Jess B.

I enjoy visiting my Mom's house.
She loves to collect little memories from past events.
I call them trinkets or choch-kies (may not be spelling it correctly).


I started looking on her shelf full of memories and dusted them off. 
I have found many items: old, brittle, and broken which has given me an opportunity
to fix them up and bring them back to life again.
Oh, how fun it would be to use them for other projects too?


Using Amazing Mold Putty, I mixed equal parts "A" and parts "B" thoroughly according to the instructions, then pressed this decorative letter K into the mold putty. To view a detailed HOW-TO of mixing Amazing Mold Putty, please CLICK HERE.


I prepared and mixed Amazing Casting Resin according to the easy to follow instructions. I poured gold glass beads before adding the resin into the mold to cast my letter. For full instructions on mixing Amazing Casting Resin, please CLICK HERE.

What's on your parents memory shelves?
Share your projects and comments down below.

To see more of my work, please CLICK HERE to visit my blog "thatzuneek".

Thanks for stopping by! 


Don't forget to subscribe to our blog on the right side bar:
Twitter at @AmazingCrafting | Facebook at AmazingMoldPutty | YouTube at AmazingMoldPutty

JESS B's GUEST DESIGNER Spotlight...


Amazing Crafting Products has changed my perspective in the crafting world. It is a fantastic addition to every craft room out there. Bonus when you want to duplicate an item, repair something broken and make something beautiful. Now I cannot live without it.

A little bit about myself...

This 43 years young gal that is full of life to the best of my ability. Chasing after 3 little energy bunnies daily really keeps me on my toes.

I love things that are eclectic, eccentric and one of a kind. I love STEAMPUNK. You wouldn't know if you saw me. I am mad scientist when crafting and looks like an explosion on my table when I am done. 

When I’m in a crowded room I love to get the energy going and have fun. Lastly I love taking pictures of the sky from dusk till dawn and post on Instagram.

What did I want to be when I grew up?

Not sure? I asked my mom again and she said I didn’t know. I know now I want to eat and sleep making beautiful things. I am constantly evolving in crafting world always wanting to try something new to find my niche.

I asked myself why didn’t I just get a degree in art? I am not sure, but I do know this… My eyes are my canvas, my hands are my tools and guide, and I’m rewarded by smiling faces.

I thank my mom for making crafting fun.

I've answered these fun questions for inquiring minds...

If I could print any phrase on a T-shirt, what would it say?

"THINK OUTSIDE THE BOX"
or
"I HAVE A 'CAN DO' ATTITUDE"


What inspires me?

I am inspired by daily life experiences. I look at every intricate details from many things people don’t look twice at (broken glass, bricks, left over paper scraps) always figuring how I could incorporate it into my works.


What is the TOP thing to do on my "Bucket LIST"?

Amazing Clear Cast ResinAmazing Clear Cast Resin - Amazing Clear Cast Resin...
then Steampunk summer themes... then Fairies... then Weddings and Baby Showers.


If I could mold ANYTHING with Amazing Mold Putty, what would it be?

Bangles, rings and branches immediately comes to mind.


What style of music gets my creative juices going?

I’m worldwide when it comes to music anything from
Classical to Bollywood, to neo-soul to techno.


Now, I pose a question to the readers...
Why haven't you tried Amazing Crafting Products yet?

I would love to hear what your answer is and what you would LOVE to create with Amazing Mold Putty... please leave a comment and your link below! To see more of my work, please CLICK HERE to visit my blog "thatzuneek".

Thanks for stopping by! 


Don't forget to subscribe to our blog on the right side bar:
Twitter at AmazingCrafting | Facebook at AmazingMoldPutty | YouTube at AmazingMoldPutty

Tuesday, May 21

Multi-Dimensional Shabby Chic Heart Collage...
by Guest Designer Jess B.


Hello Everyone - Jess B. here and once again I have been honored to show you what fun possibilities lay upon your visions. I was a the end of my Amazing Casting Resin and wanted to go another route of design. For today's project, I was inspired by loads of mixed media videos on YouTube.


What would happen if I were to ink
and stamp images in my mold and then pour
the Amazing Casting Resin on top???

This project is all experimentation - and I'm very happy with the results.


Using Amazing Mold Putty, I mixed equal parts "A" and parts "B" thoroughly according to the instructions, then pressed in my flowers to create a mold. For HOW-TO of mixing Amazing Mold Putty, please CLICK HERE. This mold was cured and ready to go in about 15 minutes.


For my heart shape, I used a mini cake silicone pan I bought at TJ Max. I used a few drops of Alumilite Dye Black on a clear stamp from Teresa Collins Every Day Moments stamp collection. Place ink and stamp on a wax sheet of paper or paint brush. **PLEASE NOTE** You don't want to use this cakeform for food after putting resin products in it.


Next, I prepared and mixed up a batch of Amazing Casting Resin according to the easy-to-follow instructions. I poured the resin into the cake pan on top of the stamped flowers. For full instructions on mixing Amazing Casting Resin, please CLICK HERE. The resin also cures in about 15 minutes...

Would the stamped images blend or stay in its place??? Well the images DID stay in place... but the dye was still a bit wet, so I decided to use the metallic powders to see if they would stick. With a brush I dusted the flower images and it stayed... and the results are Amazing! I'm loving it. I also used yellow dye to fill in the flower petals which gave it it's depth and dimension.


I also brushed on Alumilite Gold Metallic Powder to the edges of all the 3D flowers. The metallic powders can also be added to the resin while in liquid state.


You can see the stamped images and the detail of the gold edging {which I love}. I added buttons, sequins and vintage lace to complete the heart. I love the gold highlights on the stamped impressions.

I hope this has inspired you to create your shabby chic art using Amazing Crafting Products. I would love to hear what you have dreamt up - please leave a comment and your link below! To see more of my work, please CLICK HERE to visit my blog "thatzuneek".


Thanks for stopping by! 


Don't forget to subscribe to our blog on the right side bar:
Twitter at AmazingCrafting | Facebook at AmazingMoldPutty | YouTube at AmazingMoldPutty
Related Posts Plugin for WordPress, Blogger...