Showing posts with label fashion jewelry. Show all posts

Friday, February 16

How #Cre8time Charming... on any Surface be sure to Make It Artsy


Hello Amazing Makers!! Today we are sharing the latest episode of Make It Artsy where you will see two, yes TWO AMAZING Creatives... Lynne Suprock and Cat Kerr with ideas on making jeweled creations with Amazing Casting Products.

You don't want to miss this
episode of Make It Artsy?!


CLICK HERE to view this week's episode

The surface reflects your artistic flair. Lynne Suprock transforms shot gun shells into trendy jewelry. Debbi Simon adds heat to encaustic wax to create special effects. Cat Kerr creates a beautiful pendant with cool resin techniques and Mary Hettsmansperger adds color to copper.


Bookmark or PIN the Make It Artsy Website


Make It Artsy launched September 29, 2016 on Public Television stations across the country! Look for it on your local PBS channel – new episodes from series 300 are now airing. If you can't find it on your local programming, you can view this episode online by clicking this link Series 200, Episode 307 - On The Surface.


Make It Artsy is a show dedicated to the crafter, maker and artist! A series celebrates that maker spirit and enthusiasm that extends to every part of life. It’s more than crafting, more than art or scrapbooking; this is an all-encompassing show for any one that loves to make “things”. From mixed-media to metalsmithing, using tools from saws to sewing machines, and materials from paper to wood; today’s most creative “makers” join host Julie Fei Fan Balzer and unleash a new look for crafting with a touch of industrial style.


Amazing Casting Products by Alumilite Corp. is proud to be one of these fabulous group of companies partnering with Make it Artsy. Stay tuned for upcoming episodes with projects featuring more of our amazing friends using Alumilite's AMAZING products

• • • • • • • • • • • • • • • • •

Don't forget to subscribe to our blog on the right side bar:
Twitter at AmazingCasting | Facebook at AmazingMoldPutty | YouTube at AmazingMoldPutty

Wednesday, December 20

How #Cre8time Charming... AMAZING Inspiration by Lyn Gill


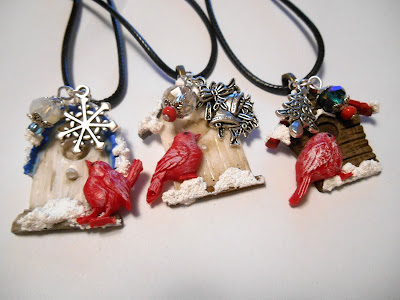
Happy Holidays everyone! Lyn here to share a bit of Christmas inspiration... cute little Winter Birdhouse Charms accented with a few feathered friends made with Amazing Casting Resin.


Using some tiny cast birds from Amazing Casting Resin and red Alumilite Dye, combined with some beads/findings, metal Christmas charms, acrylic paint and Snow Tex (available at most craft stores) –  I created these tiny Birdhouse Charms just in time for the Holidays. How cute are they? They'll be perfect Holiday gifts for loved ones!

What gifts will you create this season 

Well that's all for now... Till Next Time! Lyn

As always you can find more of my work on my blog LynzCraftz
or on YouTube LynzCraftz, or my Facebook page LynzCraftz.

• • • • • • • • • • • • • • • • •

Don't forget to subscribe to our blog on the right side bar:
Twitter at AmazingCasting | Facebook at AmazingMoldPutty | YouTube at AmazingMoldPutty

Thursday, November 30

#Cre8time Transformations... Lizard Pin/Brooch REDUX by Lyn Gill


Hi everyone! Lyn here again with a fun Lizard Fall brooch/pin project for you that's full of sparkle. I originally created this pin years ago – back when Southwest design was all the rage... so the 80s...LOL! The last time I wore it the back leg broke off. 


Now it's only made of Shrink Plastic so it's not very thick, it's kinda curved, and very textured. I've glued the leg back, but it may break off again. I decided I need to make a mold of it – so out comes the Amazing Mold Putty! It's perfect for getting the detail and I can add some depth to the pin at the same time. 


After mixing up equal portions of the 2-part Amazing Mold Putty, I pressed it out on my glass desktop to a pretty thin layer (1/4" or so), then I "rocked" the pin back a forth so that the whole pin made contact with the putty. I did it this way because I wanted the mold to be level and flat. I let this cure (it only takes 10-20 minutes). CLICK HERE to view mixing/preparation.


Now for the resin! Here I used Amazing Casting Resin with a drop of Alumilite Dye in Brown so the final colors would really pop (CLICK HERE to view mixing and preparation). I always have molds on stand-by to fill with "left-over" resin when I mix more than needed. I set aside to cure (again 10-20 minutes depending on the weather).


It worked! The finished Amazing Casting Resin Lizard is still thin but thick enough to be rigid. So it shouldn't snap like the original did.


I glued a pin back to the back with a bit of E-6000® and let that cure for at least 30 minutes – but I let it set an hour just to be sure.

Now comes the FUN part! Using some Metallic Acrylic Paints, I "dry-brushed" the pieces starting with Gold, then Bronze and then Copper (you could use any colors). The paint dries really quick so in just a few minutes, you're ready for the next step... Rhinestones! Yep, Rhinestones!!! I have some of them in several sizes and colors. So I chose some Clear Aurora Boreallis – these reflect the colors perfectly (again, you could use any color). A bit of Black Acrylic Paint for the eyes and my fun, sparkly Fall rhinestone lizard brooch is done!


This would make a great gift for the Holidays!
So glad I didn't throw that little pin away when it broke... LOL.

What broken object could you mold
then cast in Amazing Casting Resin?

Well that's all for now... Till Next Time! Lyn

As usual, you can find more of my work on my blog LynzCraftz
or on YouTube LynzCraftz, or my Facebook page LynzCraftz.

• • • • • • • • • • • • • • • • •

Don't forget to subscribe to our blog on the right side bar:
Twitter at AmazingCasting | Facebook at AmazingMoldPutty | YouTube at AmazingMoldPutty

Monday, October 23

From the Witch's #Cre8time Cupboard... by Lyn Gill


Happy Halloween everyone! Lyn here again bringing you a fun Halloween charm just in time for your big event!


I crafted the original skull from Super Sculpey and baked it until cured (according to package directions). To prepare for molding I glued it down to the bottom of a disposable plastic cup with my hot glue gun. Then I mixed a small amount of Amazing Mold Rubber according to package directions (CLICK HERE to view mixing/preparation), and then slowly poured it into the cup – covering up the skull by about a 1/2''. I set aside to let cure overnight.


After de-molding my original it is ready to fill mold with some Amazing Casting Resin. After mixing equal amounts of Parts "A" and "B", stir until swirls and cloudiness are gone, then pour into the mold. Let this cure for 10 to 20 minutes before de-molding. CLICK HERE to view mixing/preparation.


While the molded resin piece is still "soft", I screwed in a screw eye to make a charm out of the skull. Then using some Black acrylic paint, I painted the whole skull and quickly (while it was still wet), wiped it back off – leaving it with an antiqued finish. 


I think it looks kinda creepy sitting on my handmade
ATC card (Artist Trading Card) and my Art Journal... 


What will you create to go
with your Halloween costume?

Well that's all for now... Till Next Time! Lyn

As usual, you can find more of my work on my blog LynzCraftz
or on YouTube LynzCraftz, or my Facebook page LynzCraftz.

• • • • • • • • • • • • • • • • •


• • • • • • • • • • • • • • • • •

Don't forget to subscribe to our blog on the right side bar:
Twitter at AmazingCasting | Facebook at AmazingMoldPutty | YouTube at AmazingMoldPutty

Wednesday, October 18

Take a #Cre8time BITE... by Susan M. Brown {sbartist}


"Dip the apple in the brew,
let the Sleeping Death seep through..."

Hello everyone! Susan here to share my latest handmade creations... some very Witch-worthy jewels! This queen of mold putty would normally break out the magic yellow stuff but I wanted to make multiples so I decided on using Amazing Remelt and it certainly did the trick!


Amazing Remelt is a Non Toxic, one-part reusable mold making material for room temperature or low exotherm materials. Amazing Remelt softens at 120˚F and becomes liquid at 135˚-140˚F. It can be remelted and reused to make new molds time and time again. This is ideal for making molds for smaller items such as jewelry, embellishments, and chocolate molds. YES, this stuff is FOOD-SAFE and it works great with chocolate and fondant!!


I have loads of items in a "TO MOLD" box – a collection of found objects, junque and things that I have collected or purchased at thrift stores. One of these items is an old apple pin that is a nice size that would make a nice pendant for a necklace made in resin... and with Halloween just around the corner, how about a POISON apple??! 


I need to do a little prep work to this piece before making a series of molds. The first thing being adding some tape to the backside so the molding material won't flow through the hole where the stem touches the apple. 


I cris-crossed some recycled coffee stir sticks through the pin back so that I can suspend this over a small silicone bowl that I will be using as a mold box.


Now to prepare the Amazing Remelt molding material. This is easy-to-use but you need to be patient and heat to melt in the microwave LOW and SLOW {CLICK HERE to view preparation}. I have melted it in the container it comes in, but for molding small items, I prefer using this cup fashioned with Amazing Mold Putty {molded around the outside of a shot glass}. I like this cup because it can be baked up to 375º F and it helps keep the melted material from cooling too fast.


These photos are showing the mold-making process from the altered "poison" apple. The process is exactly the same for all the molds. I placed the mounted apple over the top of a small silicone bowl then poured the melted Amazing Remelt over the top, completely covering surface of item. I let this set for a minute to cool and begin to harden, then repeated with a second layer. This forms a skin layer and helps prevent air bubbles from getting trapped.


I fill the bowl and flipped the mounted pin over and placed face down into the liquid Amazing Remelt. After leveling it on the bowl, I poured in more remelt to fill up to edge of suspended apple pin. At this point it looks like a mess... but it works! I set this in the refrigerator for about a 1/2 hour to cool and harden.


Now I can pop this AMAZING little apple mold out of the bowl and demold.


Look at the mold... it's fantastic! Amazing Remelt gives you the detail quality of Amazing Mold Rubber – but it's reuseable!! 


I can use these molds, then melt them down to mold something else. I don't have the molds cluttering up my shelves and I saved my Mold Rubber for another day. I am going to have to make a few more molds for FOOD ONLY and make some poison apple Halloween treats with chocolate melts.


With all of my molds made I am ready to fill with Amazing Clear Cast Resin. I am coloring the resin with Alumilite Fluorescent Green Dye and Alumilite Phosphorescent Powder {an additive that glows in the dark}. CLICK HERE to view mixing and preparation.


I mix up the resin and set aside to rest so it the resin can cool and the air bubbles can escape. The phosphorescent powder will make magic in the dark.


I spent the most time of making this project on mold preparation. I made 16 molds which took me a a couple hours one morning plus a whole entire day. The time consuming part is melting the Amazing Remelt slowly and then waiting for it to reharden to demold the original. I sort of felt like Willy Wonka with my assembly line of candy apples in progress LOL!

Before I pour resin, I gently cut a slice in each mold where I suspend a headpin with two glass beads which will be embedded in the resin. I will use this to form a loop at the top to affix beads and a jump ring for hanging on a chain. With a tiny brush, I added a bit of color to the leaf and stem using Alumidust.


I gently poured the resin with a stir stick, and filled each mold just so. Then I covered the tray and set aside to cure overnight. **A TIP** get two metal cookie sheets from the dollar store – use one to place the items on, use the other to turn over and place on top upside down to protect resin while curing. I clipped the edges with a few binder clips.


In the morning... my Halloween goodies have hatched and are ready to embellish!


I envisioned having them painted with purple drips to look like the poison apples. My first attempt was painting on my favorite purple nail polish in a real drippy fashion. This looked great while it was wet. I set it aside to dry and when I came back hours later was disappointed at how the nail polish flattened out, even though I had painted on several layers. It looked pretty, but screamed dollar store. 


After much trial and error of a handful of different products, Ranger Perfect Pearls was the one that helped me get in the direction I desired. I painted this dimensional glaze and traced right over my failed nail polish drips. PROGRESS!!! When this completely dried I smoothed and evened out the surface by pressing on a layer polymer clay and baking to cure and harden the clay. I watched this very closely when baking because I was concerned about the dimensional glaze burning.

When cooled completely I prepped this new "poison" apple as I did with the original and made a new mold with Amazing Remelt {see mold-making photo above}.


Voila! My new mold colored with Alumidust and ready with a beaded headpin awaiting resin. I'm so excited to see the end result this time!


After a bit of fussing about with wirewrapping some beaded danglies and forming a hanger from the embedded headpin, I add my gorgeous poison jeweled apple to a ready made chain.


For the good little ghouls... a pretty glowing green goddess apple!


And for those a little bad and BATTY... the glorious poisoned variety!

I love how these turned out and I have made loads for a charm swap! I'm off making more "POISON" apples in different color combinations... and I'm having such evil Cre8time fun!!

What would you mold and transform
into handmade jeweled treasures?

Thanks for visiting! If you would like to see more of my creations,
please visit my blog sbartist : painting in the dark by clicking here. ~ Susan

• • • • • • • • • • • • • •


• • • • • • • • • • • • • •

Don't forget to subscribe to our blog on the right side bar:
Twitter at AmazingCasting | Facebook at AmazingMoldPutty | YouTube at AmazingMoldPutty

#Cre8time Celebrations... Dia De Los Muertos Sugar Skull Earrings by Maria Soto

Hi there, this is Maria and today I bring you a fun and creative project. I love to be as original as possible with everything I do – and since I love, LOVE making molds I try and make my own original pieces when possible, then create molds of these using the Amazing Mold Putty. This is my favorite product because it cures in about 10 to 15 minutes.


Earlier this year I went a bit crazy creating pieces out of two-part jewelry clay and also paper clay... from which I made so many different things and then made lots and lots of molds to help me make some fun and interesting pieces. Today I am sharing one of the items I made.


Here you see my hand sculpted skulls, different shapes and sizes. 


I decided to make one big Amazing Mold Putty mold grouping all of these – since they are small enough and its easier to keep them all together. 


Most of what I create is using Amazing Casting Resin – simply because it cures in minutes and it allows me to go from molding right into embellishing my pieces right away. Do you see my Cherub on the new packaging??!

Creating the resin skulls:

1. Mix the Amazing Mold Putty as directed. CLICK HERE to view mixing/preparation.

2. Place the skull over the putty and press down, then wait about 15 minutes to remove the skull.

3. Mix the Amazing Casting Resin as directed, and pour into the mold, wait about 15 minutes to remove the resin skull. CLICK HERE to view mixing/preparation.

Creating the earrings:

1. Paint the entire skull with white acrylic paint (since the cured resin is white I skip this step).

2. Since the details of the skull are already there, all I have to do is take paint to make them stand out. I use black acrylic paint to highlight the uni-brow, nose and mouth.

3. For the eyes instead of painting them and to add more dimension, I opted to use red sequins and clear crystals.

4. Paint tiny heart with red acrylic paint.

5. I drilled a tiny hole on each skull right under the heart and added a headpin to assemble the earrings.


This turned out to be a very simple project. I love the light-weightedness of these earrings, you simply forget you are wearing them.  That's one thing I love about using this resin, it is so light, even on bigger pieces, you don't get that heavy feeling... which is one thing I dislike when it comes to jewelry, especially earrings. 


It really helps to have molds ready for creating... and spending time sculpting items to create different types of molds ahead of time to have on hand for later has worked wonderfully for me.  

Materials used:


What would you imagine creating
using these Amazing products? 

Thanks for visiting! I invite you to stop over to my blog, "What is Creativity"
 at http://chuy-creativity.blogspot.com to see more of my creations. ~ Maria Soto

• • • • • • • • • • • • • • • • •

Don't forget to subscribe to our blog on the right side bar:
Twitter at AmazingCasting | Facebook at AmazingMoldPutty | YouTube at AmazingMoldPutty
Related Posts Plugin for WordPress, Blogger...