Showing posts with label bird. Show all posts

Saturday, December 23

#Cre8time Peace on Earth... Polymer Clay Dove Ornaments by Tracy Alden


Hello! Tracy here with another tutorial using Amazing Casting Products! Around the holidays I often find myself making last minute gifts to complete a package or basket... and this year was no exception. Harking back to the traditional theme of doves as a symbol of peace and goodwill, I decided to create "Peace on Earth" Dove ornaments. 

Supplies: 


Using a pasta machine (devoted to craft use only) set on the thickest setting, I conditioned some polymer clay. I stacked two pieces of the now smooth clay on a ceramic tile and rolled an acrylic roller over the stack to make them stick to each other. 

I drew a simple dove outline on a piece of parchment paper, then placed the paper on top of the clay. I traced the dove outline with a stylus to transfer the image.


Using a craft knife I cut out the dove shape, being careful around the edges to not tear the clay. I then smoothed out any uneven cuts in the clay with a stylus. 


Instead of stamping images into the clay (like I have done with these tag ornaments), I create a free form pattern of swirls and dots as a decorative element on the clay dove. Using a small diameter stylus I gently press into the clay – drawing on the clay, not going too deep but just enough to get a visible pattern. 


I bake the clay dove on the tile as per the manufacturers instructions. Using an emory board, I carefully sand any uneven raised surfaces created in the drawing process, without removing the dove from the tile.

Now the fun begins... 


I condition more polymer clay and create a clay wall around the cured clay dove piece. To make sure I was creating a tight seal with the clay to the tile, I press the clay in place with a metal stylus. I don't need to bake this clay – it is just serving as a wall to contain mold-making material, Amazing Remelt.


I sprayed the piece lightly with cooking spray to act as a mold release. I heat the Amazing Remelt in the microwave, in the container it comes in (click here to view preparation). I pour the heated Remelt into prepared piece on the tile from a 12 -15 inch distance – this distance gives the Remelt a chance to release more bubbles before cooling.


I let the Amazing Remelt cool until no longer tacky or warm. When completely hardened, I carefully remove the tape, clay and the original from the Remelt mold.

Now to make more...


I condition the polymer clay, making sure the clay was soft and warm enough to be pushed into the mold. I push the clay into the mold tight, using an acrylic roller to push the clay further into the mold – making sure the clay gets into the tiny embossed details.


I carefully place the mold, with the polymer clay still inside, face down on a ceramic tile, then gently peel back the mold leaving polymer clay piece stuck to the tile. I refill the mold with more polymer clay and repeat this process again and again until I have plenty of doves. 


I made holes in the clay doves with a stylus which will be for adding ribbon hangers later. I applied two to three shades of Alumidust to each clay dove and then baked the polymer pieces to cure.


These shimmering clay doves are ready to hang
on the tree or put a finishing touch on gift baskets. 

What AMAZING arts and crafts can you create?

Visit my blog Art Resurrected for more craft tutorials!

Happy Holidays and until next time, safe travels! ~ Tracy

• • • • • • • • • • • • • • • • •

Don't forget to subscribe to our blog on the right side bar:
Twitter at AmazingCasting | Facebook at AmazingMoldPutty | YouTube at AmazingMoldPutty

Wednesday, December 20

How #Cre8time Charming... AMAZING Inspiration by Lyn Gill


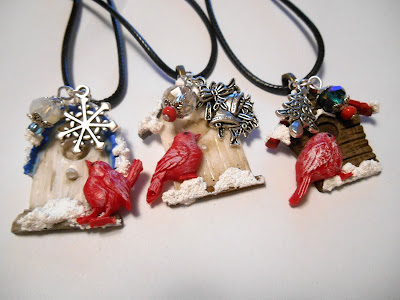
Happy Holidays everyone! Lyn here to share a bit of Christmas inspiration... cute little Winter Birdhouse Charms accented with a few feathered friends made with Amazing Casting Resin.


Using some tiny cast birds from Amazing Casting Resin and red Alumilite Dye, combined with some beads/findings, metal Christmas charms, acrylic paint and Snow Tex (available at most craft stores) –  I created these tiny Birdhouse Charms just in time for the Holidays. How cute are they? They'll be perfect Holiday gifts for loved ones!

What gifts will you create this season 

Well that's all for now... Till Next Time! Lyn

As always you can find more of my work on my blog LynzCraftz
or on YouTube LynzCraftz, or my Facebook page LynzCraftz.

• • • • • • • • • • • • • • • • •

Don't forget to subscribe to our blog on the right side bar:
Twitter at AmazingCasting | Facebook at AmazingMoldPutty | YouTube at AmazingMoldPutty

Friday, July 21

Happy Bird-day!! An Amazing #Cre8time Transformation by Maria Soto


Hi there! Happy BIRD-day! Maria here today to start off the weekend with a fun Cre8time project! You never know when or where inspiration will strike – this project was hatched from Easter!

Some time ago after Easter, I went shopping and noticed these cute tin bird containers that were on clearance. They were filled with some type of hard candy, but all I could think about is how I wanted to make a mold out of the container!!! So I bought two and went home with lots of tasty Easter candy.


I used Amazing Mold Putty for making a mold of my fun bird tin.
CLICK HERE to view instructions for making a mold.


In about 10-15 minutes, my mold is ready to use! Amazing Mold Putty is truly amazing – it works fast and it captures lots of detail, too!


I plan on hand-painting this birdie, so I decided to use Amazing Casting Resin to make my first piece. Follow the easy 1:1 instructions for mixing this resin -AND- keep in mind that it begins to cure very quickly {CLICK HERE to view mixing/preparation}.

**A TIP** This is a fairly large mold, and with larger volumes you will feel it getting hot faster... so make sure your mold is ready for it. Larger pours of Amazing Casting Resin cure quicker than smaller ones will. Keep an extra mold on hand in case you mixed too much resin – you don't want to waste this product.


I used a pencil to draw some patterns to get an idea of what designs I wanted. I could just ink these lines in with a black, gold or silver permanent pen and this would make a lovely ornament. But I plan to add some color!


I always like to paint my pieces with white acrylic first. I find it allows me to use any type of paints I want on top afterward.


For this project, I used an assortment of DecoArt Patio Paints;
simply because I love the bright colors.


Now the fun starts – I get to paint, paint, paint! First I painted the base coat, all green. I just had too much fun painting this little birdie! Once I got started I got carried away, then suddenly all the painting was done {sorry I don't have any photos to share}. 


Then I added some little clear acrylic drops to add more dimension, then used pens to add detail to the bird – giving a bit more color, illusion of dimension to the piece.


Here's a close-up of the head and tail to show the transparency
of the drops – they make the colors underneath POP.


I felt this little bird needed something else, so I glued some green ribbon to the back for hanging. Since I had all these small pieces of foil paper from Rinea, I thought, "why not give this pretty bird a fun party hat"... and here I give you the finished piece!

You are a little party animal,
you little birdie!


I hope I have inspired you to have "FUN" with these amazing products. I always do, they allow me to get really creative, they allow me to imagine and create!

What would you reimagine using
these Amazing products? 

Thanks for visiting! I invite you to stop over to my blog, "What is Creativity"
 at http://chuy-creativity.blogspot.com to see more of my creations. ~ Maria Soto

• • • • • • • • • • • • • • • • •

Don't forget to subscribe to our blog on the right side bar:
Twitter at AmazingCasting | Facebook at AmazingMoldPutty | YouTube at AmazingMoldPutty

Monday, August 15

#Cre8time Bird Watching... When Creativity Knocks All-Star Designers Summer Series

Hello Amazing Crafters! How about a little bird watching??! Today we are sharing more Cre8time inspiration from the When Creativity Knocks All-Star Designers Summer Series – as Carmen Flores-Tanis shares an adorable plush project using die-cuts, Amazing Mold Putty and Amazing Casting Resin.


From July 5 thru August 23 you can find Amazing Casting Products {a.k.a. Alumilite} and more when you watch the When Creativity Knocks All-Star Designers Summer Series. A new episode airs every week that is available for viewing 24-hours-a-day, seven-days-a-week.


This bird is packed and ready to roll! Here's a sneak peek of Carmen Flores-Tanis and her darling hand-painted fabric bird complete with a scooter made using Amazing Casting Products!


CLICK HERE to view
this week's episode.

Thanks for stopping by! Keep a lookout for Amazing Casting Products on When Creativity Knocks this summer and be sure to pop over to their website to enter to win the All-Star Designers Summer Series prize package giveaway.


• • • • • • • • • • • • • • • • •

Don't forget to subscribe to our blog on the right side bar:
Twitter at AmazingCasting | Facebook at AmazingMoldPutty | YouTube at AmazingMoldPutty

Wednesday, July 22

From "Meh..." to #Cre8time WOW! Artsy Home Decor REDUX by Aimée Wheaton #MakeThings


I'm a sucker for good deals and I'm an even bigger sucker for things that have birds on them. Well I found this good deal sometime this Spring at Hobby Lobby for $2.99... couldn't pass that up. I loved how it looked like folk art too. I decided to make it pop a bit more using some paint, gel medium, stamps, ink, glitter, pen and of course Amazing Clear Cast Resin!


Here's the original bird :)


I chose lighter aqua, yellow, orange, white
and added pink as an after thought.


I love how it started coming to life already just with acrylic paint.


I LOVE the orange.


Next I decided to stamp the word "peace" because it looked peaceful
and we could use more peace in this world and our homes.


Next I embellished certain areas with gel medium and then...


sprinkled some glitter :)


Getting really pretty!! You can see I added
a hot pink for even more color.


I mixed up some Amazing Clear Cast Resin in a larger batch – I wanted to pour into another mold as well, the same mold I used in my inspiration post last month.


Mix it well and let the bubbles settle a bit.


Originally I was going to do resin to the edges of the piece,
but decided to go to the border of the bird and stay inside.


Letting it dry overnight.

Now check out the finished product!! :)

Well to my dismay the Amazing Clear Cast Resin jumped the border! LOL I will be filling it in to cover the entire surface soon. I didn't have time to fix it before this post. I really like how it made the entire piece just pop! So much prettier to me! Simple project with a lot of pizazz!


I gave her lashes! How could I not?


Shining in the sun.


You can see where the resin migrated here. I'll go back with
another batch of Amazing Clear Cast Resin and fill it all in.


I really like how she turned out! :) What do you think?

To see how all of our AMAZING products can enhance your art,
check out these AMAZING products!

Let's see what you can create with
and blah pieces around the house.


Feel free to stop by my FB page to see the latest with me. 
To see more of my work please visit my blog "Creative Flutters"
and also at the Aimée Wheaton Art and Design website.

Till next time! Xoxo Aimée

 • • • • • • • • • • • • • •

Don't forget to subscribe to our blog on the right side bar:
Twitter at AmazingCrafting | Facebook at AmazingMoldPutty | YouTube at AmazingMoldPutty
Related Posts Plugin for WordPress, Blogger...