Showing posts with label party favors. Show all posts

Tuesday, February 13

#Cre8time with a Little Heart... DIY Resin Hearts by Tracy Alden


Hello! Tracy here with a fun tutorial using Amazing Casting Products! Sometimes I find myself making art at the spur of the moment, with a shape or color being my inspiration. This tutorial was a result of wanting a bright and cheerful Valentine's Day decoration for display in the Amazing Casting Products booth at Creativation.


If you were able to attend Creativation in Phoenix (January 20-22, 2018) and happened to drop by the Alumilite/Amazing Casting Products Booth #2214, you would have seen a wonderful selection of art from our Creative Team. You might have seen on display a bowl full of decorative resin hearts I had created. 

There was such a positive response to these quick and easy hearts – people loved picking them up and looking at the play of light. So I decided to share how quick and easy it is to make them!

Supplies: 


The hearts in this project were made using this ice cube tray I bought from IKEA. The cube shapes are very smooth, small, and perfect shape to pour resin. This particular ice cube tray is make from a synthetic rubber, so it did not need a mold release. 

**A TIP** If you are not sure what your ice cube tray is made from, test by applying a small amount of resin the the backside of the mold and let it cure completely. If it peels off easily when cured, you don't need a mold release... though if it sticks, then I recommend using Alumilite's UMR as a mold release.


To create the different color hearts I made several different color recipes. First we have Alumilite Violet Dye with Amazing Clear Cast Resin and glitter (on left); and a variation of this is including the addition of Pearl Alumidust (on right).


I repeated this process this time adding Alumilite Red Dye to the Amazing Clear Cast Resin, then glitter, and again the variation of this (seen on right) with the addition of Pearl Alumidust.


Getting a bright glittery or shimmery white is just as easy with Amazing Clear Cast Resin. Alumilite White Dye is opaque and not clear/transluscent like the other dyes – so to get a bit more of a pop of color and shimmer I added glitter and Pearl Alumidust. On the left I used Interference Red Alumidust which gives the resin a brighter, slightly pink shimmer; and the variation on the right uses Pearl Alumidust, which resulted in a softer white and less intense shimmer.


To fill this entire ice cube tray with resin hearts, I mixed up 4 fluid ounces of Amazing Clear Cast Resin – making sure to slowly stir to reduce air bubbles and let it sit for 5 minutes (CLICK HERE to view mixing and preparation). I used just *ONE* drop of Alumilite dye for that much resin to get the vivid red you see in the photo. I added some micro fine glitter and slowly stirred.

REMEMBER... Alumilite Dye is super concentrated and a little goes a long way!


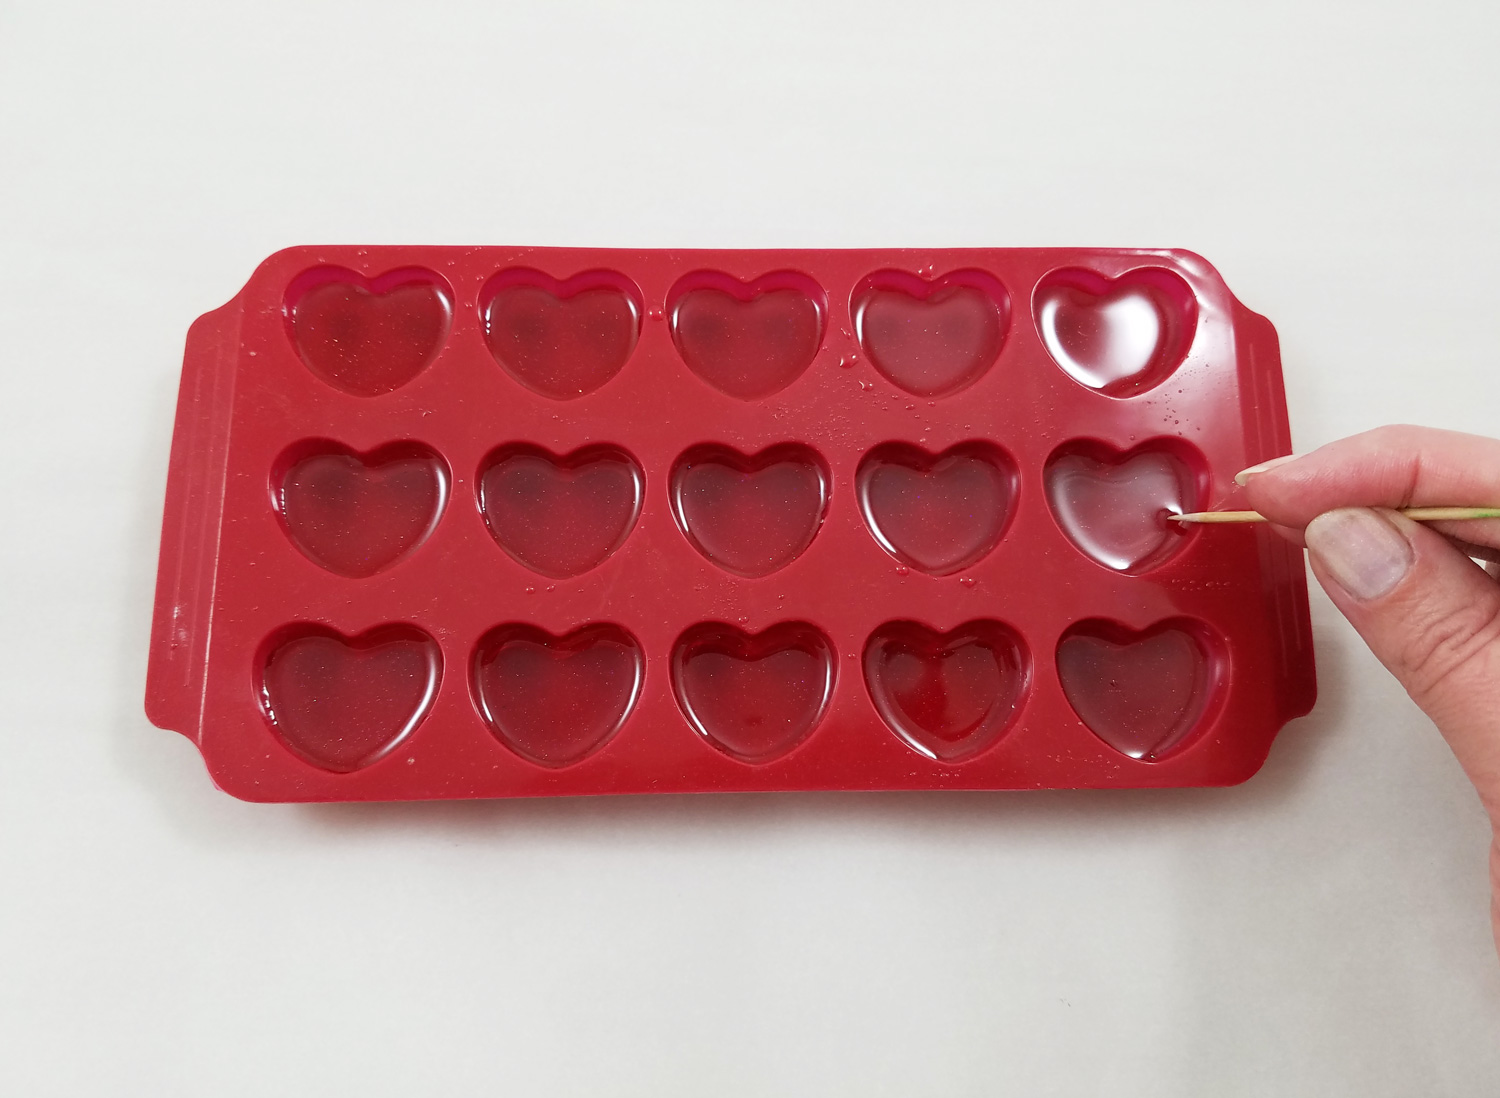
Carefully, I poured the tinted Amazing Clear Cast Resin into the ice cube mold. Bubbles that formed in the pouring process that don't pop on their own can be removed with a simple pass of a heat gun or can be popped using a toothpick. I let the resin cure fully before removing them from the mold.


I repeated filling and casting the ice cube mold several times until I had a bowl full of bright and cheerful hearts. Being that Amazing Clear Cast Resin is FDA compliant, you can put them in a vase with flowers with no worry of the resin causing issues with the flowers. 

Now don't think they are only decor... by drilling a hole into each heart you can create beads for jewelry or small charms for gifts!

What AMAZING Valentine
jewels will you create?

Visit my blog Art Resurrected for more craft tutorials!

Happy Valentine's Day! Until next time, safe travels! ~ Tracy

• • • • • • • • • • • • • • • • •

Don't forget to subscribe to our blog on the right side bar:
Twitter at AmazingCasting | Facebook at AmazingMoldPutty | YouTube at AmazingMoldPutty

Friday, July 21

Happy Bird-day!! An Amazing #Cre8time Transformation by Maria Soto


Hi there! Happy BIRD-day! Maria here today to start off the weekend with a fun Cre8time project! You never know when or where inspiration will strike – this project was hatched from Easter!

Some time ago after Easter, I went shopping and noticed these cute tin bird containers that were on clearance. They were filled with some type of hard candy, but all I could think about is how I wanted to make a mold out of the container!!! So I bought two and went home with lots of tasty Easter candy.


I used Amazing Mold Putty for making a mold of my fun bird tin.
CLICK HERE to view instructions for making a mold.


In about 10-15 minutes, my mold is ready to use! Amazing Mold Putty is truly amazing – it works fast and it captures lots of detail, too!


I plan on hand-painting this birdie, so I decided to use Amazing Casting Resin to make my first piece. Follow the easy 1:1 instructions for mixing this resin -AND- keep in mind that it begins to cure very quickly {CLICK HERE to view mixing/preparation}.

**A TIP** This is a fairly large mold, and with larger volumes you will feel it getting hot faster... so make sure your mold is ready for it. Larger pours of Amazing Casting Resin cure quicker than smaller ones will. Keep an extra mold on hand in case you mixed too much resin – you don't want to waste this product.


I used a pencil to draw some patterns to get an idea of what designs I wanted. I could just ink these lines in with a black, gold or silver permanent pen and this would make a lovely ornament. But I plan to add some color!


I always like to paint my pieces with white acrylic first. I find it allows me to use any type of paints I want on top afterward.


For this project, I used an assortment of DecoArt Patio Paints;
simply because I love the bright colors.


Now the fun starts – I get to paint, paint, paint! First I painted the base coat, all green. I just had too much fun painting this little birdie! Once I got started I got carried away, then suddenly all the painting was done {sorry I don't have any photos to share}. 


Then I added some little clear acrylic drops to add more dimension, then used pens to add detail to the bird – giving a bit more color, illusion of dimension to the piece.


Here's a close-up of the head and tail to show the transparency
of the drops – they make the colors underneath POP.


I felt this little bird needed something else, so I glued some green ribbon to the back for hanging. Since I had all these small pieces of foil paper from Rinea, I thought, "why not give this pretty bird a fun party hat"... and here I give you the finished piece!

You are a little party animal,
you little birdie!


I hope I have inspired you to have "FUN" with these amazing products. I always do, they allow me to get really creative, they allow me to imagine and create!

What would you reimagine using
these Amazing products? 

Thanks for visiting! I invite you to stop over to my blog, "What is Creativity"
 at http://chuy-creativity.blogspot.com to see more of my creations. ~ Maria Soto

• • • • • • • • • • • • • • • • •

Don't forget to subscribe to our blog on the right side bar:
Twitter at AmazingCasting | Facebook at AmazingMoldPutty | YouTube at AmazingMoldPutty

Saturday, October 29

Dracula takes a Quick #Cre8time Bite of Halloween by Tracy Alden


Hello! Tracy here with another Amazing Casting Products tutorial! This year I am going with a vampire food theme for Halloween treats and needed to decorate cupcakes in a fast and fun way. While it would have been okay to just put plastic vampire fangs on each cupcake, I wanted to make the fangs an edible candy treat!

Supplies: 


I cleaned two child sized vampire fangs, with soap and water to prepare them for molding. I placed them on a black dinner plate so I had a smooth and contrasting surface to work on.


I mixed up some Amazing Mold Putty{CLICK HERE to view mixing/preparation}, and molded it around the front portions of the vampire fangs. I was careful to press the Mold Putty up against the fangs to make sure I got a good molding of the fangs.


Once the Mold Putty was cured I removed the plastic fangs. To close up the grove created by the gum portion of the vampire fangs I mixed up and pressed tiny little wads of Mold Putty into the open portion of the mold as seen in the above photo. By doing this I would be able to place melted candy into the molds with no worry of the candy leaking out the back of the fang mold.


To keep the molds upright I placed a small teacup plate inside the large dinner plate and placed the molds snug inside the dinner plate and against the teacup plate. This will keep the molds in place while the candy is piped into the molds.

Following the manufacturer instructions, I carefully melted the Wilton Candy Melts in a sandwich bag in the microwave. Once the candy was melted I snipped the end off a corner of the sandwich baggie and pipped the candy into the molds. 

**A TIP** Make sure the candy is completely cooled before removing from the mold to make sure you don't break off a fang. A quick trip in the refrigerator is a sure way to help your candy along!


I made up a batch of Red Velvet cupcakes, applied blue-grey tinted icing, dribbled some Wilton Blood Red Glitter Gel Icing and carefully placed a set of candy fangs on each cupcake.


I had so much fun making the candy fangs, I made more than I needed for the cupcakes – the extra fangs made a fun addition to cranberry cocktails! 

What amazing Halloween
crafts can you create?

Visit my blog Art Resurrected for more craft tutorials!

Until next time, safe travels! ~ Tracy

• • • • • • • • • • • • • • • • •

Don't forget to subscribe to our blog on the right side bar:
Twitter at AmazingCasting | Facebook at AmazingMoldPutty | YouTube at AmazingMoldPutty

Sunday, December 6

#Cre8time Blossoms with Fabulous FAUX Mini Vases #12DaysofHomeDecor #ACPthrowback


Hello Amazing Crafters! For day seven of our 12 Days of Amazing Home Decor we revisit an #ACPthrowback project by creative Lynne Suprock – creating some fabulous faux mini vases. This project is perfect for displaying little vases around the house holding bits of seasonal greenery, fresh clipped flower buds, or for making favors for a wedding.


Grab those crystal vases or glasses in your china display
and mold them into fabulous faux bud vases.


With Amazing Casting Resin you can transform the crystal shape into fabulous faux milk glass... or with the addition of paint/dyes a custom look to match your AMAZING home decor.

CLICK HERE to jump to
Lynne's full how-to.

Want to see more of what Lynne is up to?
Follow her on her blog "Simply Pretty Stuff"!

• • • • • • •

Share your creations using Amazing Casting Products for
our next #ACPthrowback Third Thursday on December 17.


Post them to our Facebook page, or tag us on Instagram, Pinterest, and on Twitter to be featured here on our blog. We'll be looking for your projects with the hashtag #AmazingCastingProducts.

• • • • • • •

Don't forget to subscribe to our blog on the right side bar:
Twitter at AmazingCasting | Facebook at AmazingMoldPutty | YouTube at AmazingMoldPutty

Thursday, November 26

Thankful for #Cre8time... by Melissa Johnson


Hi everyone! In honor of Thanksgiving, I wanted to create some cute fall leaves to use in my table decor for the holiday. 


I created the leaf using Super Sculpey Clay and my set of carving tools. Once the clay was baked, I used my Amazing Mold Putty to mold the leaf shape.


I cast the leaf with Amazing Clear Cast Resin, and colored it with a combination of gold Alumidust and Alumilite red dye


I finished by adding some orange paint and a little vintage brown ink to give it a little more depth, and added some stamping and twine. This would be great on a table setting laid on top of a plate with a pretty cloth napkin under it, as place cards, or maybe several strung along some branches for a centerpiece. 


Have a Happy Thanksgiving!

Make something that makes you happy :) ~ Melissa Johnson
For more of my mixed media projects, please visit my blog.

• • • • • • • • • • • • • •

Don't forget to subscribe to our blog on the right side bar:
Twitter at AmazingCasting | Facebook at AmazingMoldPutty | YouTube at AmazingMoldPutty

Monday, November 9

#Cre8time Pumpkin Favors filled with Thanksgiving Treats...


Greetings Amazing – welcome to our final day of PUMPKIN WEEK! Susan here to share some DIY treats for the Thanksgiving table settings. Not only did I mold my real mini pumpkins using Amazing Mold Rubber – I made a few molds for molding chocolates and other sweet treats using Amazing Remelt, and Amazing Mold Putty. If you missed my faux iced birthday pumpkin, CLICK HERE and to jump over to view my faux gilded pumpkins HERE.


Amazing Remelt and Wilton Candy Melts both melt down in minutes in the microwave making custom sweet treats like a pro quick and easy.

First I selected a tapered glass bowl deep enough to fully cover my pumpkin, then melted down a container of Amazing Remelt using the lowest setting on my microwave in thirty second increments until it was completely liquified.


**A TIP** I poured a small amount into my bowl and let cool a bit before placing pumpkin in it. ALSO, I dipped the top of the pumpkin into the liquid remelt to coat the stem and let any air bubbles release before fully covering with Amazing Remelt.


After cooling in the refrigerator for a while {it was all day since I had to go to work}, I removed the mold from the bowl. I gently cut the mold in half using a sharp Xacto knife and released the pumpkin. Now I'm ready to make some chocolate mini pumpkins.


I melt down the Wilton Candy Melts following the directions for microwave in a pourable pyrex measuring cup. I scooped the melted chocolate in the Amazing Mold Putty mini pumpkin, on both sides of mold, filling completely. I placed the top half of the mold aligned to my marks and placed in refrigerator to chill and harden. 


I repeated by filling the Amazing Remelt mold and spread chocolate to evenly coat edges and leave center open – this pumpkin I will fill with an assortment of roasted seeds/nuts and mini dark chocolate chips... a perfect edible favor for the table settings.


The chocolate hardens very quickly – then I can remove, set aside on a tray in the fridge and make another set. These are fun to make and can made well in advance of the Thanksgiving Day feast!

What will you transform
into edible art with
Amazing Casting Products??

Please leave a comment below to share! If you would like to see more of my creations, please visit my blog sbartist : painting in the dark by clicking here. ~ Susan
. . . . . . . . . . . . . .

Want to Socialize with Amazing Casting Products?
Twitter at @AmazingCasting | Facebook at AmazingMoldPutty | YouTube at AmazingMoldPutty

Wednesday, May 6

Swizzel Me a Drink... by Brenda Burfeind


Good day friends, Brenda here again to show you a quick project that I accidentally created. As most of you know I love to experiment and while playing around in my craft room, I came up with a brilliant idea. Well, I think it's brilliant anyway.


I started out with my hot glue gun and a straw. (I think I need a new hot glue gun, but as long as it works it doesn't need to be beautiful.) I filled the bottom of a straw with hot glue about a quarter of an inch and made sure it was completely hard before going onto the next step.


Once the hot glue was completely hard, I clamped
the straws into clothespins to keep them in upright.


I mixed up a bit of Amazing Clear Cast Resin and poured it into one straw.
Did I mention that Amazing Clear Cast Resin is FOOD SAFE??!


I poured the Amazing Clear Cast Resin just a bit past the bendy part of the straw, and once it was completely set up... about 2 hours later, I slit the straw lengthwise and peeled the straw off. 

I cut the bendy portion of the resin piece off and...


here I've created my own swizzle sticks for my favorite tequila! 
(Our fearless leader loves this tequila also!)


I also created colors by adding Alumilite Blue dye and Alumilite Red Dye to the Amazing Clear Cast Resin. The possibilities are endless!


I love experimenting and this was a huge success! Now I can't wait to make them in all the different colors that Amazing Casting Products has available for every type of entertainment I can think of!

How would you customize your cocktails?

I hope I've given you another reason to hurry up and go get some Amazing Casting Products and start creating! Please leave me a comment and tell me what type of experimenting you would do!

Until next time, Brenda with Creativity is a State of Mind signing off! Cheers


Visit my blog, Creativity is a State of Mind to see some more of my creations.

• • • • • • • • • • • • • •

Don't forget to subscribe to our blog on the right side bar:
Twitter at AmazingCrafting | Facebook at AmazingMoldPutty | YouTube at AmazingMoldPutty
Related Posts Plugin for WordPress, Blogger...