Showing posts with label quick. Show all posts

Sunday, April 1

#Cre8time Transformations... DIY Easter Gift by Brenda Burfeind


Good day and Happy Easter everyone! Brenda here and today I want to share a project I made for my Mom for Easter. I received this cross awhile back and I love it dearly, but it's a bit heavy. Of course, since the Amazing Casting Resin is so lightweight, I decided to use it to make a lighter version of the cross to use as an embellishment.


I started with my Amazing Mold Putty and making a mold for my cross. Since the cross is a bit larger I had to mold it in chunks. You don't want to try to mold something bigger all at once since the mold putty sets up rather quickly {CLICK HERE to view mixing/preparation}. I started with the top half and let it set up; then mixed up another batch and pressed it onto the started portion and formed around to complete the bottom half.


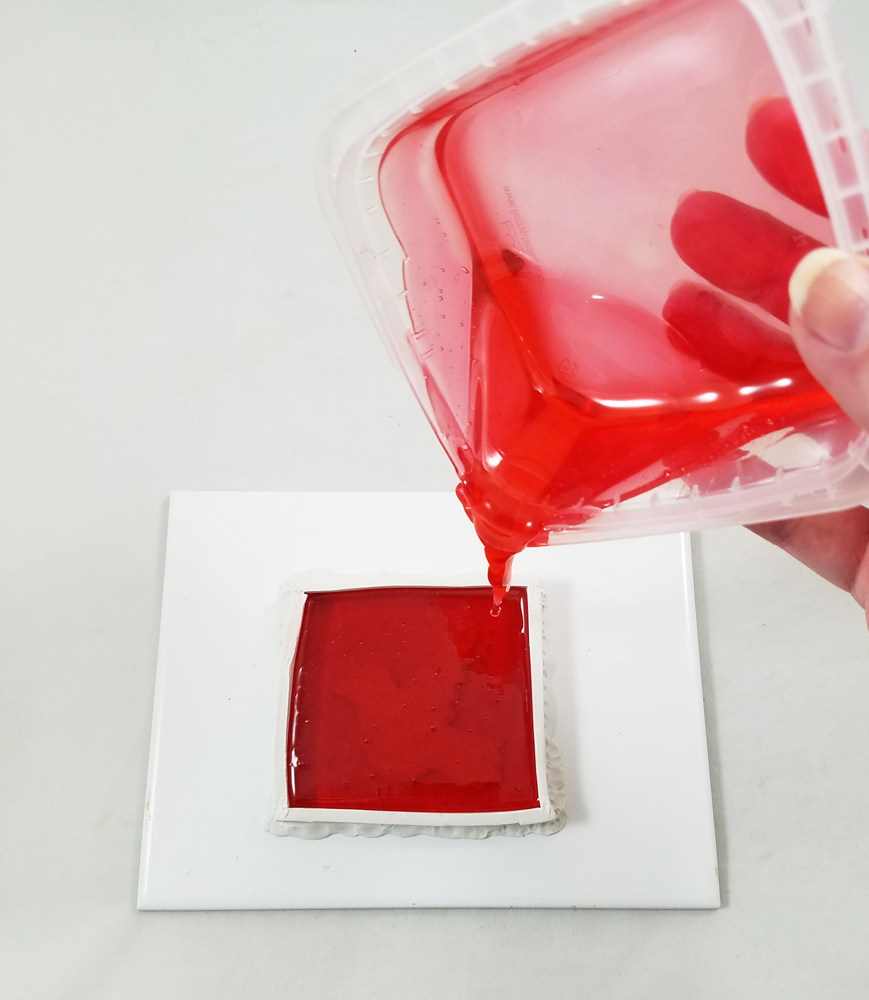
After I mixed up a batch of Amazing Casting Resin colored with a little bit of Bubblegum Alumidust. CLICK HERE to view mixing/preparation. I poured the resin into my mold and it sets up within 10-15 minutes. I can't wait to pull it out of the mold!


The cross has so much detail, but it's hard to see like this!


For Christmas I received some Art-C products that I have been dying to try out. They are similar to rub and buff and I knew these would bring out the beauty and detail of this cross.


The gold and silver combination is stunning!


Now here you can see how "thick" the original cross is – and I can control how "thick" or "skinny" I want to make my resin duplicate within the mold by how much or how little resin I pour into my mold.


Because the resin piece is so lightweight I was able to attach it to my paper flower heart with just some hot glue without "smashing" the roses. I put a hanger on the back and its ready for gifting!


I hope you've enjoyed this tutorial. I would love to see some of your creations using Amazing Casting Products. Please leave me a comment with a link to your project and I will be sure to check it out.

Until next time... Happy Crafting!
Brenda with Creativity is a State of Mind 

• • • • • • • • • • • • • • • • •

Don't forget to subscribe to our blog on the right side bar:
Twitter at AmazingCasting | Facebook at AmazingMoldPutty | YouTube at AmazingMoldPutty

Monday, March 26

#Cre8time Egg Decorating... AMAZING Easter Ornaments by Tracy Krueger

Hello, it's Tracy here! Being that Easter is right around the corner, I was trying to think of a quick and fun Egg decorating project. My kids are grown so we don't decorate real eggs anymore.


Then the simplest idea came to me! I have a mold that I had made out of a cut piece of brass (to make a Christmas ornament) and it has an Egg shape. I first mixed two equal parts of Amazing Casting Resin and poured it into my mold to give it a "egg base". I just love watching the Casting Resin cure... don't you :-)


After this base egg cured (I gave it about 15 minutes), I gathered three of my Alumilite Dyes that would be good for Easter – Blue, Purple and Yellow. I poured out very small equal portions of Amazing Casting Resin and squeezed out a tiny drop of each color into part "A" of the resin, then stirred color completely before adding part "B". CLICK HERE to view mixing/preparation.


The first color I mixed up was the yellow, and poured
random lines on top of my white cured resin.


As the yellow was curing, I was thinking "there has to be a better way to have more control over the colored resin". Awhile back I bought a bunch of disposable pipettes, so after the yellow cured, I mixed up the blue dyed resin and used the pipette to draw where I wanted my colored resin to go. It worked beautifully! I just love how I got some green where the blue was over the yellow.


Now I just had purple left. I mixed it up and used another pipette to squeeze the purple where I wanted. As always I kept a spare mold around to pour the extra resin in.


Once I was done applying the three resin colors, I let the whole thing cure for a couple of hours to make sure everything was set totally.


I took it out of the mold and trimmed the back a little, then drilled a hole in the top. I grabbed my sari ribbons and cut a small piece of a greenish/blue colored one.


I really like how this turned out.
It has kind of a watercolor look about it.


Isn't it fun that you can mix up your Holidays and make decorations for both?! I had quite a few more ideas, but have had a hard time getting them to come to fruition. I'll be back soon to share a few of my bad EGGS. 

How are you decorating for Easter?

Have fun! ~ Tracy

You can find more of my work on my Blog:
http://tracykrueger-nine.blogspot.com/2017/

• • • • • • • • • • • • • • • • •


Don't forget to subscribe to our blog on the right side bar:
Twitter at AmazingCasting | Facebook at AmazingMoldPutty | YouTube at AmazingMoldPutty

Saturday, December 23

#Cre8time Peace on Earth... Polymer Clay Dove Ornaments by Tracy Alden


Hello! Tracy here with another tutorial using Amazing Casting Products! Around the holidays I often find myself making last minute gifts to complete a package or basket... and this year was no exception. Harking back to the traditional theme of doves as a symbol of peace and goodwill, I decided to create "Peace on Earth" Dove ornaments. 

Supplies: 


Using a pasta machine (devoted to craft use only) set on the thickest setting, I conditioned some polymer clay. I stacked two pieces of the now smooth clay on a ceramic tile and rolled an acrylic roller over the stack to make them stick to each other. 

I drew a simple dove outline on a piece of parchment paper, then placed the paper on top of the clay. I traced the dove outline with a stylus to transfer the image.


Using a craft knife I cut out the dove shape, being careful around the edges to not tear the clay. I then smoothed out any uneven cuts in the clay with a stylus. 


Instead of stamping images into the clay (like I have done with these tag ornaments), I create a free form pattern of swirls and dots as a decorative element on the clay dove. Using a small diameter stylus I gently press into the clay – drawing on the clay, not going too deep but just enough to get a visible pattern. 


I bake the clay dove on the tile as per the manufacturers instructions. Using an emory board, I carefully sand any uneven raised surfaces created in the drawing process, without removing the dove from the tile.

Now the fun begins... 


I condition more polymer clay and create a clay wall around the cured clay dove piece. To make sure I was creating a tight seal with the clay to the tile, I press the clay in place with a metal stylus. I don't need to bake this clay – it is just serving as a wall to contain mold-making material, Amazing Remelt.


I sprayed the piece lightly with cooking spray to act as a mold release. I heat the Amazing Remelt in the microwave, in the container it comes in (click here to view preparation). I pour the heated Remelt into prepared piece on the tile from a 12 -15 inch distance – this distance gives the Remelt a chance to release more bubbles before cooling.


I let the Amazing Remelt cool until no longer tacky or warm. When completely hardened, I carefully remove the tape, clay and the original from the Remelt mold.

Now to make more...


I condition the polymer clay, making sure the clay was soft and warm enough to be pushed into the mold. I push the clay into the mold tight, using an acrylic roller to push the clay further into the mold – making sure the clay gets into the tiny embossed details.


I carefully place the mold, with the polymer clay still inside, face down on a ceramic tile, then gently peel back the mold leaving polymer clay piece stuck to the tile. I refill the mold with more polymer clay and repeat this process again and again until I have plenty of doves. 


I made holes in the clay doves with a stylus which will be for adding ribbon hangers later. I applied two to three shades of Alumidust to each clay dove and then baked the polymer pieces to cure.


These shimmering clay doves are ready to hang
on the tree or put a finishing touch on gift baskets. 

What AMAZING arts and crafts can you create?

Visit my blog Art Resurrected for more craft tutorials!

Happy Holidays and until next time, safe travels! ~ Tracy

• • • • • • • • • • • • • • • • •

Don't forget to subscribe to our blog on the right side bar:
Twitter at AmazingCasting | Facebook at AmazingMoldPutty | YouTube at AmazingMoldPutty

Thursday, December 7

Trimming the #Cre8time Tree... by Michele Kosciolek


Hello fellow creatives! Michele here today and I am super exciting to be sharing with you today, my very first project as an Amazing Casting Products Creative Team member!!! Today I am sharing a quick Christmas ornament I made to use as a gift topper.


I started by creating a shape to mold using some various wood pieces.


Then I used Amazing Mold Putty to mold my wood piece. I sprayed a tiny bit of Mold Release Spray just to be sure the wood wouldn't stick. Follow the package directions for the amount of time to let the putty cure {CLICK HERE to view mixing/preparation}.


Look how great that piece molded!!!


Next I brushed bronze Alumilite Metallic Powder in the numbers and antlers.


I mixed some Amazing Clear Cast Resin according to the package directions and poured in the mold {CLICK HERE to view mixing/preparation}. It is always a good idea to have other molds handy in case you have any resin let so it doesn't go to waste!!!


A bit more package directions to follow for cure time and viola!!! Look how great it looks popped right out of the mold.


I used my Crop-o-Dile to punch a hole for a bit of sparkly ribbon to hang the ornament from... easy peasy!!


Oh my I just love holiday creating and boy oh boy these Amazing Casting Products make it so easy!!!


This will be perfect from package to tree.


And that metallic bronze is gorgeous!


Thanks so much for taking a peak at my first post!
I look forward to sharing so much more inspiration with you!!!

What kind of handmade
ornaments are you making?

Until next time... ~ Michele

For more projects and inspiration please visit my blog "Stuff by Belle"
or follow on Facebook: https://www.facebook.com/michele.kosciolek

• • • • • • • • • • • • 

Don't forget to subscribe to our blog on the right side bar:
Twitter at AmazingCasting | Facebook at AmazingMoldPutty | YouTube at AmazingMoldPutty

Monday, November 27

A Key to #Cre8time... DIY Key Holder by Brenda Burfeind


Good day all! Brenda here from Creativity is a State of Mind and today I'm hoping to inspire you to make your own skeleton key holder.

My inspiration comes from a key holder our son made when he was in middle school many, many years ago... and we've used it ever since. While this has worked for us for many years – it never hung straight depending on how many keys we had. I honestly don't even know what all these keys are for. Maybe I'll make something with all the extras – LOL! 


Last week my hubby said, "we should get a new one and give the old key holder to our son since he owns his own home now. I'll put a new hanger on the back before I give it to him (or maybe not)". But that's when inspiration started to form in my creative head!


At the time, I was actually in the middle of pouring some molds for another project. Whenever I am pouring molds, I usually mix more resin than I need, so I'll pull out some extra molds out to use up any remaining resin (you can see mixing instructions here). I started with these molds made from some vintage skeleton keys I own. You can view a YouTube video HERE to see how to create your own molds using Amazing Mold Putty

This batch of keys cast with Amazing Casting Resin and Alumilite Dyes are not exactly skeleton key colors, but...


with acrylic paint anything can be transformed!


I also used a little bit of the copper Alumidust just by simply putting my finger in the jar and rubbing it all over the keys. Voila!


I used E6000® to glue the faux resin skeleton keys in the shape of a "K" onto a reclaimed wood board painted with black acrylic paint. I used picture hangers as the hooks for the real keys and distressed them with some of the black acrylic paint mixed with a little bit of copper Alumidust


I sprayed a couple of coats of clear acrylic over the entire board to seal it and give the resin skeleton keys a little shine. This also helps the acrylic paint stay on the hooks. 


After that was dried my Silhouette Cameo came in handy to cut out the "eys" in a copper colored vinyl, then transferred them to the "K" made with my resin skeleton keys.


Now we have a new key holder and my son
can now enjoy the one he made in middle school.


I hope I've inspired you to make something useful
for your home and I hope to see you again soon!

Until next time, Happy Crafting! ~ Brenda

I invite you to stop over to my blog,
to see all that I've been making. 

• • • • • • • • • • • • • • • • •

Don't forget to subscribe to our blog on the right side bar:
Twitter at AmazingCasting | Facebook at AmazingMoldPutty | YouTube at AmazingMoldPutty
Related Posts Plugin for WordPress, Blogger...