Thursday, December 31

Ring in the New Year with #Cre8time Recycling... by Maria Soto


Hi there! I decided to make a new bracelet to wear for the New Year's party. I had these empty duck tape rolls and decided to use one to make a quick and easy resin bangle. 


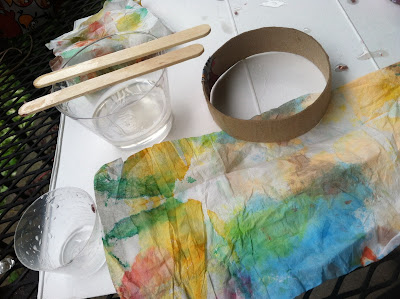
Now sometimes when I paint, I keep napkins handy to clean the brushes or spills. I'm very clumsy so it happens a lot. As I was working, I noticed all the pretty colors so I decided to use these decoupage a bangle... but instead of using glue, I used the Amazing Clear Cast Resin to add the napkins I used to clean up my paints.


It was so easy, I cut the empty roll in half. I gathered my supplies and went on to mix a small amount of Amazing Clear Cast Resin


Amazing Clear Cast Resin has easy to follow instructions on the box or CLICK HERE to view mixing/preparation. I mixed a small amount of resin and applied it to the outside of the empty roll a little bit at a time using the mixing stick, then applied sections of painted paper towels.


Once I was done covering the outside with the colored paper towel, I added a bit more Amazing Clear Cast Resin over all the tissue and let it dry overnight. I used a mold to hold the resin covered bangle and to make sure it would catch any excess resin.


It's all done and ready to wear! Now you can either do the same process to the inside of the bangle –or just paint it and then seal it with more resin.


I'm so ready to wear this for our New Year's party. Amazing Clear Cast Resin is one of my favorite crafting products... it can be used in so many different ways – not only to be used in mold making.

How do you use resin?
Any fun and creative ways?
Please do share with us by leaving a comment below.

Looking forwards to creating outside the box
in the coming year... Happy New Year to all!

Thanks for visiting! I invite you to stop over to my blog, "What is Creativityat http://chuy-creativity.blogspot.com to see more of my creations. Maria Soto

• • • • • • • • • • • • • • • • •

Don't forget to subscribe to our blog on the right side bar:
Twitter at AmazingCasting | Facebook at AmazingMoldPutty | YouTube at AmazingMoldPutty

Wednesday, December 30

Memories of #Cre8time School Days... Mixed Media Shadowbox by Aimée Wheaton


Lots of trinkets, papers, doo-dads that I've collected for years made their way into this little shadow box. It reminded me of a little old-fashioned school house. That was the inspiration for this little project. Basic collage techniques were used as the base for this project, I didn't get photos of each step because I got so into the project and forgot to take photos along the way.


You can see it was just a basic white box, and I wasted no time collaging elements in it using Golden Gel Medium paste. I trimmed out my vintage photo of a boy with a book and papers and pasted and sealed it all down on the base of the box. While the glue was still wet, I threw in some micro beads and glitter.


Another view. I let it dry for a few hours and
worked on other elements for the design.


I used this gesso on this old Monopoly game hotel and distressed it a bit. I cut out letters from my vintage book page talking about school and cut up a few sentences.


I glued down the words to the house with Golden Gel Medium.


I had a small glass bottle that I filled with small beads, glitter and the sentences I cut up for some interest. I wasn't sure if it all would be used – the hardest part was finding places for all the little trinkets I wanted to use and how to use them.


Trinkets...


I then took my red StazOn ink and distressed the box,
thinking "little red school house".


Did the same on the back and front.


I added some little stamp details along the edge of the box too. I then collaged some gorgeous rice paper into the top of the box as well as the bottom.


I found a cast off heart and distressed it with the same ink and glued it to the top.


I wasn't sure how well the box was sealed so I went around the seams with the thick gesso all over the box just to make sure it was resin-ready.


While the gesso was wet, I etched roof tiles in with a sharp tool.


It's resin ready!!!


For this project I'm using Amazing Clear Cast Resin. I mixed it all up and poured it into the base. Just mix equal amounts of Part "A" and Part "B" and you're good to go!


Pour slowly and let the resin flow around and fill in areas naturally.


With a half a drop of Alumilite blue dye I swirled it into certain areas of the wet resin for more interest. It worked out well!! Look how cool it looks!!


The blue added a lot!


I glued on the glasses to the top and added a bit
of the blue resin using the same popsicle stick.


Just an extra detail.


I added a bit of purple PearlX powder to the heart and grabbed some blue resin again and coated the top of the heart with the same stick as well.

Here are some detail shots...


I did end up using this little bottle. :)


I really enjoyed making the project
and hope you like how it turned out!


Ta-Da!!

Do you have a box of goodies
you can make into something else?

Feel free to stop by my FB page to see the latest with me.
To see more of my work please visit my new blog "Life Glitter Makeup"
and also at the Aimée Wheaton Art and Design website.

Till next time! Xoxo Aimée

• • • • • • • • • • • • • •

Don't forget to subscribe to our blog on the right side bar:
Twitter at AmazingCasting | Facebook at AmazingMoldPutty | YouTube at AmazingMoldPutty

Tuesday, December 29

Sneaking a little Holiday #Cre8time... AMAZING #jewelry Inspiration by Melissa Johnson

Hello everyone! I hope everyone had a wonderful holiday :) Today I am sharing a necklace I made over the Christmas break using goodies in my stash and some Amazing Clear Cast Resin.


I wanted to do something creative, but with all of my kids at home for Christmas break it's hard to get much accomplished. This necklace was very easy to make and I was able to use up some things I had in my stash. Always a bonus in my book!

I used some vintage style buttons and broke the backing off of them so they would lay flat. After some digging I found a bezel I had never used and another resin charm I had made a while back. I hot glued the buttons in the bezel, filled in the space with a few stones, and poured Amazing Clear Cast Resin over the entire piece. I also swirled in a bit of the Gold Alumidust.


Here is the final piece, all completed and put together.


What did you make in your
Cre8time over the holiday break? :)

Make something that makes you happy :) ~ Melissa Johnson
For more of my mixed media projects, please visit my blog.

• • • • • • • • • • • • • •

Don't forget to subscribe to our blog on the right side bar:
Twitter at AmazingCasting | Facebook at AmazingMoldPutty | YouTube at AmazingMoldPutty

Monday, December 28

#Cre8time Indoor Gardening... Amazing Mini Fish Pond by Sandra Strait

Hello!  Sandra here to tell you how I turned a ramekin into a fish pond!

About a year ago, I saw some wonderful 3D resin paintings and wanted to try my hand at it. I was a little afraid though. It looked difficult and I wasn't sure how to start. But I finally found a tutorial that roughly explained the process and I decided to give it a go. Just for grins, I decided to add a frog and some water lilies.


Supplies:

The Frog and the Water Lilies

I used Sculpey Oven Bake Clay to make a model of my frog, the water lilies and lily pads. For the frog I used an almond as a base for the body. I didn't intend to keep the originals so I didn't bake the clay.


For the lilies, I rolled some Sculpey flat, rolled it into a tube and cut the stems like I was making a crown. I did three of these and nested them. Then I cut out the shape of the lily pads and stuck the lily onto the pads. I made two sizes of lily.

To create the mold, I cut an empty Swiss Miss Cocoa tin in half, and taped my frog, two lilies and lily pad to the bottom with two-sided tape. Then I mixed Parts "A" & "B" of the Amazing Mold Rubber, and poured it in. I used cut up pieces of old molds, that I don't use any more, to reduce the amount of new liquid mold rubber needed, and ended up using about half a tub of the product.

After about twelve hours, it was ready for me to pour the resin.


I mixed Parts "A" & "B" of Amazing Casting Resin. This cures in about 5 minutes, turning white. I ended up doing two ramekin fish ponds, one with a frog and lilies, and one with just lilies, so after pulling out the first casting, I made two more castings of the lilies, painting the centers yellow. Some of the lilies I left white, and others I painted with the magenta.

Painting the Koi

Now for the actual 3D painting part!

The essence of this technique is to pour a layer of Amazing Clear Cast Resin, paint a faint layer of the fish, pour more resin, paint another layer of fish, and so on. I used 1 inch ramekins to do some practice, and found that the first layer before you start painting should be about 1/4 inch, and each layer after about 1/8 inch of resin. It takes about seven layers of resin with the top layer being thicker in this case, so that the frog and lilies were partially under the resin.

That actual time spent painting and pouring resin is probably about two hours. However, each layer of resin has to cure, which takes 12 to 24 hours, so it takes at least seven days to make a painting. That gave me time to make my frog and lilies, though.

I didn't try to photograph every layer.
Here I've shown the 3rd, 5th and 7th layers.

The first two layers are very watery and faint, getting darker and more detailed for the tail and fins. I used the same color for both layers.

On the third layer you're getting a solid silhouette, and at different angles you can see the layers underneath. I switched to another color, keeping the paint thin enough that some of the lower color shows through.

On the fourth layer, I added the eyes and started suggesting the scales with the iridescent paints. I switched to another color, keeping the paint thin enough that some of the lower color shows through.

On the fifth layer, after painting a layer of the same color as the fourth layer, I used the Payne's Gray to add a bit of shadowing along the sides and firm up the shape of the fish.

The sixth layer is the final layer of paint. I used the iridescent golds to blend in the shadow and reinforce the feeling of scale.

The seventh layer doesn't get painted it's to seal and attach the resin frog and lilies.


There was something a little fishy about this project, but I thoroughly enjoyed doing it. I hope you found it fun as well!

For more complete instructions in using Amazing Mold Rubber, Amazing Casting Resin and Amazing Clear Cast Resin, see the videos at Amazing Casting Products website.

To see more of my watercolors, Zentangles and resin projects,

• • • • • • • • • • • • • • • • •
Don't forget to subscribe to our blog on the right side bar:
Twitter at AmazingCasting | Facebook at AmazingMoldPutty | YouTube at AmazingMoldPutty
Related Posts Plugin for WordPress, Blogger...