Showing posts with label Ephemera. Show all posts

Thursday, January 14

#Cre8time Handmade Jewels... Ooey Gooey Resin Pendant by Aimée Wheaton


Hey all!! This was a bit of an experiment for me as I've never actually resined papers before but I'm pretty happy with how it turned out so I'm going to try and perfect this technique as I play more. My original plan {which usually never is how it turns out} was to make some medallion-type earrings... well I got impatient and touched one before it was dry and ruined it – so I ended up with a pendant instead!

I started with some French ephemera circles I had and thought they would be fun to work with. I love vintage papers, especially from books. I also punched out little hearts from a painted paper I created and cut some strips of other painted paper.


My pile of goodies.


I took some 20 gauge wire and bent it around
the circles then glued them down together.


This is great glue for quick projects!!


Glued together.


For more interest I ripped some of my favorite Rice Paper as well and layered them how I wanted the earrings to be. I didn't glue down the strips I wanted to see how they would react with the resin.


I mixed equal parts of Amazing Clear Cast Resin and began applying to the earrings with a popsicle stick – I found out I put way too much on, this is where I'll need more practice. It started pooling around the circles and I ended up needing to trim it after it had cured. Be conservative when applying the resin. I let it dry overnight to be certain it was done curing. CLICK HERE to view mixing/preparation of Amazing Clear Cast Resin.


This is in process while it's still wet, at this phase I put a drop of white Alumilite dye and swirled it around for a milky effect as well as some green Alumidust for some shimmer.


I did the same to this one. I threw on some pink chunky glitter as well for some more shimmer and some metallic green micro beads. I wanted it to feel very organic and I think I did accomplish that effect.


Next time I'm going to do this in phases – maybe resin and papers first, let that cure and then do the dye, glitter and after bits for more control.


I do like how it turned out. When it cured fully, I did some primitive bead loops and strung it on a ball and chain necklace. Easy peasy!

Here is the finished product!


Do you make resin jewelry?
What are your favorite ways to create
organic looking resined pieces?

Feel free to stop by my FB page to see the latest with me.
To see more of my work please visit my new blog "Life Glitter Makeup"
and also at the Aimée Wheaton Art and Design website.

Till next time! Xoxo Aimée

• • • • • • • • • • • • • •

Don't forget to subscribe to our blog on the right side bar:
Twitter at AmazingCasting | Facebook at AmazingMoldPutty | YouTube at AmazingMoldPutty

Wednesday, December 30

Memories of #Cre8time School Days... Mixed Media Shadowbox by Aimée Wheaton


Lots of trinkets, papers, doo-dads that I've collected for years made their way into this little shadow box. It reminded me of a little old-fashioned school house. That was the inspiration for this little project. Basic collage techniques were used as the base for this project, I didn't get photos of each step because I got so into the project and forgot to take photos along the way.


You can see it was just a basic white box, and I wasted no time collaging elements in it using Golden Gel Medium paste. I trimmed out my vintage photo of a boy with a book and papers and pasted and sealed it all down on the base of the box. While the glue was still wet, I threw in some micro beads and glitter.


Another view. I let it dry for a few hours and
worked on other elements for the design.


I used this gesso on this old Monopoly game hotel and distressed it a bit. I cut out letters from my vintage book page talking about school and cut up a few sentences.


I glued down the words to the house with Golden Gel Medium.


I had a small glass bottle that I filled with small beads, glitter and the sentences I cut up for some interest. I wasn't sure if it all would be used – the hardest part was finding places for all the little trinkets I wanted to use and how to use them.


Trinkets...


I then took my red StazOn ink and distressed the box,
thinking "little red school house".


Did the same on the back and front.


I added some little stamp details along the edge of the box too. I then collaged some gorgeous rice paper into the top of the box as well as the bottom.


I found a cast off heart and distressed it with the same ink and glued it to the top.


I wasn't sure how well the box was sealed so I went around the seams with the thick gesso all over the box just to make sure it was resin-ready.


While the gesso was wet, I etched roof tiles in with a sharp tool.


It's resin ready!!!


For this project I'm using Amazing Clear Cast Resin. I mixed it all up and poured it into the base. Just mix equal amounts of Part "A" and Part "B" and you're good to go!


Pour slowly and let the resin flow around and fill in areas naturally.


With a half a drop of Alumilite blue dye I swirled it into certain areas of the wet resin for more interest. It worked out well!! Look how cool it looks!!


The blue added a lot!


I glued on the glasses to the top and added a bit
of the blue resin using the same popsicle stick.


Just an extra detail.


I added a bit of purple PearlX powder to the heart and grabbed some blue resin again and coated the top of the heart with the same stick as well.

Here are some detail shots...


I did end up using this little bottle. :)


I really enjoyed making the project
and hope you like how it turned out!


Ta-Da!!

Do you have a box of goodies
you can make into something else?

Feel free to stop by my FB page to see the latest with me.
To see more of my work please visit my new blog "Life Glitter Makeup"
and also at the Aimée Wheaton Art and Design website.

Till next time! Xoxo Aimée

• • • • • • • • • • • • • •

Don't forget to subscribe to our blog on the right side bar:
Twitter at AmazingCasting | Facebook at AmazingMoldPutty | YouTube at AmazingMoldPutty

Tuesday, November 11

When the Cold Winds Blow... OWL Spoon You! Altered Spoon Pendant by Tanya Ruffin

Owl Spoon You: Tanya Ruffin with Amazing Mold Putty

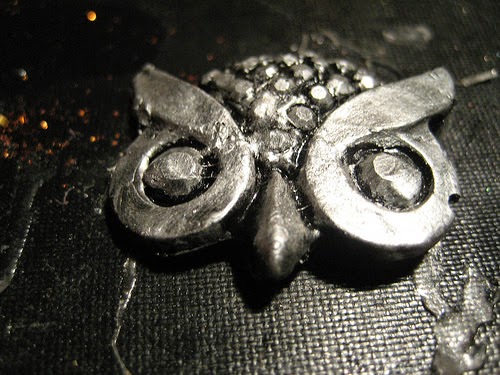
For this project I started out with a spoon, a resin owl head,
a resin clock face and watch parts.

Owl Spoon You: Tanya Ruffin with Amazing Mold Putty

First thing is gather your pieces. I thought the flourishes (under the spoon) would make great wings. Well, they didn't. but the resin clock face did. I had a mold I purchased off Etsy and had a spare cast laying around. I also used a little piece of a book page as my base.

I mixed up some Amazing Clear Cast Resin and using a craft stick dripped it in the spoon {CLICK HERE to view mixing/preparation}. You may have to prop the spoon on another craft stick so that the resin won't run out. I actually bent my spoon handle back some. You can see that in the photo above. 

Owl Spoon You: Tanya Ruffin with Amazing Mold Putty

I put the book page pieces on the bottom (so you could see my silver watch parts) and started dropping in the watch parts.

Owl Spoon You: Tanya Ruffin with Amazing Mold Putty

This is starting to look fun!

Owl Spoon You: Tanya Ruffin with Amazing Mold Putty

Silverware, its not just for breakfast anymore!

Now I cut with a pair of scissors the resin watch face. It isn't exactly in half, it is more like 1/3 of the left and 1/3 of the right side. This formed the wings. The Amazing Clear Cast Resin is all the way to the top of the spoon so dripping a little more over the top of the clock face pieces and smoothing out a nice top layer will work as a glue. I also dropped in a second hand.

Owl Spoon You: Tanya Ruffin with Amazing Mold Putty


While the Amazing Clear Cast Resin is curing I painted the white resin owl head with black acrylic paint. I molded the head from an old ring. I have probably 100 cast resin pieces in multiple drawers and pull them out and rummage through them when I start a craft project. So no telling how long ago I made this. After the black dries I go over it with silver Rub 'n Buff®. I LOVE that stuff! 

Owl Spoon You: Tanya Ruffin with Amazing Mold Putty

After the Amazing Clear Cast Resin has cured I can bend the spoon. Using two sets of pliers, I held the bottom of the spoon with one set (you could use your hand for this) and grabbed about 1/2 inch above the spoon part (I need to leave room for the owl head, be sure to test out where you want the head to sit) slowly bending the spoon handle back. I folded mine all the way back because I wanted the tip of the handle to represent tail feathers. 

Owl Spoon You: Tanya Ruffin with Amazing Mold Putty

This is how it looks from the side.

Owl Spoon You: Tanya Ruffin with Amazing Mold Putty

This was originally going to be another pendant, but the opening on it was large enough to make it a scarf pendant. With winter coming, even in south Louisiana, we need something to keep our necks warm!

How will you alter your flatware

You Can Craft Your Own Way! ~ Tanya

Tanya Ruffin with Create Studios

Please visit my site to see more of my inspiring creations at www.tanyaRuffin.com


Tanya Ruffin for tanyaruffin,com

Create Studios Baton Rouge

• • • • • • • • • • • • • •

Don't forget to subscribe to our blog on the right side bar:
Twitter at AmazingCrafting | Facebook at AmazingMoldPutty | YouTube at AmazingMoldPutty


Related Posts Plugin for WordPress, Blogger...