Showing posts with label keepsake. Show all posts

Wednesday, February 28

Memorabilia of #Cre8time Family... DIY Keepsake by Tracy Krueger


Hello everyone! It's Tracy here and I wanted to share with you today a project I created that holds some memorabilia pieces. A few months back I purchased some wood pieces at an antique market that used to hold watch parts. I knew I wanted to use these with Amazing Clear Cast Resin at some point... easily transforming one into a keepsake.


I decided to join my parents, my in-laws, my husband and I in a hanging with some pieces that either belonged to them or had some special meaning. I gathered some pins, a jewelry charm, tigers eye, shells and a silver heart. I also made some clay hearts that I painted red and wrote the initials of each of us on them. I played around laying them in different spots until I found the way I wanted them.


I mixed up a small batch of equal parts of Amazing Clear Cast Resin and mixed it with some fine glitter {CLICK HERE to view mixing/preparation}. I filled up the small outside circles and the top one.


After letting cure for at least 24 hours, I mixed up another small batch of Amazing Clear Cast Resin with some gold glass glitter, then filling the bottom half of each of the center sections.


I wanted the resin to be cured, but not fully hardened so that I could lay each piece of memorabilia into the resin and it would "settle" and not move around when I add the final resin layer. I set aside to let resin completely harden.


Then I mixed up my final batch of Amazing Clear Cast Resin and filled each of the center sections to the top... covering the keepsakes in each.


After the resin is fully cured, this is ready to hang! I drill small holes in the top sides and screwed in small screws. I opened my stash of sari ribbon and tied a piece of cream sari ribbon to the top to hang it by.


I hope you enjoyed my little piece of family history.
See you again soon!

What ideas do you have
to preserve family history?

Stay tuned for more... ~ Tracy

You can find more of my work on my Blog: http://tracykrueger-nine.blogspot.com/2017/

• • • • • • • • • • • • • • • • •

Don't forget to subscribe to our blog on the right side bar:
Twitter at AmazingCasting | Facebook at AmazingMoldPutty | YouTube at AmazingMoldPutty

Monday, December 26

#Cre8time Traditions... AMAZING Handmade Pins by Lyn Gill


Hi everyone it's Lyn Gill here again. This time to share my Christmas pins for this year. As I did with a similar project last year with my Santa hats – I am continuing a tradition my Grandfather started many years ago... Christmas Pins! Now my Grandfather was a wood carver and made beautiful pins, so I thought I would continue the tradition with my own hand-sculpted trees.


First I started with an original sculpt of a Christmas Tree made of Super Sculpey Polymer Clay. Then I created a mold with Amazing Mold Putty. It is just a simple sculpt but that's part of the tradition.


Then I add various glitters, Alumidust and Alumilite Dyes to small batches of Amazing Clear Cast Resin and pour into the mold. I finish off the resin trees with a touch of glitter glue to add ornaments for the final results... fancy festive tree pins!


I always enjoy creating these little gifts for family and friends at this joyous time of year. I hope you'll give it a try and create a new tradition by making your own little handmade gifts.

Thank you so much for joining me today in sharing one of my families traditions. I hope you have a very Merry Christmas...  Till Next Time! Lyn

What new family traditions will you
add to the holidays this year?

As usual, you can find more of my work on my blog LynzCraftz
or on YouTube LynzCraftz, or my Facebook page LynzCraftz.

• • • • • • • • • • • • • • • • •

Don't forget to subscribe to our blog on the right side bar:
Twitter at AmazingCasting | Facebook at AmazingMoldPutty | YouTube at AmazingMoldPutty

Monday, November 28

Dia De Los Muertos - Amor de Familia... a #Cre8time Keepsake by Maria Soto


Hi There! Maria here today and I wanted to share how I came about this project... a Family Shrine for the "Day of the Dead" celebration. 

Many years ago I went to Mexico for my grandmother's funeral. My Grandfather had passed away many years before her. When we arrived at the cemetery, they opened her coffin, and added human remains inside her coffin. I asked my Dad what that was about and he said that was my Grandfather, and he would be with her now for eternity.

Until that day I never knew you could do this. So I decided to make a coffin shrine for my project – you will see more than one skeleton on the inside, and also many skulls on the top... representing all of the other family members that have passed on.

Products used:
Measuring cups
Mixing sticks
Acrylic paints and various colors
Paint brushes
Recycled bag
Kleenex tissues
Flowers
Cheese cloth


I had a handful of plastic skulls and also some little tiny ones that are actually double-sided. I used Amazing Mold Putty to make this multi-skull mold. I need a lot of skulls for this project, and making one single mold was not a good idea – so I made this big one with many instead.

First make sure to follow the simple instructions on how to mix Amazing Mold Putty {CLICK HERE to view mixing/preparation}. It's pretty easy – it comes it two parts, Part "A" and Part "B"; and you take equal amounts of each (one part is white the other is yellow) and you mix these two until you no longer see any white, only a uniform yellow putty.


I used a plastic bowl to place the putty inside and then quickly pressed down all the skulls, trying to use as much of the putty's surface as possible. You have to move fast because this sets pretty fast once mixed together. I was able to make 10 large skulls and 7 tiny skulls from this one mold.


Now since I was going to paint all these skulls for Day of the Dead, I needed to use the Amazing Casting Resin. This resin not only cures in about 10 minutes... but it cures a nice opaque white as you can see in photos – and you can also add color to the resin is you want. I just left them white because I knew I would be hand painting each differently. I had extra resin leftover so I poured into a bigger skull mold (I'll use this later in another project). CLICK HERE to view how to mix and prepare Amazing Casting Resin. 


I made this little heart with wings out of Creative Paperclay. I did make a mold of this piece, but at the end I decided to use the one made from paperclay instead of the resin, same goes for a little skull I used on the inside of the coffin.


Here is the wood coffin I purchased from Michael's. I painted it first, then played around with how to add the skulls, add texture and embellishments, etc.


I love to use recycle items in my projects. In this project I used this empty potato bag. I painted the inside of the coffin purple, and this mesh was perfect because it matched the inside color. 


Here is the coffin, all painted with acrylic paints... 
black on the outside and the inside is purple.


So now I'm ready to add the skulls to the outside of the coffin. First I added some Amazing Casting Resin to the top of the coffin – a little bit at a time. Since this resin cures really fast, I had to make sure to work in small amounts, waiting for each pour to cure. It took me a few hours to get the top completely done.

Each resin pour over the coffin meant I would add a few skulls. As you can see I did color some of the skulls black, and then I stopped because I remembered I needed them to be all white. Adding the skulls at first was easy, but then I really had plan where to place them first before adding more resin – because I needed to fill the entire top of the coffin, making sure not to cover up the bottom skulls. This took a while, but I think it turned out perfect. The tiny little skulls were the perfect size for use as fillers.

Once I was done adding the skulls to the top of the coffin, I painted all of them white. Since some of the skulls were black tinted resin, it took a couple of coats to completely paint them all white.


Once they were all white the fun could begin... going back in and adding all the little details of color to each. This took a while but I really liked the end result!


I also added some color to the resin that spilled over the coffin – I wanted it to look as if the bodies had melted away, and all you had left were the skulls.


Here you can see how I added the recycled bag on one side, and then added the heart with wings and the skull made from paperclay. Had to add some flowers... they were orange, but I wanted to distress them. So I painted them all black, then I added back some red, orange and black. The heart as you can see was painted black, then I added some red and white and the word "amor" which means "Love". The tiny skull was painted all white, then detailed with bright colors. 


This close up shows the final look on the inside of the coffin, You can see the three bodies I added on the right side of the coffin. I used two kleenex tissues to cover the bodies and then added Amazing Casting Resin colored with Black Dye with a piece of cheese cloth over the cured resin. I painted over these materials to give them more dimension.

Here are more detail views of the finished inside of my coffin shrine.


This project took me about three days to start and finish. Once I was happy with everything, I took it to my office and created a little setting to celebrate my loved ones that have moved on... then brought it back home for the traditional celebration including food and lighted candles with my family. 


I've shared my take on how I used these products to celebrate a special day with my family. CLICK HERE to view some other Sugar Skulls and a Mini Shrine I created last year for this occasion.

How would you celebrate
a special holiday using
these Amazing products? 

Please share your ideas with us. We have the winter season and Christmas coming up, let's see what amazing creations we can all come up with! We love to see what others do with these awesome products.

Thanks for visiting! I invite you to stop over to my blog, "What is Creativity"
 at http://chuy-creativity.blogspot.com to see more of my creations. ~ Maria Soto

• • • • • • • • • • • • • • • • •

Don't forget to subscribe to our blog on the right side bar:
Twitter at AmazingCasting | Facebook at AmazingMoldPutty | YouTube at AmazingMoldPutty

Monday, August 29

#Cre8time Keepsakes... Memory Inspired Collage from Trinkets by Aimée Wheaton


What is this? 

It started with a broken mug my mom had saved... believe it or not. This was a simple keepsake project using three products and trinkets I had around the house.


My mom LOVED blue and white dishes and saved
even her broken ones to use in mosaic art.


This was from a mug and makes a perfect niche.


The focal point was a pin she bought me at Express back in the 90's and it was a favorite. We had "Fleur de Lis" all over our home due to our French heritage. I loved it so much I had to mold it before I embedded it in resin. I LOVE Amazing Mold Putty for that reason alone.


I mixed some Amazing Casting Resin and threw in the trinkets!
Wait for the magic!


I swirled around a drop of blue dye as well. As the resin cures, it turns opaque.


Ooey gooey goodness! Love how RICH this looks!


From different angles...


This keepsake project came together quickly. I like how it is free-form and very different – it would make a great conversation starter. Hope you enjoyed this and see how easy it is to save pieces to use in resin work.

Do you save things to create with?

Feel free to stop by my FB page to see the latest with me.

To see more of my work please visit my new blog "Life Glitter Makeup"
and also at the Aimée Wheaton Art and Design website.

Till next time! Xoxo Aimée

• • • • • • • • • • • • • • • • •

Don't forget to subscribe to our blog on the right side bar:
Twitter at AmazingCasting | Facebook at AmazingMoldPutty | YouTube at AmazingMoldPutty

Monday, July 25

#Cre8time Furbaby Keepsakes... Making a Paw Print Rubber Stamp – Part 2 by Tanya Ruffin


Part 2: The Stamp

To read Part 1 – click here.

Now that you have your second mold you are going use the UMR mold release and spray several coats inside your silicone mold.

After they mold release dries, mix a small amount of Amazing Mold Rubber (follow the directions on the box for mixing small amounts). Pour into mold and allow to cure. 


Don't try to de-mold too soon. Let it cure overnight. 

The gently pull the rubber out of the mold. You may have some areas where the silicone mold sticks to the rubber. But if you used the mold release it shouldn't be too bad. 

THIS IS WHY WE DIDN'T USE OUR ORIGINAL MOLD!!!!

If you don't use a mold release or not enough mold release, the Amazing Mold Rubber will fuse to the Amazing Mold Putty making a solid rubber block.


Tape your rubber paw to an acrylic block.


Ink up with a permanent ink.


Make your print.
It may take a few tries to get a good print.


I scanned my print into the computer to make some background paper.


I also printed a laser print of my beloved Lily and mod podged it to a vase. 


I used the paw print paper to fill in some of the empty space
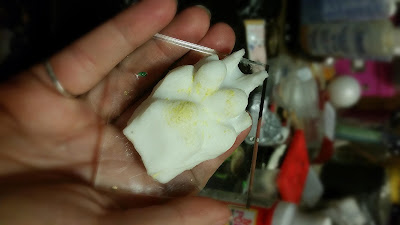
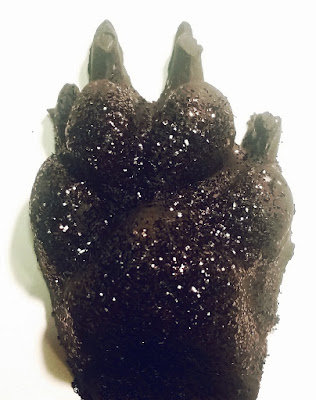
 and embellished with the black glittered resin paw. 


What rubber stamps can you make


Go Craft Your Own Way!
Tanya


Please visit my site to see more of my inspiring
creations at www.tanyaRuffin.com

• • • • • • • • • • • • • • • • •

Don't forget to subscribe to our blog on the right side bar:
Twitter at AmazingCasting | Facebook at AmazingMoldPutty | YouTube at AmazingMoldPutty
Related Posts Plugin for WordPress, Blogger...