Showing posts with label memory keeping. Show all posts

Wednesday, February 28

Memorabilia of #Cre8time Family... DIY Keepsake by Tracy Krueger


Hello everyone! It's Tracy here and I wanted to share with you today a project I created that holds some memorabilia pieces. A few months back I purchased some wood pieces at an antique market that used to hold watch parts. I knew I wanted to use these with Amazing Clear Cast Resin at some point... easily transforming one into a keepsake.


I decided to join my parents, my in-laws, my husband and I in a hanging with some pieces that either belonged to them or had some special meaning. I gathered some pins, a jewelry charm, tigers eye, shells and a silver heart. I also made some clay hearts that I painted red and wrote the initials of each of us on them. I played around laying them in different spots until I found the way I wanted them.


I mixed up a small batch of equal parts of Amazing Clear Cast Resin and mixed it with some fine glitter {CLICK HERE to view mixing/preparation}. I filled up the small outside circles and the top one.


After letting cure for at least 24 hours, I mixed up another small batch of Amazing Clear Cast Resin with some gold glass glitter, then filling the bottom half of each of the center sections.


I wanted the resin to be cured, but not fully hardened so that I could lay each piece of memorabilia into the resin and it would "settle" and not move around when I add the final resin layer. I set aside to let resin completely harden.


Then I mixed up my final batch of Amazing Clear Cast Resin and filled each of the center sections to the top... covering the keepsakes in each.


After the resin is fully cured, this is ready to hang! I drill small holes in the top sides and screwed in small screws. I opened my stash of sari ribbon and tied a piece of cream sari ribbon to the top to hang it by.


I hope you enjoyed my little piece of family history.
See you again soon!

What ideas do you have
to preserve family history?

Stay tuned for more... ~ Tracy

You can find more of my work on my Blog: http://tracykrueger-nine.blogspot.com/2017/

• • • • • • • • • • • • • • • • •

Don't forget to subscribe to our blog on the right side bar:
Twitter at AmazingCasting | Facebook at AmazingMoldPutty | YouTube at AmazingMoldPutty

Monday, November 28

#Cre8time to Try Something New... Make it Artsy Episode 107 - Industrial

Hello Amazing Crafters!! Have you heard about Make It Artsy?? It's a brand new TV show for makers and crafters – featuring tips, techniques and projects for makers, crafters and artists... AND... in this week's episode you can see Joe Rotella create a dimensional keepsake tray using Amazing Casting Products.

It's time for a new episode of Make It Artsy!


CLICK HERE to view this week's episode
Series 100, Episode 107 - Industrial 

Look toward the gritty, industrial world for inspiration. Using industrial materials and AMAZING Clear Cast Resin, Joe Rotella creates an artsy tray. Illustrator Jenn Mason designs contemporary earrings, then hardens them with heat. Joe Rotella revs up his micro lathe to carve a keepsake pen. Finally, take a road trip to the Columbus Idea Foundry, a center for the growing Maker Movement.

Bookmark or PIN the Make It Artsy Website
http://makeitartsy.com

Make It Artsy launched on September 29th on Public Television stations across the country! Look for it on your local PBS channel. If you can't find it on your local programming, you can view Series 100, Episode 107 – Industrial online from November 25th - December 2nd.


Make It Artsy is a new series that celebrates that maker spirit in everyone. From mixed-media to metalsmithing, using tools from saws to sewing machines, today's most creative "makers" join host Julie Fei Fan Balzer to unleash a new look for crafting with a touch of industrial style.


Amazing Casting Products by Alumilite Corp. is proud to be one of these fabulous group of companies partnering with Make it Artsy. Stay tuned for episodes with projects featuring some of our AMAZING products! Don't worry... we'll be posting here when each new episode is available so you can tune in.

• • • • • • • • • • • • • • • • •

Don't forget to subscribe to our blog on the right side bar:
Twitter at AmazingCasting | Facebook at AmazingMoldPutty | YouTube at AmazingMoldPutty

Monday, August 29

#Cre8time Keepsakes... Memory Inspired Collage from Trinkets by Aimée Wheaton


What is this? 

It started with a broken mug my mom had saved... believe it or not. This was a simple keepsake project using three products and trinkets I had around the house.


My mom LOVED blue and white dishes and saved
even her broken ones to use in mosaic art.


This was from a mug and makes a perfect niche.


The focal point was a pin she bought me at Express back in the 90's and it was a favorite. We had "Fleur de Lis" all over our home due to our French heritage. I loved it so much I had to mold it before I embedded it in resin. I LOVE Amazing Mold Putty for that reason alone.


I mixed some Amazing Casting Resin and threw in the trinkets!
Wait for the magic!


I swirled around a drop of blue dye as well. As the resin cures, it turns opaque.


Ooey gooey goodness! Love how RICH this looks!


From different angles...


This keepsake project came together quickly. I like how it is free-form and very different – it would make a great conversation starter. Hope you enjoyed this and see how easy it is to save pieces to use in resin work.

Do you save things to create with?

Feel free to stop by my FB page to see the latest with me.

To see more of my work please visit my new blog "Life Glitter Makeup"
and also at the Aimée Wheaton Art and Design website.

Till next time! Xoxo Aimée

• • • • • • • • • • • • • • • • •

Don't forget to subscribe to our blog on the right side bar:
Twitter at AmazingCasting | Facebook at AmazingMoldPutty | YouTube at AmazingMoldPutty

Monday, July 25

#Cre8time Furbaby Keepsakes... Making a Paw Print Rubber Stamp – Part 2 by Tanya Ruffin


Part 2: The Stamp

To read Part 1 – click here.

Now that you have your second mold you are going use the UMR mold release and spray several coats inside your silicone mold.

After they mold release dries, mix a small amount of Amazing Mold Rubber (follow the directions on the box for mixing small amounts). Pour into mold and allow to cure. 


Don't try to de-mold too soon. Let it cure overnight. 

The gently pull the rubber out of the mold. You may have some areas where the silicone mold sticks to the rubber. But if you used the mold release it shouldn't be too bad. 

THIS IS WHY WE DIDN'T USE OUR ORIGINAL MOLD!!!!

If you don't use a mold release or not enough mold release, the Amazing Mold Rubber will fuse to the Amazing Mold Putty making a solid rubber block.


Tape your rubber paw to an acrylic block.


Ink up with a permanent ink.


Make your print.
It may take a few tries to get a good print.


I scanned my print into the computer to make some background paper.


I also printed a laser print of my beloved Lily and mod podged it to a vase. 


I used the paw print paper to fill in some of the empty space
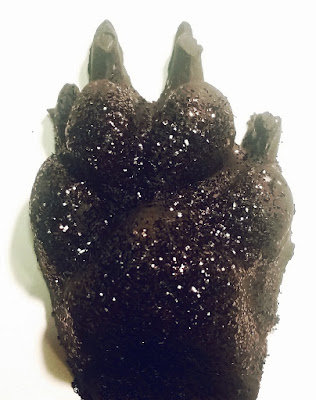
 and embellished with the black glittered resin paw. 


What rubber stamps can you make


Go Craft Your Own Way!
Tanya


Please visit my site to see more of my inspiring
creations at www.tanyaRuffin.com

• • • • • • • • • • • • • • • • •

Don't forget to subscribe to our blog on the right side bar:
Twitter at AmazingCasting | Facebook at AmazingMoldPutty | YouTube at AmazingMoldPutty

#Cre8time Furbaby Keepsakes... Making a Paw Print Rubber Stamp – Part 1 by Tanya Ruffin


In this project I want to make a rubber stamp of my dog's paw print. Yes, I could just ink up my dog's paw and make a paw print and scan it into the computer, but I wanted a little something different.

My Lily had become sick with kidney disease and I knew she wasn't going to be around much longer, sadly. So I made a mold of her paw before I had to go out of town. I am so glad I did because she died while I was in route home... she was only 7. I am brokenhearted, but that is another blog series.


I recommend any pet lover to make a paw mold while your pet is still happy and healthy. It will save you are a lot of heartache later.

Lily modeling for one of my earlier projects! 

This may seem like a lot of steps to get to the end results but you end up with multiple use pieces along the way. So I have made this in a two part series.

Part 1 – The molds

I first made a mold of her paw with Amazing Mold Putty {please CLICK HERE to view mixing/preparation}. I recommend that you write the date, "original" and pet's name on the back of the mold.

Mold #1 – the Original 

Then make a cast using resin. You will use the cast to make the rubber stamp. Make sure it comes out good, the next steps involve this first generation cast.

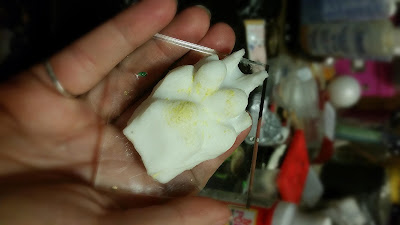
For the first cast I made – I used Amazing Casting Resin with black dye, and I put fine black glitter in the mold. Since my pup had black paws I thought this was adorable! I always tend to jump the gun and should have waited to make this cast until after I made my cast for the rubber stamp. It really doesn't matter except that my rubber stamp cast now has some black glitter in it.


Then I made the cast for the rubber stamp mold.
This is why you see some remnants of glitter in the cast piece. 


With this cast you will made a second mold with Amazing Mold Putty

With the resin casting made from first mold we are making a second mold – because the following steps are a bit tricky and you could ruin your mold. This way you always have your "original" saved somewhere that you can use to make another cast. 

Mold #2 

This is the mold we will use now. On to Part 2!

I'll be back later today with
another post and part 2.


Go Craft Your Own Way!

Please visit my site to see more of my inspiring
creations at www.tanyaRuffin.com

• • • • • • • • • • • • • • • • •

Don't forget to subscribe to our blog on the right side bar:
Twitter at AmazingCasting | Facebook at AmazingMoldPutty | YouTube at AmazingMoldPutty

Thursday, June 23

#Cre8time Transformations... DIY Graduation Keepsake by Brenda Burfeind

Hi amazing crafting friends! Brenda here from Creativity is a State of Mind and I am pretty excited to show off my faux lightbulb with you today using most of the Amazing Casting Products.

My niece recently graduated from high school and I wanted to make her something special she can keep her tassel in and still be displayed. So let's get started.

I started with an ordinary light bulb that I hoarded away when hubby wasn't looking. He's been making me purge because he recently built me an amazing crafting space. Two full rooms to be exact and I will have pictures up on my blog soon. It's still a work in progress, but it's getting there. After rearranging and sorting I have found so many "new" things to play with that I am forcing myself to stay away from the craft store. Working at Michaels doesn't help one bit though – LOL!

Anyway, back to my light bulb. I carefully took it apart. There are tutorials on Pinterest on how to do this, but it's quite simple. I poked a hole in the black part and with a needlenose pliers I broke away everything around it. I did wear protective eye wear and gloves just in case. Honestly, it wasn't as scary as I thought it would be.


Now onto the fun part. I took my Amazing Clear Cast Resin and some Fluorescent "Flo" Yellow dye and mixed it up. You can view mixing instructions HERE


I then poured the mixture into my light bulb and kept swirling it around. Now the Amazing Clear Cast Resin takes hours to set up, but when you do such a thin layer it doesn't really take that long. I sat myself in front of the TV and just kept rotating my light bulb until I could see that it wasn't moving anymore. It coated the inside of the light bulb wonderfully in about 20 minutes. I then turned it upside down in a cup to let any drippings if any come out. 

Now the reason I used Amazing Clear Cast Resin is because the light bulb is made of REAL glass and I wanted to prevent it from breaking. The resin inside of the glass will hopefully help with that. It felt pretty tough when it was done setting up.


Now after I had done this, I realized I didn't have a stopper that looked realistic, so I went into the bathroom and stole another light bulb just to mold my black piece. I used Amazing Mold Putty {to mix this up and you can view those instructions HERE}. The mold set up in no time.


I mixed up some Amazing Casting Resin with the black Alumilite dye and the same mixing instructions as above and created my cap.


See how realistic this looks and it only took a few minutes to set up?


Now I didn't want to have to explain what the gift was, so instead I created a faux tassel. She may or may not keep it like this.


I attached some wire to the tassel and
threaded it through the faux cap.


For now I used some double-sided super heavy duty sticky tape and taped the cap onto the light bulb. If she puts her own tassel in it for safe keeping she may think about gluing the cap on.


And with my Cricut I cut "To a bright future" out in vinyl and applied it to the light bulb. Isn't that just fun? I love how it turned out and cannot wait to hear what she thinks of her gift.

What item in your
"trash"
would you repurpose?

I'm glad you stopped by today and as always, I hope you've enjoyed my "how to". Please leave me a comment and also head over to Creativity is a State of Mind to see what else I am up to.

Until next time, shine bright! ~ Brenda

• • • • • • • • • • • • • • • • •

Don't forget to subscribe to our blog on the right side bar:
Twitter at AmazingCasting | Facebook at AmazingMoldPutty | YouTube at AmazingMoldPutty
Related Posts Plugin for WordPress, Blogger...