Showing posts with label CreateBR. Show all posts

Monday, July 31

#Cre8time Halloween Decorations... Fabulous Faux Eygyptian Scarabs by Tanya Ruffin


I wanted to make dozens of scarabs for Halloween decorations, but I didn't realize how much resin would be involved until I started. So I have devised a way to make an original in resin and then make copies of it using plaster and sand.

Things you'll need for this project:
Steps:

1.) First create your original.


I found a Transformers toy in the close-out section that came in a cool egg shape. I used the egg shape as the back of the scarab. I used air dry clay to sculpt the rest of the body. The legs are very delicate so it I had to make them thick enough so they wouldn't break when dry. The scarab is 7 inches long and 5 inches wide.

2.) Create a mold.


I then used a small cardboard box to be the base of my mold. I hot glued the scarab in the bottom of the box and mixed up the Amazing Mold Rubber and poured {CLICK HERE to view mixing/preparation}. 

The mold came out great!


3.) Make a casting in resin.

Now to pour some Amazing Casting Resin {CLICK HERE to view mixing/preparation}. I originally thought I would be making dozens of these in resin, but then realized how much resin I would end up needing. Sorry, but I have more crafty things to make with my resin! 


So I cast just one to use as as a decoration. I mixed Alumilite Black Dye with the Amazing Casting Resin and used some cool Alumidust on the shell... this Interference Green is awesome!!!

So you may be asking – why not just pour the plaster in the rubber mold? Well, to get plaster out of the mold you pull back the mold and you get this... 


Unfortunately the plaster is too fragile and the legs broke off as I removed it from the mold. 

4.) Make many from one.

So I came up with another way. I will use sand to serve as a mold and pour the plaster into that. To get the plaster out of the sand you just brush away the sand. So I ran down to the building supply store and bought a 50lb bag of playground sand for a whooping $5.00. 

**TIP** also buy your plaster at the building supply store {not at the craft store} it is way cheaper.

I had an old box that a dozen glasses came in so I put a garbage bag inside and dumped in the sand. Then add some water so that the sand will stick to itself and pat it down to make a flat surface.


Press your object {I used the piece cast from Amazing Casting Resin} into the sand and gently pull it out. If the side walls collapse, then you need to add some more water to the sand. Repeat to make as many that will fit in sand box leaving ample space between each.

Then mix up your plaster and pour into each void. Wait for plaster to harden.

And then... Tada!!!


The legs were rather fragile being cast in plaster, so I poured it thicker and that is why there are more places that need clean up. These will embellish a wall in an Egyptian haunted house, so I am not too concerned about them being perfect.

The thing I love is the sand that is embedded in the hardened plaster. It looks like an ancient relic of sorts.

What handmade decorations
will you create for Halloween?

Now go and Craft Your Own Way! ~ Tanya


Please visit my site to see more of my inspiring
creations at www.tanyaRuffin.com

• • • • • • • • • • • • • • • • •

Don't forget to subscribe to our blog on the right side bar:
Twitter at AmazingCasting | Facebook at AmazingMoldPutty | YouTube at AmazingMoldPutty

Monday, July 25

#Cre8time Furbaby Keepsakes... Making a Paw Print Rubber Stamp – Part 2 by Tanya Ruffin


Part 2: The Stamp

To read Part 1 – click here.

Now that you have your second mold you are going use the UMR mold release and spray several coats inside your silicone mold.

After they mold release dries, mix a small amount of Amazing Mold Rubber (follow the directions on the box for mixing small amounts). Pour into mold and allow to cure. 


Don't try to de-mold too soon. Let it cure overnight. 

The gently pull the rubber out of the mold. You may have some areas where the silicone mold sticks to the rubber. But if you used the mold release it shouldn't be too bad. 

THIS IS WHY WE DIDN'T USE OUR ORIGINAL MOLD!!!!

If you don't use a mold release or not enough mold release, the Amazing Mold Rubber will fuse to the Amazing Mold Putty making a solid rubber block.


Tape your rubber paw to an acrylic block.


Ink up with a permanent ink.


Make your print.
It may take a few tries to get a good print.


I scanned my print into the computer to make some background paper.


I also printed a laser print of my beloved Lily and mod podged it to a vase. 


I used the paw print paper to fill in some of the empty space
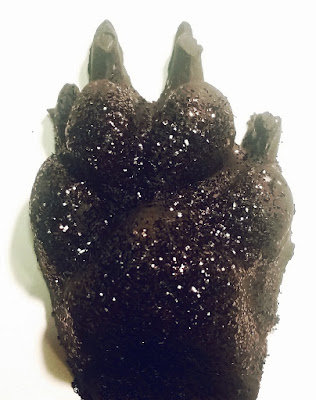
 and embellished with the black glittered resin paw. 


What rubber stamps can you make


Go Craft Your Own Way!
Tanya


Please visit my site to see more of my inspiring
creations at www.tanyaRuffin.com

• • • • • • • • • • • • • • • • •

Don't forget to subscribe to our blog on the right side bar:
Twitter at AmazingCasting | Facebook at AmazingMoldPutty | YouTube at AmazingMoldPutty

Wednesday, June 8

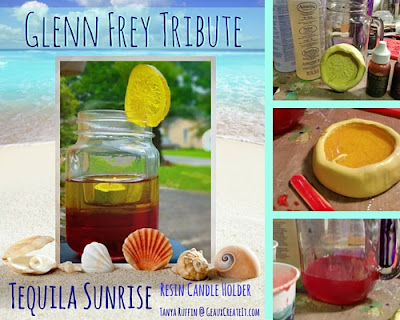
It's #Cre8time Somewhere... Tequila Sunrise Resin Candle Holder by Tanya Ruffin

Tequila Sunrise Resin Candle Holder- Glenn Frey Tribute- Tanya Ruffin for Amazing Mold Putty

Using a Dollar Store Mason Jar mug, Amazing Mold Putty, Amazing Clear Cast Resin and Alumilite dyes, I created a touching tribute to Glenn Frey – a Tequila Sunrise resin candle holder. 


If you have trouble viewing video, please CLICK HERE to view.

Tequila Sunrise Resin Candle Holder- Glenn Frey Tribute- Tanya Ruffin for Amazing Mold Putty

How do you decorate for the Summer?

Go Craft Your Own Way!


Please visit my site to see more of my inspiring creations at www.tanyaRuffin.com

• • • • • • • • • • • • • • • • •

Don't forget to subscribe to our blog on the right side bar:
Twitter at AmazingCasting | Facebook at AmazingMoldPutty | YouTube at AmazingMoldPutty

Tuesday, May 24

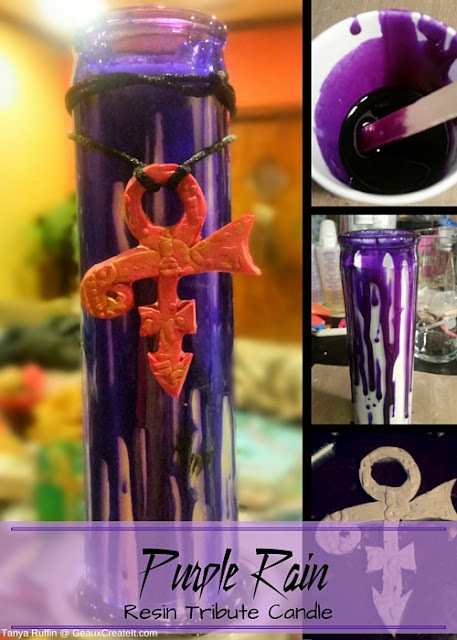
Purple Resin Rain, Purple Resin Rain-ay-ainnnn... by Tanya Ruffin

Purple Rain Resin Candle- Tanya Ruffin for Amazing Mold Putty

and Violet Dye I made a tribute to the late great Prince.

Purple Rain Resin Candle- Tanya Ruffin for Amazing Mold Putty

Super easy, scoop up some resin on the craft stick
and drip down the side of the candle.

Purple Rain Resin Candle- Tanya Ruffin for Amazing Mold Putty

You can leave it pooled around the bottom or trim with scissors.

After looking at it I decided it needed a little something extra,
so I pulled out some polymer clay and came up with this...

Purple Rain Resin Candle- Tanya Ruffin for Amazing Mold Putty

It was a tad plain so I pressed a Sizzix embossing folder into the clay design. 

I used the clock design. Clock, Time, Morris Day and the Time... get it? Anyway...

Purple Rain Resin Candle- Tanya Ruffin for Amazing Mold Putty

After baking clay the next step – make a mold of the Prince Love symbol...


It's quick and easy with Amazing Mold Putty!


Mix Violet Dye with Amazing Casting Resin. Pour into mold and wait about 10 minutes to cure. Rub some Gold Rub 'n Buff® to highlight the design. I ended up casting a pink version that I used to finish my candle. I am also going to make some necklaces with my Amazing Prince Love symbol!


Go Craft Your Own Way!

Tanya


Please visit my site to see more of my inspiring creations at www.tanyaRuffin.com

• • • • • • • • • • • • • • • • •

Don't forget to subscribe to our blog on the right side bar:
Twitter at AmazingCasting | Facebook at AmazingMoldPutty | YouTube at AmazingMoldPutty

Thursday, April 14

#Cre8time Transformations... AMAZING Copper Resin Finish by Tanya Ruffin


When I wanted to paint a piece of MDF that I had used in a previous studio space to look like copper, I never imagined how great it would turn out!

I learned a trick a long time ago that to make copper really pop you should paint your base a rust color. It took just 3 steps to achieve this great metallic finish!

Step 1. Paint surface a rust color.


Step 2. Mix your entire box of Amazing Clear Cast Resin and add a little (I used the end of a craft stick to dip) Alumilite Copper Metallic Powder. A little goes a LONG way!


Step 3. Make sure your surface is completely dry and you don't have any wet spots from cleaning. Tape off the edge of your surface and pour. You can use a foam brush or an old credit card to smooth it out.


Allow it to cure overnight. You may have some spots you need to even out later but it really does give it character. I used a file from the dollar store to clean up the edges.

And then... TADA!


The little touch up spots (see the circle above) looks awesome!


You can make your counter any color you want using the powders!

I love it!

What would you give a metallic finish?

Craft Your Own Way!

Tanya


Please visit my site to see more of my inspiring creations at www.tanyaRuffin.com

• • • • • • • • • • • • • • • • •

It's that time to have you chance to join our team of Amazing Creatives!


DEADLINE to apply is April 22, 2016.

  http://amazingmoldputty.blogspot.com/2016/04/an-amazing-opportunity-awaits.html

• • • • • • • • • • • • • • • • •

Don't forget to subscribe to our blog on the right side bar:
Twitter at AmazingCasting | Facebook at AmazingMoldPutty | YouTube at AmazingMoldPutty

Thursday, January 28

#Cre8time Jewelry Making... AMAZING Hose Clamp Charms by Tanya Ruffin


What do you get when you cross some hose clamps from the dollar store, a clip from a mini clipboard and Amazing Clear Cast Resin??!


These!!!


Get a variety pack of hose clamps for one buck...


Duct tape... yes, all I had was some zebra tape from the dollar store. You could use packing tape but I left mine in the car and the cold zapped the sticky off it.


Wrap the hose clamp with tape and burnish down. The edges have openings so you want to make sure to cover/seal them all up! Wherever resin can seep in, it will!


Mix up a batch of Amazing Clear Cast Resin and let rest for 5 minutes to let bubbles escape; then pour into charms {CLICK HERE to view mixing/preparation}. After experimenting I discovered that the view-able side would be the top – so you may want to do a little planning and layer your embellishments accordingly. Keep the tape on until the end after resin has fully cured.


I found this rhinestone edging at Micheal's and used
it around the outside edge of the larger hose clamps.


Finished charm with rhinestone edge.


I threaded wire through the top of the hose clamp and twisted to make a bail.


I used the mini clip to hold one of the charms instead of making a bail.
Love this for an industrial look!

What cool hardware would you transform
into charms and pendants?

Craft Your Own Way!


Please visit my site to see more of my inspiring creations at www.tanyaRuffin.com

• • • • • • • • • • • • • • • • •

Don't forget to subscribe to our blog on the right side bar:
Twitter at AmazingCasting | Facebook at AmazingMoldPutty | YouTube at AmazingMoldPutty
Related Posts Plugin for WordPress, Blogger...