Showing posts with label dollar tree. Show all posts

Monday, November 28

#Cre8time Decorating for the Season... DIY Sugar Skull Wreath by Tanya Ruffin


This project was so much fun. It all started after seeing some amazing Halloween and seasonal wreaths in a store. I though it could replicate much much cheaper than the $35.00 price tag.

Dollar tree (DT) was my friend! You can find everything you need for seasonal decorating.

Supplies I used:
  • (DT) skull ice cube tray
  • 3 bunches of flowers (DT), yellow, pink and purple
  • (DT) wire flower wreath
  • (DT) pink mesh ribbon
  • (DT) rhinestones
  • Floral glitter spray paint
  • Glue Gun {or tacky glue}
  • Amazing Casting Resin
  • Red Dye for Resin
  • Extras - I used a sugar skull cookie cutter for the center piece.


Your visit to Dollar Tree will cost you about 6 bucks!


First thing I did was mix up some Amazing Casting Resin and pour into the ice cube tray. For these I mixed a tiny bit of red dye into the white resin. It came out more flesh color, but that was OK.


After those cured, I painted each with acrylic paint and embellished with rhinestones and handmade resin flowers from a previous project. The large skull was from a sugar skull cookie cutter.


Wrap the pink mesh ribbon around the wire wreath.
Use a glue gun or tacky glue to secure.


Glue flowers around the wreath.


Then the fun part... adding the sugar skulls onto the wreath! The finishing touch – spraying the wreath with glitter spray paint. Change up the colors, florals and seasonal embellishments for endless possibilities!

Tada!


How would you decorate your wreath?

Go Craft Your Own Way!
Tanya


Please visit my site to see more of my inspiring
creations at www.tanyaRuffin.com

• • • • • • • • • • • • • • • • •

Don't forget to subscribe to our blog on the right side bar:
Twitter at AmazingCasting | Facebook at AmazingMoldPutty | YouTube at AmazingMoldPutty

Tuesday, May 24

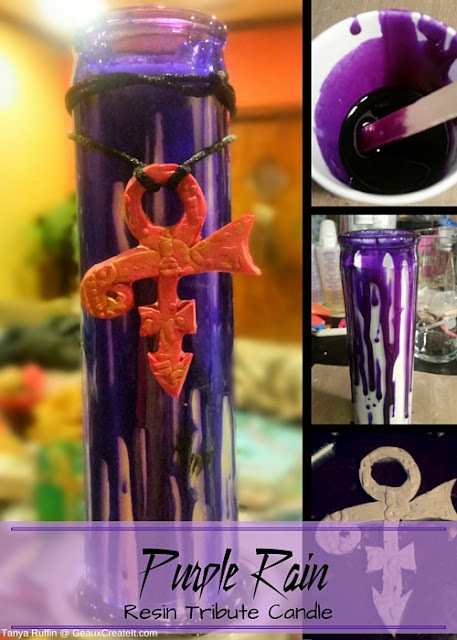
Purple Resin Rain, Purple Resin Rain-ay-ainnnn... by Tanya Ruffin

Purple Rain Resin Candle- Tanya Ruffin for Amazing Mold Putty

and Violet Dye I made a tribute to the late great Prince.

Purple Rain Resin Candle- Tanya Ruffin for Amazing Mold Putty

Super easy, scoop up some resin on the craft stick
and drip down the side of the candle.

Purple Rain Resin Candle- Tanya Ruffin for Amazing Mold Putty

You can leave it pooled around the bottom or trim with scissors.

After looking at it I decided it needed a little something extra,
so I pulled out some polymer clay and came up with this...

Purple Rain Resin Candle- Tanya Ruffin for Amazing Mold Putty

It was a tad plain so I pressed a Sizzix embossing folder into the clay design. 

I used the clock design. Clock, Time, Morris Day and the Time... get it? Anyway...

Purple Rain Resin Candle- Tanya Ruffin for Amazing Mold Putty

After baking clay the next step – make a mold of the Prince Love symbol...


It's quick and easy with Amazing Mold Putty!


Mix Violet Dye with Amazing Casting Resin. Pour into mold and wait about 10 minutes to cure. Rub some Gold Rub 'n Buff® to highlight the design. I ended up casting a pink version that I used to finish my candle. I am also going to make some necklaces with my Amazing Prince Love symbol!


Go Craft Your Own Way!

Tanya


Please visit my site to see more of my inspiring creations at www.tanyaRuffin.com

• • • • • • • • • • • • • • • • •

Don't forget to subscribe to our blog on the right side bar:
Twitter at AmazingCasting | Facebook at AmazingMoldPutty | YouTube at AmazingMoldPutty

Wednesday, April 8

From Functional to FABULOUS! Upscale a Dollar Store Compact by Tanya Ruffin


Resin Embellished Compact


I started off with a Dollar Tree compact, it actually came with a large hand mirror, so it was cheaper than a dollar!

This is a fairly quick and cheap way to jazz up a compact. I plan on doing a similar effect with the large mirror and this was my successful test!


Open the mirror up and lay it flat (mirror side down) on a non stick surface. Pour some Amazing Clear Cast Resin on the surface making sure that it doesn't drip off the edge. CLICK HERE to view mixing/preparation.


Gather your powders. I chose several colors of Alumidust.


Sprinkle several colors of Alumidust. I placed a small amount on the end of a craft stick and tapped the stick till the powder lightly fell onto the surface.


Using a stick ( I had a chop stick), I swirled
the powders to make a faux marbled look. 


Let cure. Keep checking to make sure the resin doesn't drip
into the hinge. If it does, you can clean up with a craft knife.


I embellished with a cameo and some stringed beads adhered using E6000. I dripped a little Amazing Clear Cast Resin to further secure the beads and to finish the look. This will keep the beads from getting knocked off inside a purse!

To see the steps in making the Egret Cameo > click here.

How would you customize your
pocket mirror into ART?

Craft Your Own Way! ~ Tanya

Tanya Ruffin with Create Studios

Please visit my site to see more of my inspiring creations at www.tanyaRuffin.com


• • • • • • • • • • • • • •

Don't forget to subscribe to our blog on the right side bar:
Twitter at AmazingCrafting | Facebook at AmazingMoldPutty | YouTube at AmazingMoldPutty

Wednesday, March 26

#Cre8time for FURbabies! Cheap and Easy Springy Dog Collar by Tanya Ruffin


Spring has sprung, but in Louisiana we usually have 2 seasons, Winter and Summer... So Spring to me means Summer is on it's way. I just returned from a cruise and beautiful tropical flowers were everywhere. This collar reminds of Jamaica and summer (and another cruise). The project was very cheap and easy to make. I think I will start on a Halloween collar too!

I used Amazing Crafting Products and dollar store items!


Materials:


Cheap project. Cost $2.00 cash and supplies on hand! 

Steps:

The first thing I did was take my collar out of the package and decide where I wanted the flowers to go. I marked the collar with a pen and punched holes using a  Crop-A-Dile.


I then put E6000® on a Q-tip and ran it through
and around each hole so the collar wouldn't fray.


The collar was woven and would start to unravel if I skipped this step. 

The next step is to pour your resin. I mixed some Alumilite Violet Dye with the Amazing Casting Resin to get a light purple {CLICK HERE to view how to prepare/mix resin}. Then pour the resin into the ice cube tray. As it is just about to set up I place my brads in, letting them sink in a little – but not so much that they fall to the bottom of the tray. 


After the resin sets up, I mixed up some more Amazing Casting Resin – this time leaving it white, then pour another layer of resin into each mold. I only pour enough to cover the bottom of the brads, so they are sealed in. 


You can see the second layer curing. 

When completely cured (about 20 minutes),
pop out your pieces and attach to the collar.


How Stinking Adorable is This?

Quick and easy project. The hardest part was trying to get one of my dogs to sit still long enough to get a photo! Two dogs (daddy and daughter) were used to get these photos. :)


What can you make with brads?


Until next time! ~ Tanya

Please visit my site to see more of my inspiring creations at www.tanyaRuffin.com


• • • • • • • • • •

Don't miss a single post!
Please subscribe to our blog on the right side bar:
Twitter at @AmazingCrafting | Facebook at AmazingMoldPutty | YouTube at AmazingMoldPutty
Related Posts Plugin for WordPress, Blogger...