Showing posts with label gold. Show all posts

Monday, August 29

#Cre8time Keepsakes... Memory Inspired Collage from Trinkets by Aimée Wheaton


What is this? 

It started with a broken mug my mom had saved... believe it or not. This was a simple keepsake project using three products and trinkets I had around the house.


My mom LOVED blue and white dishes and saved
even her broken ones to use in mosaic art.


This was from a mug and makes a perfect niche.


The focal point was a pin she bought me at Express back in the 90's and it was a favorite. We had "Fleur de Lis" all over our home due to our French heritage. I loved it so much I had to mold it before I embedded it in resin. I LOVE Amazing Mold Putty for that reason alone.


I mixed some Amazing Casting Resin and threw in the trinkets!
Wait for the magic!


I swirled around a drop of blue dye as well. As the resin cures, it turns opaque.


Ooey gooey goodness! Love how RICH this looks!


From different angles...


This keepsake project came together quickly. I like how it is free-form and very different – it would make a great conversation starter. Hope you enjoyed this and see how easy it is to save pieces to use in resin work.

Do you save things to create with?

Feel free to stop by my FB page to see the latest with me.

To see more of my work please visit my new blog "Life Glitter Makeup"
and also at the Aimée Wheaton Art and Design website.

Till next time! Xoxo Aimée

• • • • • • • • • • • • • • • • •

Don't forget to subscribe to our blog on the right side bar:
Twitter at AmazingCasting | Facebook at AmazingMoldPutty | YouTube at AmazingMoldPutty

Tuesday, December 15

#Cre8time Greencrafting... from Packaging to #Recycled Girly Frame by Maria Soto


Hi there, this is Maria and today I bring you a project I created because I wanted to recycle. I got this package in the mail that had several boxes inside and each box was kept in place with a cardboard frame. Well as I removed each box, I placed each cardboard frame over each other and that's when I noticed that if I joined all three I could create a frame. 


I played with the idea... sure I could just paint and embellish it a bit and add a photo, but I thought why not bring out one of my Amazing Mold Rubber frame molds –  I have several made from previous projects.


This time I decided to use Amazing Clear Cast Resin to cast the frame... to make it fun I added some gold foil into the frame. The process took a few days since I had to apply layers of the resin and the gold foil – I wanted the foil to look as if it was floating inside the frame.


Now the easy part was to make the resin frame. Once that was done, I had to decide on what colors to use on the cardboard frame.


I used acrylic paints – a mix of gold, silver and copper with a bit of shine to the mix. As I created the frames, I decided to use it to frame a photo of my daughter and my two nieces. I added add a bit of pink to break up the colors and make it girly.

I wanted a simple frame, so I added a pretty white flower to the side and added a hanger... now this recycled frame is all ready to go up on my wall at my office. I have tons of photos of all the kids in our family – it was time to add a photo with our newest addition, little Victoria, and her two older cousins.


Funny how sometimes you can be inspired to create with simple things like pieces of cardboard that just happened to create a frame when you place them on top of each other! Now I have a very pretty frame to decorate my office {or I just might keep it at home}, either way it's a nice home/office decoration.

I hope this project has inspired to look around to see what inspires you to create. 

Materials used:


What items do you save for greencrafting?

Thanks for visiting! I invite you to stop over to my blog, "What is Creativityat http://chuy-creativity.blogspot.com to see more of my creations. Maria Soto

• • • • • • • • • • • • • • • • •

Don't forget to subscribe to our blog on the right side bar:
Twitter at AmazingCasting | Facebook at AmazingMoldPutty | YouTube at AmazingMoldPutty

Saturday, December 13

AMAZING Golden Personalized Gifts... by Maria Soto


Hi there, this is Maria and today I'm sharing a fun project to make for gifts. This time of year we all try and find the perfect presents for our family and friends – I wanted to make my own. I've been working on several and I've wanted to make some custom key chains. I had one a friend gave me when she came back from Florida. I liked the shape so I thought it would be fun to make a mold and custom make some. I thought about adding glitter, but then I noticed I had several packs of green leaf – so I thought it would be fun to make some and show the leafing as if it was floating inside a casting of Amazing Clear Cast Resin.

I used the new product Amazing Remelt to make my mold – it's very easy to use. This product comes packaged in a plastic container and it looks like a big block of jello. You cut the amount you think you will need and melt it in the microwave using the following directions {CLICK HERE to view preparation/process}. 


Once the Amazing Remelt is liquified, you mix it gently so you don't create any air bubbles and if you see any you can pop them with a needle. the photo below shows the melted product, and the bubbles you see were gone when I mixed it and I popped the bigger ones. You need to remember to use a heat safe container, and be careful handling since it might be hot when you remove it from the microwave.

Now I suggest that you have your other container with your items to be molded ready, so when your Amazing Remelt is ready, so are your items. I buy frozen dinners and some come in these cute plates and I save them now to use for this product – since they are heat safe, I can use them to melt or to mold on them. In the container I had room for two items. You don't want to waste product, even if this molding product is re-usable... just add another item and you will have two items done at once.


After pouring the Amazing Remelt over my items, it sets up and is ready in about half an hour. Since I always work late, I always leave my molds to cure over night.


Remelt has cured over night. I flipped over the mold to remove the items molded.


My molds are ready, and I placed this mold back onto the plastic plate I used.


I used Amazing Clear Cast Resin to pour into the new Amazing Remelt mold, layered with Variegated Green Leaf to make my key chain {CLICK HERE to view mixing/preparation}. I turned my mold over and left it in the same plastic plate to work on it.


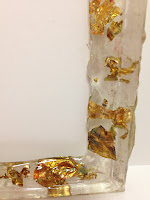
I used a metal hair pin to make sure I had an opening for the key chain. Because the mold is very thin, I had to use the mixing stick to pour the Amazing Clear Cast Resin into the mold slowly, filling it half way. I did wait about 20 minutes before adding the metal leaf, just to make sure it will stay on top of the resin. 


After adding the metal leaf to the resin, I poured more Amazing Clear Cast Resin over it and left it to cure overnight.


It came out as I imagined! The metal leaf stayed right in the center of the resin – it looks as if it's floating around. I took some glitter glue I had on hand and added a little all around the edging of the key chain. I attached the metal findings, and it is ready to be gifted. You can add anything you want to this mold... an image, beads, even glitter if you want! There are so many ways to customize this mold. It all depends on who you plan to give this to.


This was a fun project, easy and perfect to make customized gifts for any occasion. I hope I have inspired you to get creative with all of these amazing products... there really is nothing you can't do. They allow me to make my creative visions real. It's such a wonderful feeling to be able to create what you imagine, especially with products that allow you to do this are truly amazing.

What would you cast into Amazing Remelt
to create personalized holiday gifts?

Share your projects with us, we love to see what
everyone creates with Amazing Casting Products.

Thanks for visiting! I invite you to stop over to my blog "What is Creativity"
at http://chuy-creativity.blogspot.com to see more of my creations. Maria Soto

• • • • • • • • • • • • • • • • •

Don't forget to subscribe to our blog on the right side bar:
Twitter at AmazingCrafting | Facebook at AmazingMoldPutty | YouTube at AmazingMoldPutty

Tuesday, May 27

If You Give an Artist Some Sunshine...
AMAZING Inspiration with Rachel Whetzel

Hello, Creatives!! Rachel Whetzel, here, with a little vintage patriotic fun! I'm sure I'm not the only artist whose inspiration sometimes comes in an A.D.D. kind of mind stream. The kind that resembles the book If You Give a Moose a Muffin. For me it goes like this: The sun starts to come out, the fire pits gets it's first fire of the season, and I start thinking about Summer. Thinking about Summer makes me start to think about BBQ's. Thinking about BBQ's gets me thinking about my garden. Thinking about my garden gets me thinking about fresh fruit. Thinking about fresh fruit makes me start planning which one's I'll pick, like blueberries and strawberries. I like to dip them in whipped cream. Thinking about eating strawberries and blueberries dipped in whipped cream gets me all red white and blue, which reminds me of the 4th of July. Thinking about the 4th of July reminds me of BBQ's, and I decide I might make invitations to a BBQ on the 4th this year... and so I begin. 

I have a vintage pin that says U.S. on it,
and that's where I jumped off for this project. 


After molding the pin, I used Amazing Casting Resin with Bronze and Gold Metallic Powders to create the metal finish of the pin! I also had some vintage red white and blue crepe paper streamer that I used to back the pin.


Here's the finished invitation!! I really love the way these turned out, and how simple and easy it was to create them! I think I might use these pieces to create some patriotic banners too! I especially love that my "I-only-have-one" piece has now turned into an "I-have-as-many-as-I-want!" piece, thanks to Amazing Crafting Products


Now tell the truth... Am I the only
person whose muse takes them 
on this twisted path to creation!? 

Thank you for reading! Want to see more of what I'm up to?
Visit me on PINTEREST and INSTAGRAM, or like MY PAGE on Facebook!
Thanks for stopping by! ~ rachel

• • • • • • • • • • • • • •

Don't forget to subscribe to our blog on the right side bar:
Twitter at AmazingCrafting | Facebook at AmazingMoldPutty | YouTube at AmazingMoldPutty

Tuesday, August 27

Make the Walls Your SCRAPBOOK... AMAZING Family Wall Plaque by Michelle Frae Cummings


Have you had the chance to try the "NEW" Amazing Mold Rubber?

It allows you to create the perfect mold the first time with out having to make it in sections which can leave to imperfections. It is especially clever when you have something with fine detail or a large shape, such as this porcelain plaque. 

To make the above Family Wall Plaque, I used the following:


Secure your plaque in the clean container face up. I used very strong double stick tape.

Next mix the Amazing Mold Rubber according to the package and mix very thoroughly, scraping the sides as you mix. Make sure you are in a well ventilated area as it can be quite aromatic before it sets. 

Pour around the outside of the plaque inside the container and then fill the inside. Don't worry about any bubbles. 


The Amazing Mold Rubber will start to turn solid with in 15 minutes, so make sure you have it on a flat surface. To fully cure, it may take anywhere from 4-10 hours to set. I left mine alone over night.

When it was not sticky to touch, I trimmed down my container so I could start to separate the mold from the plastic. 


I carefully pulled the plaque from the rubber, making sure not to disturb the columns for the holes; then trimmed around where any silicone leaked under the tape. 


I poured equal amounts of the Amazing Casting Resin in the cups provided and added 2 drops of the Brown Alumilite Dye to the part "A" of the resin. I mixed thoroughly before adding a bit of both Gold and Copper Alumilite Metallic powders. I mixed again, added the resin part "B" and quickly mixed, scraping the sides and bottom of the cup before pouring into the rubber mold.


It took approximately 15-20 minutes for the Amazing Casting Resin to harden. While it was still a little warm and slightly soft, I pulled it from the mold and trimmed off any jagged edges.


What you will LOVE about this type of mold, is that all parts of the resin, what was in the mold or not, will remain shiny and smooth as if you had finished it with coat of Amazing Clear Cast Resin


I simply added my photo, dew drops and ribbon
to make a nice happy Family Wall Plaque


What would you mold to create your own
family plaque using Amazing Crafting Products?


Thanks for coming by! Please visit my blog, Faerie Dust Dreams 
for more creative inspiration. ~ Michelle Frae Cummings
.................................

Don't miss a single post!
Please subscribe to our blog via email or bloglovin' on the right side bar:
Twitter at @AmazingCrafting | Facebook at AmazingMoldPutty | YouTube at AmazingMoldPutty

Tuesday, May 21

Multi-Dimensional Shabby Chic Heart Collage...
by Guest Designer Jess B.


Hello Everyone - Jess B. here and once again I have been honored to show you what fun possibilities lay upon your visions. I was a the end of my Amazing Casting Resin and wanted to go another route of design. For today's project, I was inspired by loads of mixed media videos on YouTube.


What would happen if I were to ink
and stamp images in my mold and then pour
the Amazing Casting Resin on top???

This project is all experimentation - and I'm very happy with the results.


Using Amazing Mold Putty, I mixed equal parts "A" and parts "B" thoroughly according to the instructions, then pressed in my flowers to create a mold. For HOW-TO of mixing Amazing Mold Putty, please CLICK HERE. This mold was cured and ready to go in about 15 minutes.


For my heart shape, I used a mini cake silicone pan I bought at TJ Max. I used a few drops of Alumilite Dye Black on a clear stamp from Teresa Collins Every Day Moments stamp collection. Place ink and stamp on a wax sheet of paper or paint brush. **PLEASE NOTE** You don't want to use this cakeform for food after putting resin products in it.


Next, I prepared and mixed up a batch of Amazing Casting Resin according to the easy-to-follow instructions. I poured the resin into the cake pan on top of the stamped flowers. For full instructions on mixing Amazing Casting Resin, please CLICK HERE. The resin also cures in about 15 minutes...

Would the stamped images blend or stay in its place??? Well the images DID stay in place... but the dye was still a bit wet, so I decided to use the metallic powders to see if they would stick. With a brush I dusted the flower images and it stayed... and the results are Amazing! I'm loving it. I also used yellow dye to fill in the flower petals which gave it it's depth and dimension.


I also brushed on Alumilite Gold Metallic Powder to the edges of all the 3D flowers. The metallic powders can also be added to the resin while in liquid state.


You can see the stamped images and the detail of the gold edging {which I love}. I added buttons, sequins and vintage lace to complete the heart. I love the gold highlights on the stamped impressions.

I hope this has inspired you to create your shabby chic art using Amazing Crafting Products. I would love to hear what you have dreamt up - please leave a comment and your link below! To see more of my work, please CLICK HERE to visit my blog "thatzuneek".


Thanks for stopping by! 


Don't forget to subscribe to our blog on the right side bar:
Twitter at AmazingCrafting | Facebook at AmazingMoldPutty | YouTube at AmazingMoldPutty
Related Posts Plugin for WordPress, Blogger...