Showing posts with label Stamps. Show all posts

Monday, December 4

Three #Cre8time cheers for #CarveDecember... Amazing Inspiration by Susan M. Brown {sbartist}


Hello everyone! Susan here with an AMAZING idea using Amazing Mold Rubber. I have been waiting all year to test out this idea and to share for "Carve December 2017" – a month long celebration online dedicated to 31 days of hand carved stamps using #CarveDecember dreamt up by Julie Fei-Fan Balzer author of "Carve Stamp Play".

I ruined several of my mold putty molds back last December filling them with mold rubber with the intention of using them as stamps... I  FORGOT to use a MOLD RELEASE – so I have several wonky looking yellow/pink paper weights. Inspired from watching all the amazing creative hand-carved stamps, I put these rubber blobs aside and saved them for trials with stamp carving.

So CarveDecember is 4 days in and I am dying to carve something and today's test is on the backside of one of my molds! HERE we go!


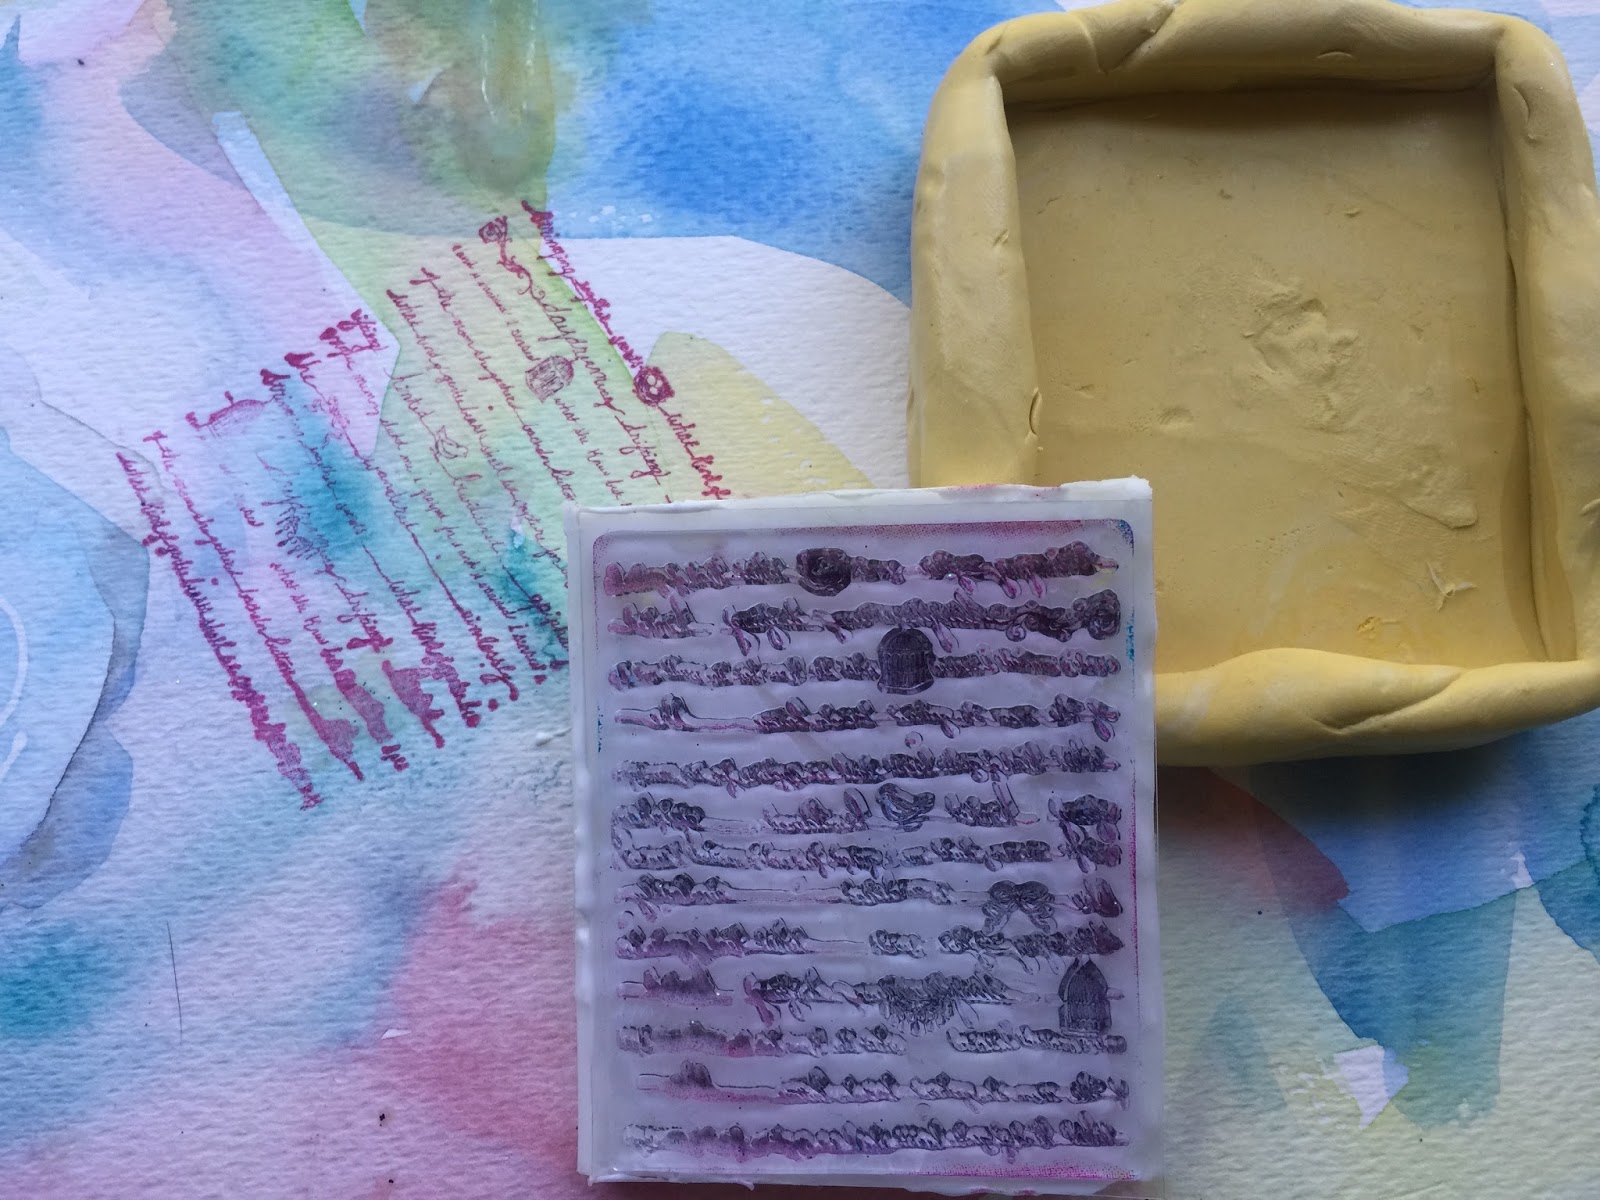
All I need is a mold with a pristine flat backside or a slab poured from Amazing Mold Rubber, a Speedball stamp carving tool, a scrap of paper and an ink pad! For my first carve I used a small rectangle of the speedball carving rubber. It's a bit stiff and will require some practice to get the hang of detailed carving. I did this to see how carving the mold rubber compared to the traditional carving media.

The mold rubber is much softer and more pliable in comparison, and doesn't require as much pressure to carve into. I have loads of molds piled up with blank canvases for carving {or for fun monoprinting shapes}. This mold is about 2 1/2" in diameter. I have divided this into a quad and I have carved two designs so far – a wonky mosaic and a curved design sort of like a rainbow. 

What are you carving for Carve December?

Happy carving!!! Stay tuned... I will try carving
one out of Amazing Mold Putty in a few days!

Thanks for visiting. If you would like to see more of my creations,
please visit my blog sbartist : painting in the dark by clicking here. ~ Susan

• • • • • • • • • • • • • •

Don't forget to subscribe to our blog on the right side bar:
Twitter at AmazingCasting | Facebook at AmazingMoldPutty | YouTube at AmazingMoldPutty

Friday, March 4

#Cre8time Transformations... Dishing Up a Shamrock Ring Holder by Brenda Burfeind


Good day friends! Brenda here from Creativity is a State of Mind and I'm going to show you how to use a failed project to dish up a shamrock...


It all started with a butterfly cutout I had. I really wanted to turn this beautiful butterfly into a stamp. I mixed up some Amazing Mold Putty and you can see mixing instructions HERE. I pressed my butterfly cutout into the mold putty and waited for about 10 minutes.


When I pulled the butterfly out I realized it didn't look perfect, so I cut around it anyway using regular scissors. There were definitely some imperfections and when I stamped it, it didn't give me a clean look (sorry no picture of the stamped image). I really didn't want to waste all that mold putty and so I thought and thought about what I could do with it.


I remembered a tutorial I made for this Valentine's day pendant.
You can go and view it HERE!


I used the same concept again. This time however, since the Amazing Mold Putty had already set up, I couldn't get my heart clay cutter to go through the putty. I could get a bit of an indentation of the shape and then I just used my scissors to cut the hearts out. Since the putty was so thin, it was very easy.


Here are my hearts and I even used an edge of the butterfly to create the stem for my shamrock. You can see that it had even been stained with the ink.


Now, the hoarder I am... I had these cute little ceramic
coasters that I purchased eons ago at a thrift store.


I tried hot gluing the putty pieces down, but they just popped right off. I sprayed some Krylon Spray Adhesive to the pieces and glued them onto the ceramic coaster. That worked like a charm!


Then I mixed up some Amazing Casting Resin and poured it into the dish, just enough to fill around the shamrock shape. There is a video HERE you can view on mixing instructions.


That set up to cure for about 10 minutes and then I gently pulled the pieces out.
Pretty cool huh?


Then I mixed up some more Amazing Casting Resin with the Fluorescent "FLO" Green Dye and filled in the open areas. That also set up in a matter of minutes.


And here you have an Amazing Shamrock ring dish!


I am so excited about my (failed) fabulous Shamrock ring dish!

Have you had a failed project
that you turned into a masterpiece?

Please leave me a comment and tell me about it.
Until next time, Brenda wishing you "luck" for no failed projects.

Visit my blog, Creativity is a State of Mind to see some more of my creations.

• • • • • • • • • • • • • • • • •

All month long we are celebrating our favorite
molding product in all its YELLOW glory...
Amazing Mold Putty!!


Tune in via Instagram and on our Facebook Page for games and giveaways for your chance to win some AMAZING Casting Products! The more you play along and share... the more chances you have to win!!! Use the hashtag #MoldPuttyMadness when sharing.

• • • • • • • • • • • • • • • • •

Don't forget to subscribe to our blog on the right side bar:
Twitter at AmazingCasting | Facebook at AmazingMoldPutty | YouTube at AmazingMoldPutty

Tuesday, November 24

Having a #Stamping BLOCK - No Problem!! #Cre8time Quick Fix by Aimée Wheaton


This inspiration post came out of me being a cheapskate when it comes to flat/unmounted stamps. I never could justify buying the acrylic blocks to mount them on and have a bunch of them that I rarely use because they are unmounted. It hit me that I could make my own mounts using products I have already! YAY! A creative solution that is an easy fix.


I had a blank rubber sheet that I could carve for stamps but it was the perfect size to mold using our Amazing Mold Putty so that is what I used.


I sized it to the unmounted stamp and then mixed up a batch of Amazing Mold Putty to form around it {CLICK HERE to view mixing/preparation}.


Mix and pour the Amazing Casting Resin because it cures fast and is white...


and then glued down the stamp! It was a perfect fit
and takes about 20 minutes from start to finish!


YAY! Look how easy that was!

Hope you all have an amazing Thanksgiving Break!

What cool fix can you make
with Amazing Mold Putty
and Amazing Casting Resin?

Feel free to stop by my FB page to see the latest with me.
To see more of my work please visit my new blog "Life Glitter Makeup"
and also at the Aimée Wheaton Art and Design website.

Till next time! Xoxo Aimée

• • • • • • • • • • • • • •

Don't forget to subscribe to our blog on the right side bar:
Twitter at AmazingCasting | Facebook at AmazingMoldPutty | YouTube at AmazingMoldPutty

Tuesday, August 4

Glass Pebbles so #Cre8time CHARMing... #Stamping meets #Jewelry by Tracy Alden


Hello! Tracy here with another charming project to inspire you using Amazing Casting Products! I collect all kinds of little stones, trinkets and pieces of glass. I often put them on display around the house in eclectic little assortments. I noticed the larger decorative glass pebbles I have, that can be found at most craft stores, have wonderful little round shapes that make me think of shape of charms and pendants.

The shapes and textures not only look pretty but often give my inspiration for future projects, such as the one I am sharing with you today! I knew Amazing Remelt would make not only quick but glass-smooth molds and Amazing Clear Cast Resin would be perfect to pour into the molds to create the charms... so off I went looking for my supplies!

CLICK HERE to visit
my blog Art Resurrected
for the complete craft tutorial 
to make your own
 Stamped Resin Pendants!


Mid process: I rubbed in some Alumidust, poured a second layer of Amazing Clear Cast Resin mixed with Alumilite Metallic Powder and let it cure.

**A NOTE** If you live in an high humidity area you might notice when you pop out the resin pieces the next day they will be hard but slightly tacky. Just remove them from the molds and place them on parchment paper and wait for the resin to completely harden outside of the molds.


Once the pieces were fully cured I drilled tiny holes so I could put jewelry wire and jump rings on them to be able to add chain and ribbons later.

What AMAZING arts and crafts can you create?


Visit my blog Art Resurrected for more craft tutorials!

Until next time, safe travels! ~ Tracy

• • • • • • • • • • • • • • • • •

Don't forget to subscribe to our blog on the right side bar:
Twitter at AmazingCrafting | Facebook at AmazingMoldPutty | YouTube at AmazingMoldPutty

Wednesday, July 22

From "Meh..." to #Cre8time WOW! Artsy Home Decor REDUX by Aimée Wheaton #MakeThings


I'm a sucker for good deals and I'm an even bigger sucker for things that have birds on them. Well I found this good deal sometime this Spring at Hobby Lobby for $2.99... couldn't pass that up. I loved how it looked like folk art too. I decided to make it pop a bit more using some paint, gel medium, stamps, ink, glitter, pen and of course Amazing Clear Cast Resin!


Here's the original bird :)


I chose lighter aqua, yellow, orange, white
and added pink as an after thought.


I love how it started coming to life already just with acrylic paint.


I LOVE the orange.


Next I decided to stamp the word "peace" because it looked peaceful
and we could use more peace in this world and our homes.


Next I embellished certain areas with gel medium and then...


sprinkled some glitter :)


Getting really pretty!! You can see I added
a hot pink for even more color.


I mixed up some Amazing Clear Cast Resin in a larger batch – I wanted to pour into another mold as well, the same mold I used in my inspiration post last month.


Mix it well and let the bubbles settle a bit.


Originally I was going to do resin to the edges of the piece,
but decided to go to the border of the bird and stay inside.


Letting it dry overnight.

Now check out the finished product!! :)

Well to my dismay the Amazing Clear Cast Resin jumped the border! LOL I will be filling it in to cover the entire surface soon. I didn't have time to fix it before this post. I really like how it made the entire piece just pop! So much prettier to me! Simple project with a lot of pizazz!


I gave her lashes! How could I not?


Shining in the sun.


You can see where the resin migrated here. I'll go back with
another batch of Amazing Clear Cast Resin and fill it all in.


I really like how she turned out! :) What do you think?

To see how all of our AMAZING products can enhance your art,
check out these AMAZING products!

Let's see what you can create with
and blah pieces around the house.


Feel free to stop by my FB page to see the latest with me. 
To see more of my work please visit my blog "Creative Flutters"
and also at the Aimée Wheaton Art and Design website.

Till next time! Xoxo Aimée

 • • • • • • • • • • • • • •

Don't forget to subscribe to our blog on the right side bar:
Twitter at AmazingCrafting | Facebook at AmazingMoldPutty | YouTube at AmazingMoldPutty

Monday, July 6

#Cre8time for #DIY Stamps... #ACPthrowback for #MakeThings a Tutorial using Amazing Mold Rubber


Our AMAZING creative friend Katie Smith, of Punk Projects is hosting a fun craft challenge for the summer and ACP is proud to be one of the sponsors. Play along for your chance to win weekly prizes and a grand prize at the end! The week is young so you have time to squeeze in some Cre8time and enter this week's challenge.


This week's "Make Things!" theme is... FOLLOW A TUTORIAL! What a fun challenge! Today we are sharing an AMAZING #ACPthrowback project using Amazing Mold RubberWe'd love to see what you create using the loads of tutorials found here on the Amazing Casting Products Inspiration Blog.

Grab some AMAZING Mold Rubber
and create your own custom stamps
3 ways using this tutorial...


Lynne Suprock has some amazing uses for Amazing Mold Rubber! Grab up those metal stamps, found objects and plastic textured packaging in your crafty stash to cast some fun textured and custom rubber stamps! You can create your own durable stamps quick and easy.

CLICK HERE to jump to
Lynne's full how-to.

Want to see more of what Lynne is up to?
Follow her on her blog "Simply Pretty Stuff" HERE!

• • • • • • • • • • • • • •

Share Your Creations with us
on Social Media to be Featured on
#ACPthrowback Third Thursday

July 16 is another THIRD THURSDAY... this is your chance to be featured. Post your creations to our Facebook pagePinterest, and on Twitter! We'll be on the hunt for your projects with the hashtag #ACPThrowBack, (you can even go back into your past pins and add this pin to help us find you!) and share ALL your projects using the hashtag #AmazingCastingProducts!!

• • • • • • • • • • • • • •

Don't forget to subscribe to our blog on the right side bar:
Twitter at AmazingCrafting | Facebook at AmazingMoldPutty | YouTube at AmazingMoldPutty

Tuesday, June 16

Soar with a Little #Cre8time and REuse leftover Resin... by Aimée Wheaton


Forgive me for this brief little project but hopefully it will inspire you to "soar" with your creativity. Summer break has started which means both kids full time and no me time. I am ready for school to start again LOL. Anyways I came up with the idea to reuse leftover resin pieces and turn it into something nice. This could be a magnet, a pendant (pretty large), wall hanging, something pretty to look at on your desk or whatever else you can think of.

These leftover resin pieces I have are from new projects where I make too much resin and I have molds readily available to fill so I don't waste the resin. Let's just say I make too much resin and have a box full of goodies to use.


This came together quickly because the pieces were already cured. I hope you enjoy this simple project. All you need is Gel medium, paper, stamp pad, alphabet stamps, glue, paint and leftover resin pieces!!


Hope you like it!!!


To see how all of our AMAZING products can enhance your art,
please check out these AMAZING products!

Let's see what you can create

Feel free to stop by my FB page to see the latest with me. 
To see more of my work please visit my blog "Creative Flutters"
and also at the Aimée Wheaton Art and Design website.

Till next time! Xoxo Aimée

 • • • • • • • • • • • • • •

Don't forget to subscribe to our blog on the right side bar:
Twitter at AmazingCrafting | Facebook at AmazingMoldPutty | YouTube at AmazingMoldPutty
Related Posts Plugin for WordPress, Blogger...