Showing posts with label picture frame. Show all posts

Tuesday, December 15

#Cre8time Greencrafting... from Packaging to #Recycled Girly Frame by Maria Soto


Hi there, this is Maria and today I bring you a project I created because I wanted to recycle. I got this package in the mail that had several boxes inside and each box was kept in place with a cardboard frame. Well as I removed each box, I placed each cardboard frame over each other and that's when I noticed that if I joined all three I could create a frame. 


I played with the idea... sure I could just paint and embellish it a bit and add a photo, but I thought why not bring out one of my Amazing Mold Rubber frame molds –  I have several made from previous projects.


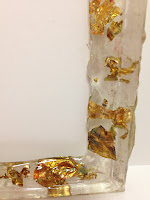
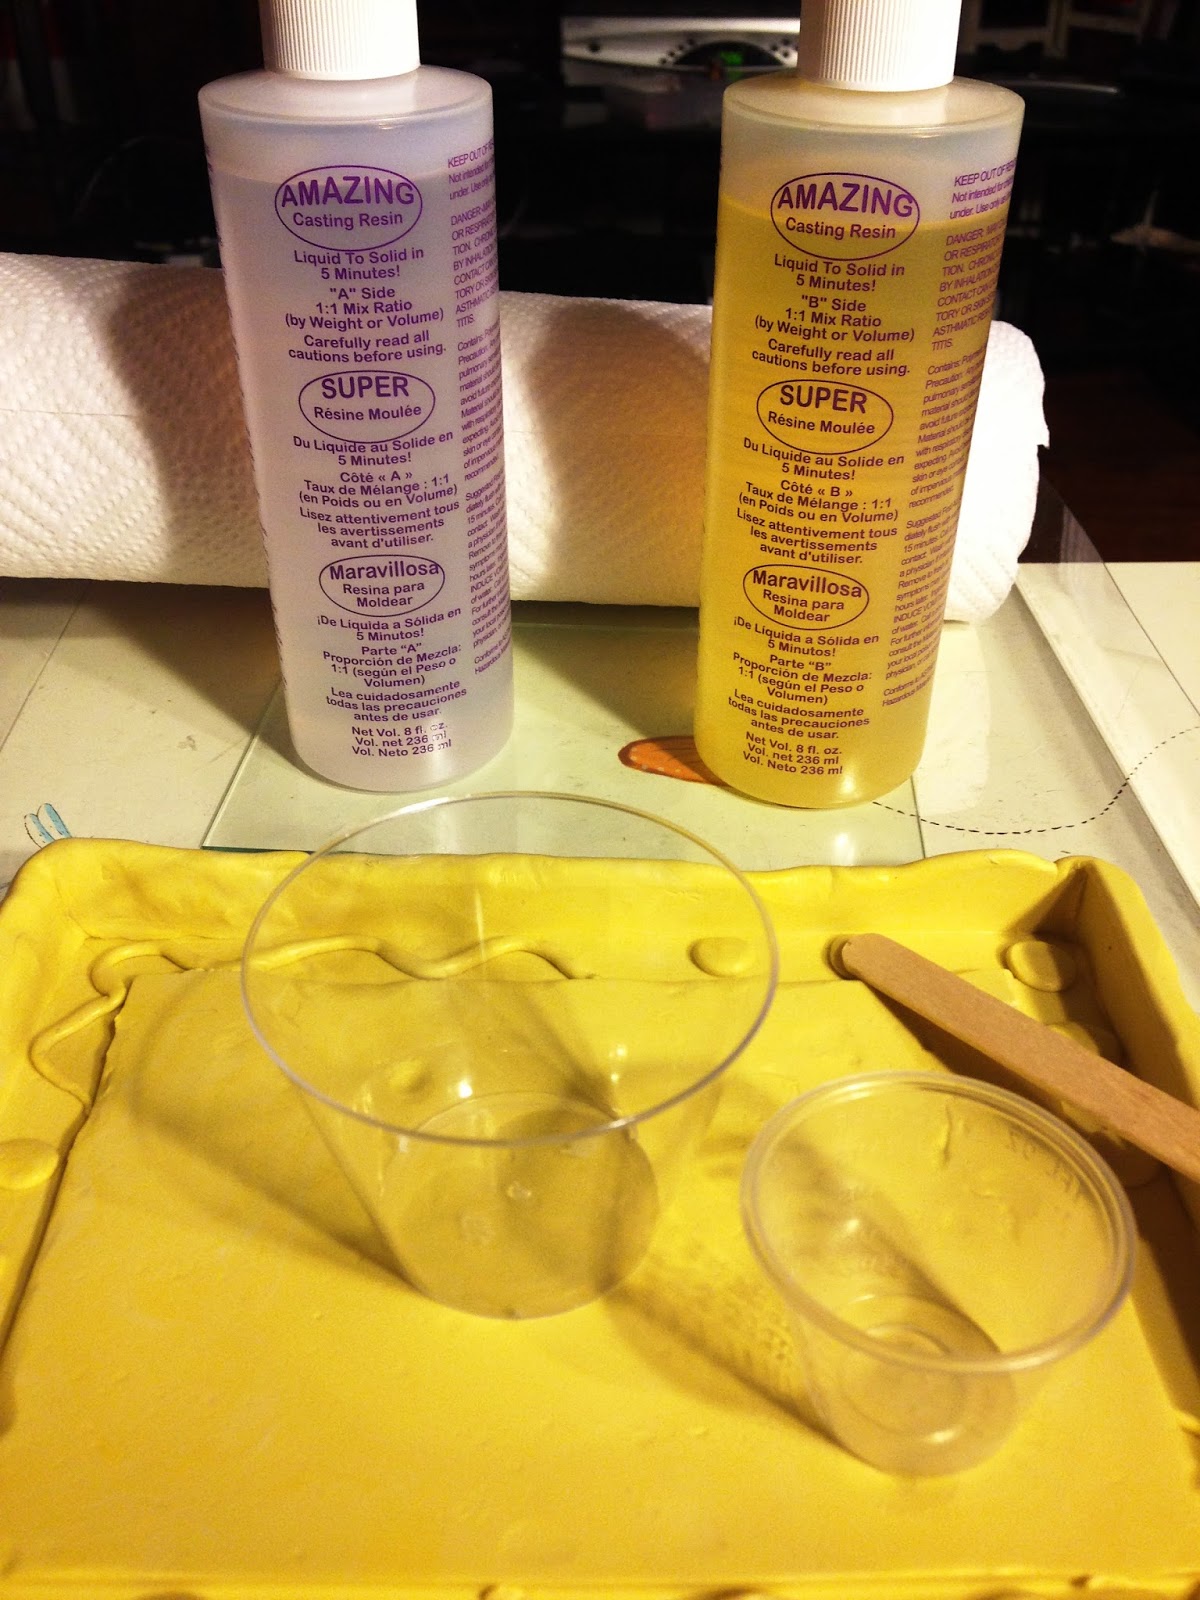
This time I decided to use Amazing Clear Cast Resin to cast the frame... to make it fun I added some gold foil into the frame. The process took a few days since I had to apply layers of the resin and the gold foil – I wanted the foil to look as if it was floating inside the frame.


Now the easy part was to make the resin frame. Once that was done, I had to decide on what colors to use on the cardboard frame.


I used acrylic paints – a mix of gold, silver and copper with a bit of shine to the mix. As I created the frames, I decided to use it to frame a photo of my daughter and my two nieces. I added add a bit of pink to break up the colors and make it girly.

I wanted a simple frame, so I added a pretty white flower to the side and added a hanger... now this recycled frame is all ready to go up on my wall at my office. I have tons of photos of all the kids in our family – it was time to add a photo with our newest addition, little Victoria, and her two older cousins.


Funny how sometimes you can be inspired to create with simple things like pieces of cardboard that just happened to create a frame when you place them on top of each other! Now I have a very pretty frame to decorate my office {or I just might keep it at home}, either way it's a nice home/office decoration.

I hope this project has inspired to look around to see what inspires you to create. 

Materials used:


What items do you save for greencrafting?

Thanks for visiting! I invite you to stop over to my blog, "What is Creativityat http://chuy-creativity.blogspot.com to see more of my creations. Maria Soto

• • • • • • • • • • • • • • • • •

Don't forget to subscribe to our blog on the right side bar:
Twitter at AmazingCasting | Facebook at AmazingMoldPutty | YouTube at AmazingMoldPutty

Wednesday, October 28

Transform #Cre8time leftovers into Spooky Shrines... by Maria Soto

Hi there, this is Maria and today I want you to take a look at the resin pieces you have created and find other ways to use them. I've been really working a lot with skulls this month. I've never been so inspired by Halloween and the Day of the Dead like this before. This year I've done so much – its crazy to see all the different types and sizes of skulls I've created using resin.

I have this resin skull I made with the Amazing Clear Cast Resin – it was a test piece to see how the skull would come out using this resin. I usually work with the Amazing Casting Resin because I like the white opaque resin so I can paint it my way. I chose not to use it since the project I made last month required a lot of color, so I just put this clear skull aside for later. 


Well it was time to craft something with this clear resin skull. As I looked around, I noticed the tiny metal frames I got at the Dollar Store and thought why not frame it outside the glass. I gather all types of leftovers from other projects and put together a tiny little frame that now sits on my desk at the office. I have so many skulls that I think I'm going to be crafting with these even after the month is over, maybe I'll make next years projects now. You can see in the photo the mold I made from Amazing Mold Putty and a white plastic skull.


Here is the finished frame. I love the fact that its small, too! I really liked how it came out – the frame was black, and I added a little bit of alcohol inks; then brushed over with a thin coat of Amazing clear cast resin to seal the alcohol ink and to make it look as if it was a glass frame instead of metal.

You can also make these into shrines, by adding the name of a loved one and something personal, to give it a meaningful touch. These are great as just a fun Halloween decorations, too –  it's all up to you as to how you want to decorate these with... there are so many possibilities. 


Here is a close up of the skull in Amazing Clear Cast ResinTo see how I made the skull used in this project, click here to jump over to view my Dia De Los Muertos Celebration Skull.

I hope that I have inspired you to go back and challenge yourself to find other ways to use your cast resin pieces... you just never know what you can come up with!

How do you decorate for Halloween?

Thanks for visiting! I invite you to stop over to my blog, "What is Creativityat http://chuy-creativity.blogspot.com to see more of my creations. Maria Soto

• • • • • • • • • • • • • • • • •

Don't forget to subscribe to our blog on the right side bar:
Twitter at AmazingCasting | Facebook at AmazingMoldPutty | YouTube at AmazingMoldPutty

Thursday, August 27

#Cre8time for #DIY Artsy Frames... by Maria Soto


Hi there, this is Maria and today I want to share a post about framing. I have a lot of sketchbooks. I've been painting a lot lately and was wondering what to do with all these works. My son is going to sell his art for the first time at an art show next month and asked me to share the table with him. He suggested I sell the art pieces I've been working on for the last couple of months. 

I decided to share the table with him and was wondering how I would frame the smaller pieces. After a lot of thinking it came to me... I would make my own frames using the Amazing Mold Putty and the Amazing Casting Resin.

I went to the dollar store to get some house cleaning supplies and found a few frames to use for the small art pieces. I thought I would first try and make a frame using Amazing Mold Putty – and maybe use the putty to add some designs to the frame to make it different that the one I purchased.


Here is one of the frames I purchased.


Amazing Mold Putty is so easy to use! You need to take same amounts of part "A" & part "B", mix them well until the white and yellow become a solid yellow color. Since the putty sets fast, you need to make sure your item to mold is ready. For this mold I spread out the putty on a plastic container, and then placed the front of the frame over and pressed into the putty. I waited a few minutes and turned the frame over and folder over the excess putty to wrap it around the frame as you can see in the photos below.


Mixing the Amazing Mold Putty to start making the mold of the frame.
CLICK HERE to view mixing/preparation.


The front and sides of the frame are covered with the mold putty – just waiting a few minutes for the Amazing Mold Putty to fully cure.


Once the mold putty was set, I removed the frame and decided to mix up another batch of mold putty to add some type of design to the frame. I didn't want it to be a solid frame, and I figure it would be fun to make designs. The Amazing Mold Putty will fuse to itself if a mold release agent is not used – so you can build up a large mold, use like clay to make your own shape, or add shapes/layers to create a custom design.


I have my new mold, resin, measuring cup, mixing cup and mixing stick ready – now it's time to add the resin. I used the Amazing Casting Resin to make the first frame casting. No color was added to the resin. I used 2 full measuring cups each of part "A" and part "B"; using equal amounts of each part, otherwise your resin will not cure properly. This resin cures really fast so once you are done mixing, pour it over your mold as soon as it begins to feel warm. The photos below show the process. 


Part "A" & Part "B" are mixed and ready to pour into the mold.
CLICK HERE to view mixing/preparation. 


Here you can see how the Amazing Casting Resin starts out clear – then as the resin is starting to set it turns solid white. When fully cured it's pretty flexible for a few minutes. The heat of your environment affects how long it will take for the resin to become solid {so it could be faster or a few minutes longer}. It's pretty cool here in Indiana this week, and it took about 10 minutes for my resin frame to cure.


Here is the Amazing Casting Resin frame – just removed from the mold and is still very soft and flexible. At this time you can carve, cut or make holes for hanging. 


I made two tiny holes on the top of the frame and added string for hanging, you can use wire too. Next step is painting the frame, I used a mixture of acrylic paints, first in gold and silver, then added a bit of blue for contrast. the center of the frame didn't need to be colored but I added color anyway.


I squirt out a mixture of paints to be applied to the entire frame. I love painting my molded items cast in Amazing Casting Resin.


I added blue paint to the outside of the frame. I will use Ranger Glossy Accents to glue my painting directly into the center of the frame.


The completed frame with my art piece glued on...
now it's time to add a bit more interest to the piece.

The frame itself is a work of art!


I used Glossy Accents to glue a few tiny shells on the bottom corner of the painting. This frame is done, and I can't wait to make more frames! I have quite a few more small paintings that need to be framed.

I hope that I have inspired you to find ways to customize your molds, using ready made frames and adding fun texture or designs helped me make my own frame. 

How would you embellish your custom frames?

I hope to have inspired you to look around and see what items you can recycle into something new, something fun with Amazing Casting Products.

Thanks for visiting! I invite you to stop over to my blog, "What is Creativityat http://chuy-creativity.blogspot.com to see more of my creations. Maria Soto

• • • • • • • • • • • • • • • • •

Don't forget to subscribe to our blog on the right side bar:
Twitter at AmazingCrafting | Facebook at AmazingMoldPutty | YouTube at AmazingMoldPutty

Friday, April 24

Transform Found Textures into #MixedMedia Art
by Aimée Wheaton


Hi all! Aimée here with some ideas of turning random textures into reusable pieces for your mixed media art. I'm always looking for unique patterns and texture so I thought I'd search the house for random items to mold and then create some textures to use and reuse in any project.

I have to say this was a breakthrough for me, I knew what I wanted to mold but was going to just show you the pieces I created, instead it ended up a piece of art. I haven't done "art" since losing my Dad very suddenly last Summer. This amazing design team has been keeping my hands crafty and for that I'm grateful. I was in complete shock when I finished this!! I hope you enjoy, it's been stewing since last Summer apparently.


I gathered up the elements I wanted to mold, just bits and pieces of things, an old frame, trim, a broken earring that was made a long time ago by my Mom.

Of course I started with my favorite product Amazing Mold Putty! I only wanted a part of the picture frame but the whole thing has some awesome texture. I grabbed equal parts of the putty and began mixing it. 


When it was mixed I spread it on the area I wanted to mold and let it harden, while it was setting I started molding my other pieces I was going to use.


I used the rusty part with the flowers and bow.


Working it's magic!

Next came the trim that I wanted to use as embellishments and cut out if I wanted them while the resin was still soft. I chose a bunch of different rope like trim. 


Kinda fun right?

Next I started making my texture plates which I will use like stamps which is what I wanted for that extra grunge effect.


I crumpled up aluminum foil – I wasn't sure it would work but it did!!


It looks like a brain to me.


Broken earring that had some fun texture.


I pressed it into the soft putty and created my own pattern.


The end result.


OK... so I made two texture plates and two molds. For these molds I ended up adding a lip on all sides so the resin wouldn't spill out by mixing more mold putty and and adding it to the already cured mold – it adheres to itself!


Once the molds were done I decided to use some Alumidust to add to the interest. I just love the colors of these dusts, very shimmery and fun to use in so many ways. 


So pretty!!


Love this combo!


Next, I mixed my favorite Amazing Casting Resin and poured into the molds. This sets quickly which is great for any project if you need something and don't have it. Please CLICK HERE to view mixing/preparation.


Waiting is the hard part. Amazing Casting Resin cures in about 10 minutes (approx. depending on how big the molds are and how much resin you use).


This is kind of a cheat but I created it last year, it's a 12" x 12" canvas panel that I collaged and painted on with water colors and inks. It's been sitting in a drawer waiting to be used. I took it out and started playing with it, so glad I had this part done already. This project came together quickly.


Love how the tile turned out and the rope accents are fun too! I trimmed out the pieces I wanted while it was still soft enough to do that.


So vibrant!!


Next I applied gesso to soften the background.


Derwent Inktense Chalk – first time using this kit!! I scribbled around the canvas.


Then I applied water with a brush to turn them into water color and let them drip a bit.


I collaged on the dress form graphic and let that dry, then I went around with my "brain" texture using StazOn Teal Blue ink.


BRAIN!


Then I smudge the earring one in parts using the ink as well.

This is the place I like to call a CREATIVE PAUSE because I got so in the zone I forgot to take photos. Basically I just went around the canvas and painted, gessoed and drew on more Inktense, smoothed areas out and just played. Sorry about that! LOL!


I added on some shimmery Alumidust on here while the paint was wet, can you see it?


You can see it really good here! Also noticed I've glued down the elements I created.


The top rope! Love it!


I really like it!!! Last thing I did was edge it with Black StazOn ink (not pictured here).


You can see the dimensions here.


What do you think? I had fun with this one!! I am still considering coating it with Amazing Clear Cast Resin but I'm going to think about it for a bit. :)

Let me see what amazing textures you have around your house!!

To see how all of our AMAZING products can enhance your art,
please check out these AMAZING products!

Let's see what you can create
with Amazing Mold Putty

Feel free to stop by my FB page to see the latest with me. 
To see more of my work please visit my blog "Creative Flutters"
and also at the Aimée Wheaton Art and Design website.

Till next time! Xoxo Aimée

 • • • • • • • • • • • • • •

Don't forget to subscribe to our blog on the right side bar:
Twitter at AmazingCrafting | Facebook at AmazingMoldPutty | YouTube at AmazingMoldPutty
Related Posts Plugin for WordPress, Blogger...