Showing posts with label texture plate. Show all posts

Monday, September 26

Going #Cre8time Crazy... #MixedMedia Monoprints Art with Susan M. Brown {sbartist}


Hello everyone! Susan here with a quick and easy project featuring monoprinted creations using the Gel Press® reusable gel printing plate along with texture plates and molds made using Amazing Mold Rubber


For this project I gathered some old book pages, letter and pattern stencils, punchinella, some texture plates made from Amazing Mold Rubber, a prepared cast resin embroidery hoop, Speedball brayer, Mod Podge, a few Ranger Distress Paints, Golden Green Gold fluid acrylic paint, and a Gel Press® plate. I also need a pencil, scissors, Diamond Glaze, and a couple markers. I am a pumpkin baby and the resin pumpkins are a for a separate project... I will be collaging them in the same color scheme and I need to make extra painted papers for them.


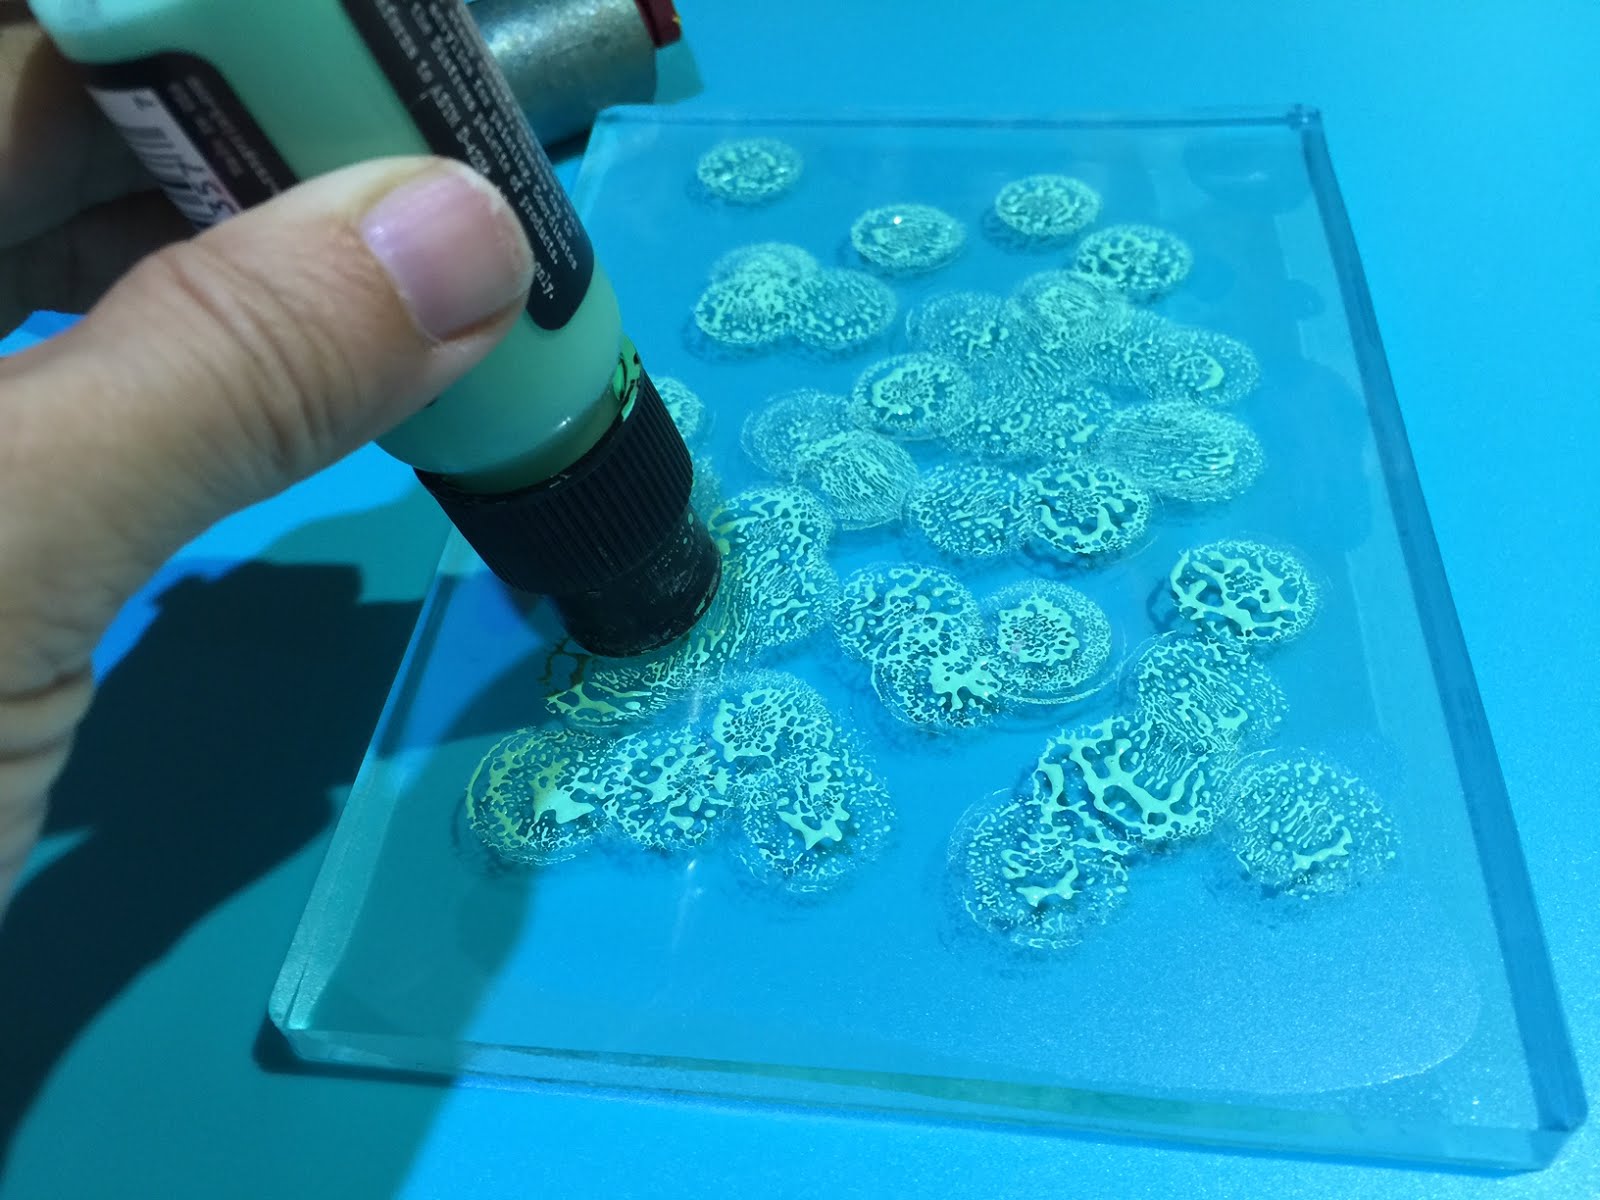
I set out the Gel Press® plate onto a cutting mat from the Dollar Tree {these work great for a protective work surface}. The Gel Press® plate sticks itself to the surface and stays put while you are moving your paint around with a brayer. I apply some Cracked Pistachio Distress Paint to the plate. I like using the Distress Paints for monoprinting as they are a little bit wetter than regular acrylics which allows me a little more time to work with while creating patterns in the wet paint.


I spread out the color evenly with my brayer then pressed my mold rubber texture plate into the wet paint. I pressed evenly across the plate then peeled back to reveal this beautiful circular pattern taken from a vintage decorative plate. I pressed the paper onto the Gel Plate® to transfer my first painted layer. I repeated this several times to make five sheets of paper that will all be similar when I'm done.


The second layer from the Gel Press® will be Mermaid Lagoon Distress Paint with this awesome punchinella design that I got from Gauche Alchemy. It gives a pattern that is a cross between a floral and an animal print. I am really loving how easy this is and how this is coming along! 


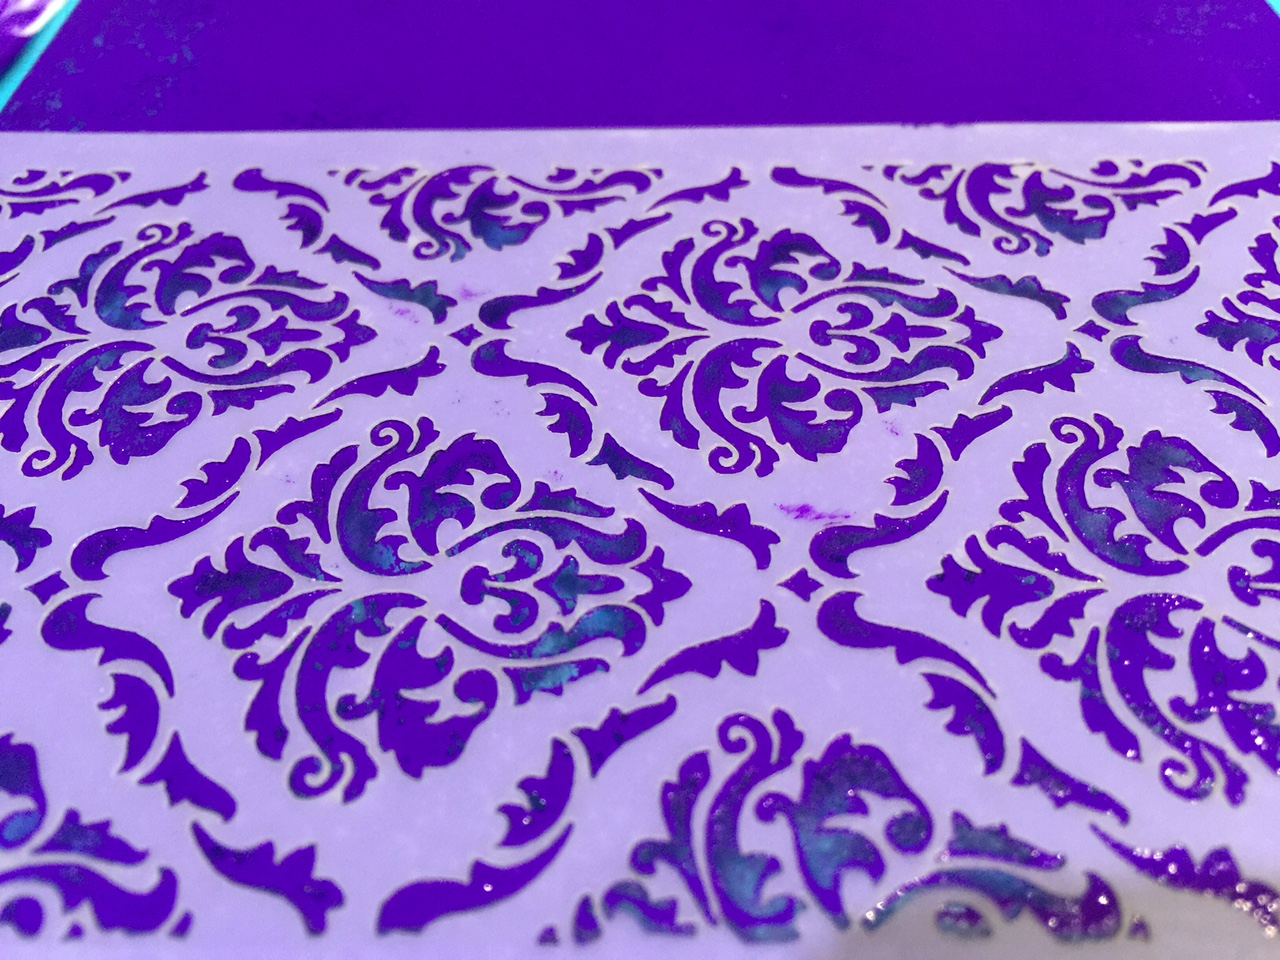
Of course you know I have to have purple... the third layer is Wilted Violet Distress Paint combined with a Tim Holtz mini Damask Stencil {THMST004 mini stencil set 4}. 

With the smaller size of this stencil, I needed to work quickly. I pressed the stencil onto the painted Gel Press® then rubbed a scrap section of paper to remove paint in the negative areas. I removed the stencil, then repeated two more times to completely cover the plate with the damask pattern.


This is the result of the third pull. The colors and variations of layers and texture are so interesting... and my recycled book pages are totally transformed into beautiful art. In about a half an hour, I have 5 finished matching patterns and a whole bunch of starters as a result of cleaning off brayer and leftover paint on the plate and stencils.


I select one of the finished Gel Press® printed papers and prepared my resin frame for mounting to this custom word art. FIRST I need to add some stenciled and hand written words... it's much easier to do this before mounting the frame.


I place the frame over the section of paper I want to use and I trace around the inside and outside edges of the frame with a pencil. This is so I can see where I need to center the lettering going forward.


Since I'm combining my hand writing with stencils - I go ahead and plan it out in pencil on a scrap of paper first. This is just for my piece of mind. For "embrace" I used a Tim Holtz THS011 Schoolhouse layering stencil and for "your" a generic lettering stencil from the art supply aisle at Michaels.


I traced the letters with a Black Sakura Pigma™ FB pen. The nib is a small size brush tip and it fit perfectly through the voids of the stencils. I added my freehand "crazy" then went back building up and filling in the letters with the pen. I also added a little doodling and flourishes. I blended out a bit of Seedless Preserves Distress marker in from the edges to add interest. I cut the circle out following the traced line of the outer edge of the frame.


I wouldn't have normally painted the backside of this resin piece - though I had a paint spill that resulted with paint all over my hands – I rubbed some off on the frame, some paper and to my resin pumpkins. I ran a line of Diamond Glaze around the edge to adhere to my lovely word art.


I press down gently to adhere edges and let dry for a few minutes. Then I go and back trim any excess with scissors. I think I will add a sheet of self-adhesive magnet to the backside to finish this off so I can also hang it on my fridge.


I tied off a section of hand-dyed sari ribbon.
BEA-U-TIFUL!!!


I love how the Amazing Mold Rubber picked up every tiny detail of woodgrain from the vintage embroidery hoop casting... and I can't wait to hang this in my studio reminding me to "Embrace my Crazy"!


I have created a five matching book page backgrounds, and starter backgrounds for future use cleaning paints off my brayer, texture plates and stencils. Monoprinting is quite addictive and so much fun for creatives of all ages! Stay tuned to see what comes of the resin pumpkins...

What would you mold
to create texture plates
to use for monoprinting?

Thanks for visiting! If you would like to see more of my creations,
please visit my blog sbartist : painting in the dark by clicking here. ~ Susan

• • • • • • • • • • • • • •

Don't forget to subscribe to our blog on the right side bar:
Twitter at AmazingCasting | Facebook at AmazingMoldPutty | YouTube at AmazingMoldPutty

Thursday, September 15

#Cre8time Seaside Dreams... an AMAZING Remelt tutorial by Tracy Alden


Hello! Tracy here with another Amazing Casting Products tutorial! I recently started to change the decor in one of my bathrooms, going with sea life, drift wood and glass themes in shades of blue, white, gray and brown. I noticed that one of the walls was missing a little something. With the help of Amazing Remelt it was easy to mold some of the sea shells and glass bobbles I already had as decorations in the room to create that final decoration!

Supplies: 


Using a plastic lunch tray as my mold box, I carefully placed sea shells and glass marbles on the bottom layer of the tray, making sure none of the pieces reached the top lip of the tray.


I heated the Amazing Remelt in the microwave, in the container it comes in. I poured the heated Remelt into the plastic lunch tray with the shells and glass pieces from a 12 -15 inch distance – the distance gives the Remelt a chance to release more bubbles before cooling. A few of the shells floated, because of trapped air bubbles, all I had to do was push the shells back down with a stir stick and the air bubbles rose to the surface of the still-liquid Remelt.


I let the Amazing Remelt cool until no longer tacky or warm – putting the tray in a refrigerator can speed up this process. Once the mold was cool and no longer tacky, I carefully removed the Remelt from the tray and flexed the mold until the glass pieces popped out.

Some of the Remelt had gone between the glass pieces and shells – requiring me to cut and remove the excess Remelt with sharp crafting scissors. I trimmed the uneven edges and made sure there was no loose or over hanging Remelt.


Using a small cosmetic brush I dusted the inside of the mold with Bright Blue, Ocean Blue, Interferance Blue and Pearl Alumidust


I mixed up a small portion of Amazing Clear Cast Resin, making sure to slowly stir to reduce air bubbles and let it sit for 5 minutes. Using a toothpick, I put a tiny drop of Blue Alumilite Dye into a small mixing cup and poured a portion of the pre-mixed resin in it. I poured un-tinted Amazing Clear Cast Resin in the mold and used a toothpick to drop in small portions of blue tinted resin in different areas to create visual contrast.


Once Amazing Clear Cast Resin was cured I carefully removed it from the Amazing Remelt mold and trimmed any uneven edges.


Using a plain gesso covered canvas I applied Viva Decor Inka Gold Metalic Rub, Silver and StazOn Blue Hawaii Ink with a Cosmetic Sponge.


I glued on the casted resin piece to the canvas with Beacon Gem-Tac Adhesive and let dry. I added some Liquitex Gloss Varnish over and around the edges of the resin and sprinkled on Stampendous Crystal Snow White Glitter.


With as easy as I found this to do I am now looking at what other decor items I can create with Amazing Remelt!

What AMAZING arts and crafts can you create?

Please share them on the user GALLERY on the Amazing Crafting Products Website!

Visit my blog Art Resurrected for more craft tutorials!

Until next time, safe travels! ~ Tracy

• • • • • • • • • • • • • • • • •

Don't forget to subscribe to our blog on the right side bar:
Twitter at AmazingCasting | Facebook at AmazingMoldPutty | YouTube at AmazingMoldPutty

Tuesday, April 12

A #Cre8time Throwback to Nature... AMAZING Tree Bark Jewels by Tracy Alden


Hello! Tracy here with some Amazing Casting Products inspiration! Some years ago I had come up with an idea of using Amazing Mold Putty to create a Tree Bark Texture Plate to use with polymer clay. I often use that texture plate to this day, using some of the same techniques I was able to create new, easy yet stylish, jewelry with the help of Amazing Mold Putty and some Amazing Clear Cast Resin!


Even years after I made the original texture plate Amazing Mold Putty is still flexible enough to put the polymer clay and plate through a pasta machine to emboss polymer clay. 


As before I rubbed on some Alumilite Metallic Powder on the uncured clay, highlighting the embossed details and used a small oval cookie cutter to cut out ovals. I baked the clay ovals as per the manufacturers instructions. Once the ovals were cool to the touch I carefully sanded the edges and cleaned any dust off the pieces.


I mixed up some Amazing Clear Cast Resin and carefully applied it to the front of the polymer clay pieces. I let the resin sit for about 10 minutes before adding some small flat-backed crystals to the resin with a crayon (the wax of the crayons sticks just long enough to transfer crystals to the surface after lightly pressing the crayon on the surface of the crystal). Not only did the resin act as an adhesive for the crystals but it helped the colors of the metallic power appear more vivid.


I let the resin cure completely and used a jewelry hole punch to punch small hole through the top of each oval. This allowed me to put jumprings through each oval to create a one of a kind necklace!


By going through some of your Amazing Mold Putty
molds what inspiration might you find?

What AMAZING arts and crafts can you create?

Please share them on the user GALLERY on the Amazing Crafting Products Website!

Visit my blog Art Resurrected for more craft tutorials!

Until next time, safe travels! ~ Tracy

• • • • • • • • • • • • • • • • •

It's that time to have you chance to join our team of Amazing Creatives!


DEADLINE to apply is April 22, 2016.

  http://amazingmoldputty.blogspot.com/2016/04/an-amazing-opportunity-awaits.html

• • • • • • • • • • • • • • • • •

Don't forget to subscribe to our blog on the right side bar:
Twitter at AmazingCasting | Facebook at AmazingMoldPutty | YouTube at AmazingMoldPutty

Wednesday, January 20

Having an AMAZING #Cre8time Treasure Hunt...
by Maria Soto


Hi there! Today I thought I would share how I used some items I have at home to make some fun customized molds. I thought it would be interesting to take something from around the house and find a fun area to mold... then once you have a partial mold, you can go ahead and cut it up, or add more of the amazing mold putty and make something fun and different.

I love Amazing Mold Putty, because it's so easy to use... and the best part is you can carry it with you also! In this case I just went around the house looking to see what fun items I could find that I could turn into new molds.

First thing I did was check my chimney mantel and sure enough I found this fun vase I had purchased at an estate sale – I got it not only because of the color and texture, but because of the fun trim near the top of the vase, and the bottom as it has fun details.


So with this household finding I decided to make two different molds. I mixed equal amounts of parts "A" & "B" of the Amazing Mold Putty (CLICK HERE to view instructions on how to mix), and when the putty was fully combined, I pressed it against the pattern sections I wanted to mold.

I covered the trim on the top of the vase with Amazing Mold Putty – pressing it all the way around. Then I mixed more putty and placed it along the bottom of the vase, but only on the front side.


This is what the mold on the bottom looks like – it captured every little detail from the design on the vase. This can be a really nice stamp, or I can ink it up and add a very thin layer of resin to cast just parts of this mold in resin.


Here is the mold I made from the top of the vase, including all the beautiful texture! This mold is pretty big and thick, so I just might cut it up into two halves and trim the edges so I can use the middle part of the mold later on.


I flipped the mold inside out so you can see all the pretty detail captured by the Amazing Mold Putty! It's so fun looking for fun items you can use to make molds out of... but it's even more fun trying to think of ways to use these new molds once you create them! Please come back later to see what I end up making with these fun molds.

What fun household items can you
transform into Objects d'Arte?

Please do share your ideas with us by leaving a comment below.

Thanks for visiting! I invite you to stop over to my blog, "What is Creativityat http://chuy-creativity.blogspot.com to see more of my creations. Maria Soto

• • • • • • • • • • • • • • • • •

Don't forget to subscribe to our blog on the right side bar:
Twitter at AmazingCasting | Facebook at AmazingMoldPutty | YouTube at AmazingMoldPutty

Tuesday, November 17

Geared up for #Cre8time... adding Dimension to #mixedmedia Collage by Brenda Burfeind

Good day friends! Brenda here again from Creativity is a State of Mind. Today I am hoping to inspire you by adding some texture with a mold. I am always looking for fun ways to create. I knew I wanted some texture on a piece I was doing and I just sort of ran with it. I wasn't sure if my idea would work, but I'm very pleased with how it turned out.


Turn this mold that I created with Amazing Mold Putty...


... into this!

Bet you'll never guess what else I've used for this fun mixed media collage. To see more details and the full tutorial, I hope you will jump over to my blog.

How do you take your mixed-media
Cre8time to a new dimension?

Thanks for stopping by and until next time, Brenda saying "see you soon"!

Visit my blog, Creativity is a State of Mind to see some more of my creations.

• • • • • • • • • • • • • •

Don't forget to subscribe to our blog on the right side bar:
Twitter at AmazingCasting | Facebook at AmazingMoldPutty | YouTube at AmazingMoldPutty

Monday, July 27

#Cre8time Adventures in Moldmaking... and Fabulous FAUX Old World Tiles!


Greetings Amazing Crafters! Susan here to share a project that combines my love of moldmaking and casting with altered books... and I've transformed a plain jane kraft journal into something with old world Italian charm.

Cool2Cast is a product created by Tiffany Windsor of Cool2Craft – a fiber plaster medium which sets up really fast unlike paper maché casting or paper based air dry clays. This media brings a whole different feel, texture and effect to my stash of molds - and totally expands their use!

For my book I started with a plain blank spiral bound journal book. This particular one has a window already cut out of it and that's what I plan to house the casting in. I've also selected a texture plate from my stash made from Amazing Mold Rubber {CLICK HERE to view details}.


Since the cover made of craft paper, it's already primed and ready to go. I grabbed my three metallic colors of Ranger Distress paint and which have a dauber top, and I quickly painted the cover and around the edges, on the inside of the window and around the edges on the inside of the cover. When I am all done, I can go back and line inside cover with a pretty paper.


In just a few minutes the paint is dry and I'm ready to move
on to filling the window with a special casting.

I grabbed my Amazing Mold Rubber texture plate that I made from molding a vintage glass tile. I place the cover over it to decide what section of the design I want to have featured in my window. On the inside of the cover, I applied some removable blue painters tape to protect it from the liquid Cool2Cast from sticking. When it hardens, I plan to gently pull the cover off and place the casting back into the window after sanding/painting.

In hindsight - I really needed to protect the front of the cover and do this process from the backside {in reverse} so that I don't bend the casting in handling. Then I could have just mounted a piece of cardstock directly to the back of the inside cover to secure in place after it was hardened. Not a problem though, I got the results I was looking for... and the cracks that I created in my clumsiness actually added to the old world charm of my finished book.


I used some bags of glass beads to way down my cover so when I pour the Cool2Cast mixture it would not seep under the edges of the book cover.


In a Ziploc baggie I prepared a small batch of the Cool2Cast following the easy instructions - which is a 2 to 1 ratio of the casting medium to water, mixed to a pancake batter consistency. When ready, I snipped off the corner the baggie and squished onto my mold.


I used a small rubber spatula to spread the mixture around evenly,
and then I let it sit to harden for about an hour.


This created thin casting since I matched the thickness of the cover - next time I would go over and add second layer of Cool2Cast to reinforce it as I remove it from the flexible mold. I was so excited to see the result I really wasn't being as gentle as I should have been. It's all good though!


After sanding the edges slightly to square it up to fit back in the cover, I mounted a piece of chipboard {painted to match} as a backer and glued in place. I brushed on the same colors of the Distress Paint to give my Cool2Cast mod texture a nice matching patina.


I applied some coordinating metallic trim to line the edges and metallic bronze photo corners to finish it off add a little extra bling and interest.


Now I have a beautiful book ready to go that I can customize for a gift or I can use this as one of my many art journals in rotation. I really love the option of using the Cool2Cast because it gives a more earthen and distressed result when used in my Amazing Casting Products molds as opposed to the using resins that give you such a perfect and pristine casting.

The Cool2Cast insert really looks like it's a piece of old antique weathered ceramic tile. I think the next time I'm working with Amazing Clear Cast Resin, I will paint on a layer to add a protective seal to the chipboard and make the faux ceramic insert really POP.


I really love the finish on this and I'm happy how it turned out as I have a few more of these books in my stash! I look forward to trying Cool2Cast in my collection of Amazing Mold Putty and Amazing Mold Rubber molds to make castings with an old world plaster feel.

How will you alter books art

Please leave a comment below to share! If you would like to see more of my creations, please visit my blog sbartist : painting in the dark by clicking here. ~ Susan
. . . . . . . . . . . . . .

Want to Socialize with Amazing Crafting Products?
Twitter at @AmazingCrafting | Facebook at AmazingMoldPutty | YouTube at AmazingMoldPutty
Related Posts Plugin for WordPress, Blogger...