Showing posts with label Necklace. Show all posts

Thursday, June 30

Eye-Catching #Cre8time Jewels... AMAZING Inspiration from Aimée Wheaton


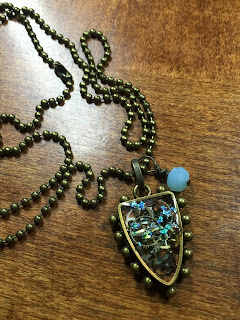
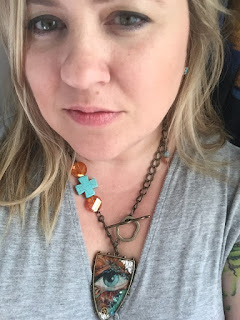
Remember the pendants I made in my last post {CLICK HERE if you missed my tutorial}? Here they are all grown up into their own necklaces! I had a blast putting them together. With a little creativity and products from Amazing Casting Products you can go far!! I've worn the two bigger ones and gifted the smaller one, I get lots of compliments when I wear them. Amazing Clear Cast Resin truly is amazing! 


Check out the close ups below...


My favorite!


Yep I'm that goofy, creative person. You have to have fun right?! 

Do you love making mixed media jewelry?

Feel free to stop by my FB page to see the latest with me.

To see more of my work please visit my new blog "Life Glitter Makeup"
and also at the Aimée Wheaton Art and Design website.

Till next time! Xoxo Aimée

• • • • • • • • • • • • • • • • •

Don't forget to subscribe to our blog on the right side bar:
Twitter at AmazingCasting | Facebook at AmazingMoldPutty | YouTube at AmazingMoldPutty

Friday, April 15

Wear some #Cre8time Steampunk... by Featured Artist Myléne Hillam of Mill Lane Studio


Hi Amazing Crafters! For today’s special project, I’ve designed a bright and fun necklace with an avant-garde feel. This bold, colorful piece puts an entirely different spin on steampunk. I chose Amazing Casting Resin for this project because it will cure quickly so you’ll be able to cast the necklace and put it together in an afternoon – you’ve got to love a project that looks great but comes together quickly! The moulds I’m using are actually silicone beer bottle markers that I found at my local kitchenware shop. If you can’t find them locally, shop for them on Amazon.


Here’s what you’ll need to cast the cogs:


To assemble the necklace, you’ll need these jewelery-making items:
  • 8 - 6x5mm drum beads
  • 2 cone beads
  • 16” strand haematite bugle beads
  • 4 - 3mm silver spacer beads
  • 2 silver wire guardians
  • 2 silver #2 crimp tubes
  • 2 silver split rings
  • Silver hitch and ball clasp
  • Silver 0.21” beading wire
  • Tools: split ring pliers, crimping pliers, flush cutters


Brush the outside surface of some of the bottle
markers with Alumilite Gold Metallic powder


Use a piece of adhesive tape to remove the excess powder
on the bottom surface of the powdered bottle markers.


Turn all the rings outside-in.

Cut a piece of packing tape and position the bottle markers on it. Press them down on to the tape. You won’t be able to burnish them because the silicone doesn’t stick very well to the tape but try to make sure they have good contact with it to minimize leakage.


Measure out ½ oz (15mls) each of Parts "A" and "B" of Amazing Casting Resin. Add 2 or 3 drops of Alumilite Violet dye to Part "A". 


Mix the color well and then add Part "B" and mix Amazing Casting Resin according to the package instructions. CLICK HERE to view mixing/preparation.


Pour the Amazing Casting Resin into the bottle markers, 
filling as many as you can with the resin.


Set the cogs aside to cure.


Remove the cogs from the tape. If there has been any leakage, you should be able to easily remove the flashing from the silicone by pulling it away.


To demold, pull the silicone ring away
from the resin. It will release quite easily.


Use the Stanley knife to trim away any other resin on the top edges.

Make a batch of red cogs using Amazing Casting Resin with Alumilite Red dye and a white batch with no colorant. As a guide, it takes approximately 1/5 fl oz (6 mls) to fill each silicone ring.


Select the cogs you’d like to use in your necklace. You’ll need nine to complete the design featured here. Measure and mark the centre of each cog.


Use the drill to drill each hole. If you’re using a Dremel, 
use a slow speed so that you don’t melt the resin.

Now you’re ready to start stringing the necklace!


Cut a 24” (60cm) length of beading wire. String on a crimp tube and the wire guardian. Thread the wire back through the crimp tube and then pull up the loop. Make sure the wires lay flat inside the crimp tube rather than crossing over each other.


Place the crimp tube inside the second hole of the crimping tool and squeeze it gently but firmly. It should create two channels, one for each of the beading wires. Tug the wire to make sure it’s secure. 


Position the crimp tube in the hole nearest the tip of the crimping pliers and squeeze again to bring the two channels neatly to the centre.


String two spacer beads on the beading wire. Draw them up to the crimp tube, making sure they pass over both wires. Trim the short wire as close to the second bead as you can. String 6.5” (16.5cm) of haematite beads on to the beading wire and then a cone bead.


String a cog and a drum bead.


Continue stringing cogs and drum beads until you have strung nine cogs and eight drum beads. String the other end of the necklace to match. Finish with a crimp and wire guardian.


Open a split ring and connect the end of the necklace to one half of the clasp. Use the second split ring to attach the other side of the necklace to the other half of the clasp.


Ready to wear!!


For some extra bling, glue pointy-back crystals to the holes in some cogs. Or go for a more steampunk look, by brushing Alumilite’s Silver Metallic, Gold Metallic and Pearlescent powders on black dyed cogs. The pearlescent powder will look like pewter – adding to the industrial look.


Or string the cogs on bracelet memory wire and make a really bold avante-garde piece instead. But most importantly, have fun with this idea!

• • • • • • • • • • • • 


Please stop by my blog Mill Lane Studio or join me
at Mill Lane Studio on Facebook for more inspiration.


For more jewelry ideas and inspiration, please check out my jewelry-making books: "Fabulous Jewelry from Findings" and "Stylish Leather Jewelry"

• • • • • • • • • • • • 

Thanks so much for dropping by! Check back next Friday for more from our Featured Artist Myléne Hillam... you don't want to miss it! CLICK HERE to head on over to Myléne's Blog Mill Lane Studio to see more of her fabulous work!

Have a fabulous day! :) Sb

Thursday, January 14

#Cre8time Handmade Jewels... Ooey Gooey Resin Pendant by Aimée Wheaton


Hey all!! This was a bit of an experiment for me as I've never actually resined papers before but I'm pretty happy with how it turned out so I'm going to try and perfect this technique as I play more. My original plan {which usually never is how it turns out} was to make some medallion-type earrings... well I got impatient and touched one before it was dry and ruined it – so I ended up with a pendant instead!

I started with some French ephemera circles I had and thought they would be fun to work with. I love vintage papers, especially from books. I also punched out little hearts from a painted paper I created and cut some strips of other painted paper.


My pile of goodies.


I took some 20 gauge wire and bent it around
the circles then glued them down together.


This is great glue for quick projects!!


Glued together.


For more interest I ripped some of my favorite Rice Paper as well and layered them how I wanted the earrings to be. I didn't glue down the strips I wanted to see how they would react with the resin.


I mixed equal parts of Amazing Clear Cast Resin and began applying to the earrings with a popsicle stick – I found out I put way too much on, this is where I'll need more practice. It started pooling around the circles and I ended up needing to trim it after it had cured. Be conservative when applying the resin. I let it dry overnight to be certain it was done curing. CLICK HERE to view mixing/preparation of Amazing Clear Cast Resin.


This is in process while it's still wet, at this phase I put a drop of white Alumilite dye and swirled it around for a milky effect as well as some green Alumidust for some shimmer.


I did the same to this one. I threw on some pink chunky glitter as well for some more shimmer and some metallic green micro beads. I wanted it to feel very organic and I think I did accomplish that effect.


Next time I'm going to do this in phases – maybe resin and papers first, let that cure and then do the dye, glitter and after bits for more control.


I do like how it turned out. When it cured fully, I did some primitive bead loops and strung it on a ball and chain necklace. Easy peasy!

Here is the finished product!


Do you make resin jewelry?
What are your favorite ways to create
organic looking resined pieces?

Feel free to stop by my FB page to see the latest with me.
To see more of my work please visit my new blog "Life Glitter Makeup"
and also at the Aimée Wheaton Art and Design website.

Till next time! Xoxo Aimée

• • • • • • • • • • • • • •

Don't forget to subscribe to our blog on the right side bar:
Twitter at AmazingCasting | Facebook at AmazingMoldPutty | YouTube at AmazingMoldPutty

Friday, December 18

Take a #Cre8time Trip to Castaway Island...
Easy and Inspired Gifts by Aimée Wheaton


Well this simple idea came about because I'm now working with kids at a school and my brain is frazzled... but it's also now thinking more like a kid. This was a super easy project and would be awesome for stocking stuffers or just a sweet little gift for someone special. I will be giving this to my daughter Lily at Christmas.

I started with browsing through my box of cast offs to see if I had anything I wanted to use. What is a cast off? Well it's the extra resin you end up with if you mix too much for your project, that's what it is to me. I have a box of goodies I dig out for projects and sometimes use them. I found this heart that I had made around the time of my Disney Cruise in February. I had painted this one teal. It was a plain smooth magnet I bought, altered and molded. The raised areas were hot glue designs added on it and then I molded it using Amazing Mold Putty, mixed up some Amazing Casting Resin and had this awesome new heart design. It's perfect for a necklace and I have a ton of these hearts in that box. 


I started digging around in my jewelry findings box and had this bail that fit perfectly. I glued it on with Tacky Glue and let it dry. I then glued on the sweet little pink bow which was in my mom's old button stash, added more glue and then some glitter on the raised areas. Oh and I sanded the back so it was smooth against her skin. Easy peasy!! I know my girl will love it! Super simple project!!


Don't throw out those cast offs!!!! Use them in other projects! There are so many ways to use them. First idea that comes to mind a is a Louise Nevelson inspired shadow box!

What cool fix can you make
with your cast offs?

Feel free to stop by my FB page to see the latest with me.
To see more of my work please visit my new blog "Life Glitter Makeup"
and also at the Aimée Wheaton Art and Design website.

Till next time! Xoxo Aimée

• • • • • • • • • • • • • •

Don't forget to subscribe to our blog on the right side bar:
Twitter at AmazingCasting | Facebook at AmazingMoldPutty | YouTube at AmazingMoldPutty
Related Posts Plugin for WordPress, Blogger...