Showing posts with label beads. Show all posts

Thursday, June 30

Eye-Catching #Cre8time Jewels... AMAZING Inspiration from Aimée Wheaton


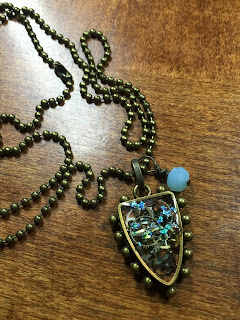
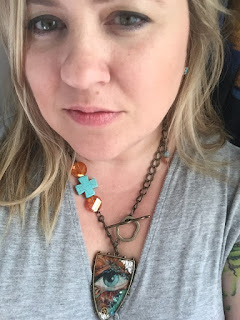
Remember the pendants I made in my last post {CLICK HERE if you missed my tutorial}? Here they are all grown up into their own necklaces! I had a blast putting them together. With a little creativity and products from Amazing Casting Products you can go far!! I've worn the two bigger ones and gifted the smaller one, I get lots of compliments when I wear them. Amazing Clear Cast Resin truly is amazing! 


Check out the close ups below...


My favorite!


Yep I'm that goofy, creative person. You have to have fun right?! 

Do you love making mixed media jewelry?

Feel free to stop by my FB page to see the latest with me.

To see more of my work please visit my new blog "Life Glitter Makeup"
and also at the Aimée Wheaton Art and Design website.

Till next time! Xoxo Aimée

• • • • • • • • • • • • • • • • •

Don't forget to subscribe to our blog on the right side bar:
Twitter at AmazingCasting | Facebook at AmazingMoldPutty | YouTube at AmazingMoldPutty

Wednesday, May 18

Sealed with a #Cre8time Kiss... DIY Springtime Frame by Maria Soto


Today I want to share a nice project I made using an inexpensive wood frame that I purchased at Michael's {similar to this one}.


I really had no idea what I was going to do with this frame, so many ideas came to mind. I figured this would be a simple project, and I let my creative ideas just come to me as I worked on this piece. 

First thing I did was decided on two colors to use – since we are still waiting for Spring to come here in Indiana, I thought why not use red and yellow acrylic paints... they remind me of the warmth from the sun. I painted the frame and left it alone for a couple of days waiting for some more ideas to come to me.


One day I was working on some resin projects and had quite a bit of Amazing Clear Cast Resin left, I usually just pour extra resin into old molds but this time I thought why not use the extra resin to cover the front of this frame and make it look like it's all glass; so I took a foam make-up applicator and applied the resin over the entire front of the frame. 


The Amazing Clear Cast Resin is so easy to mix and use, and depending on the climate where you live, it can start to set within 30 minutes of mixing. Just remember to use equal amounts of both parts "A" and "B" to make sure your resin sets perfectly {CLICK HERE for full mixing instructions}. The photos show how the painted frame looks after adding the clear resin.


It was then that I thought about adding some flowers to the frame and I noticed the tiny clear beads I had taken out to used on my other resin projects and figured these would give the frame a bit of dimension. I added these tiny clear beads on some parts of the red areas, and next it was time to add some flowers on the resin before it all sets. I also took some paper and fabric flowers and tiny butterflies and added these over the resin, playing around a bit. I was able to move the flowers from one area to another until I was happy with the placement, as long as the resin has not started to set, you can move your embellishments around like I did here. 


Once I was happy with the look of the frame I let it set over night. There's no glass in the photo section of this frame but the frame itself looks like it's all covered in glass thanks to the Amazing Clear Cast Resin. A very simple project, but very pretty and ready for a nice photo of the kids to give to Grandma as a gift, or for me to keep at the office... just a nice "Spring" like frame. 


How would you use resin on a frame? 

I used it to embellish the frame and as a adhesive on this project. Share your ideas with us, we'd love to see how creative you are with Amazing Clear Cast Resin.

Thanks for visiting! I invite you to stop over to my blog, "What is Creativity"
 at http://chuy-creativity.blogspot.com to see more of my creations. ~ Maria Soto

• • • • • • • • • • • • • • • • •

Don't forget to subscribe to our blog on the right side bar:
Twitter at AmazingCasting | Facebook at AmazingMoldPutty | YouTube at AmazingMoldPutty

Wednesday, April 13

Fashion meets #Cre8time... Quick and Easy Earrings with Aimée Wheaton


Ever have those days where you can't find earrings that go right with your outfit? Maybe you envision a certain look but can't find exactly what you're looking for. Well here is a super quick earring project that you can finish in under 30 minutes... depending how detailed you get. 

I bought these two bezels that were probably supposed to be for pendants but I love BIG earrings :)

I decided to try a technique I haven't tried yet on them just to see how they turned out.

Here is what you'll need:
  • Amazing Casting Resin - this cures in under 10 minutes usually and is white when it's cured. 
  • Alumilite Dye color of choice - I chose violet. 
  • 2 Earring bezels 
  • Glitter 
  • Earring wires 
  • Jump rings 
  • Beads 
  • Gloves 
  • Popsicle stick 
  • Measuring cups 
  • Jewelry making tools 

Super easy – all it takes is some imagination for a lot of WOW!! 

Mix the Amazing Casting Resin, drop a drop of Alumilite Dye in, swirl around and add the glitter and beads. When cured, I turned them into earrings!


Easy!


Peasy!

Do you create jewelry on the fly?
Ever use resin to make it?

Feel free to stop by my FB page to see the latest with me.

To see more of my work please visit my new blog "Life Glitter Makeup"
and also at the Aimée Wheaton Art and Design website.

Till next time! Xoxo Aimée

• • • • • • • • • • • • • • • • •

It's that time to have you chance to join our team of Amazing Creatives!


DEADLINE to apply is April 22, 2016.

  http://amazingmoldputty.blogspot.com/2016/04/an-amazing-opportunity-awaits.html

• • • • • • • • • • • • • • • • •

Don't forget to subscribe to our blog on the right side bar:
Twitter at AmazingCasting | Facebook at AmazingMoldPutty | YouTube at AmazingMoldPutty

Friday, March 11

#Cre8time Recycling... Serving Tray REDUX by Melissa Johnson


Hi everyone! Melissa here and today I would like to share a fun Mardi Gras style serving tray featuring Amazing Clear Cast Resin.


SUPPLIES NEEDED:

 
As I'm sure I have mentioned before, I LOVE repurposing items and thrifting. It's so much fun to transform things into art pieces! For this project I picked up this really well made serving tray at Goodwill for $4.00.


I spread the tacky glue all over the serving tray with a credit card and laid out my bead necklaces to be within easy reach. Then I started cutting the bead strings and laying out circular designs into the glue.


I continued on with this method until the entire tray was full of color.


When the tray was complete, I mixed up Amazing Clear Cast Resin and poured a few layers over the top – allowing each layer to dry before pouring the next {CLICK HERE to view mixing and preparation}.
 
This took about a week to fully complete. I found that if I pour too thick of a layer of resin at once, it takes longer to cure.


And here is my finished tray, all ready to laissez les bons temps rouler!


How do you transform your thrift store finds?

Make something that makes you happy :) ~ Melissa Johnson
For more of my mixed media projects, please visit my blog.

• • • • • • • • • • • • • •

Don't forget to subscribe to our blog on the right side bar:
Twitter at AmazingCasting | Facebook at AmazingMoldPutty | YouTube at AmazingMoldPutty

Tuesday, November 3

#Cre8time Jewels Freshly Picked... Day Two of #PumpkinWeek #ACPthrowback


Greetings Amazing – welcome to the day two of PUMPKIN WEEK... a week of projects and inspiration dedicated to all things pumpkin! Today we are revisiting a jewelry project from Amazing Creative Tracy Alden that is fresh from the pumpkin patch.


The inspiration for this necklace came to Tracy one day as she watered her pumpkin patch. She loves watching the plants start from seeds, then grow into the trailing vines, to big beautiful leaves with flowers that eventually grow into lovely pumpkins. She wanted to recreate that same story of a pumpkin patch... translated as beautiful jewels. She had the perfect leaf and flower beads but no pumpkin beads! So with the help of Amazing Mold Rubber and Amazing Clear Cast Resin, Tracy created handmade pumpkin beads and make a wonderful necklace.

http://amazingmoldputty.blogspot.com/2014/08/taking-cre8time-trip-to-pumpkin-patch.html

CLICK HERE to jump over
to see Tracy's full tutorial.

Want to see more of what Tracy is up to?
Follow her on her blog HERE or her PAGE on Facebook!

• • • • • • • • • • •

Share your ACP creations
by tagging us on social media!
You can be featured on our
#ACPthrowback Thursday 
November 19, 2015?

Post them to our Facebook page, Pinterest, and on Twitter! We'll be on the hunt for your projects with the hashtag #ACPThrowBack, (you can even go back into your past pins and add this pin to help us find you!) and share ALL your projects using the hashtag #AmazingCastingProducts!!

• • • • • • • • • • •

Don't forget to subscribe to our blog on the right side bar.
Twitter at AmazingCasting | Facebook at AmazingMoldPutty | YouTube at AmazingMoldPutty

Tuesday, May 26

Amazing #Cre8time Jewelry Transformations...
by Maria Soto


Hi there, this is Maria and today I want to share a fun project. Back in January I created several molds using some fun items I found in my office. I've been wanting to use these for jewelry making. One day as I was looking at an old magazine and I found a page that inspired me to create a pendant. Well, I figured it was time to bring out my mold and see what would come from this mold, a magazine page and some Amazing Clear Cast Resin.

You can CLICK HERE to see how I made this fun mold. 


After adding some Alumilite Metallic Powders with a paintbrush on all the molds, I poured some Amazing Clear Cast Resin. As you can see, these are very thin molds so only a little bit of resin was needed.


Here are some of the resin pieces I made. I used two of them to make a couple of pendants... inspired by a magazine page, as you can see in the photos below. It had a cute little girl, and some very pretty flowers – I thought would make some cute pendants.


After trimming and adding the papers to the molds, I added some paint, glitter, and some beads. Once everything was put together it was time to add a bit more of the Amazing Clear Cast Resin to seal and finish these two pieces.

Here are the two pendants, all done and ready to wear.
These will make some fun gifts.


Funny how you never know when inspiration will hit you – I was on my lunch break looking at some old craft magazines... and looking at the pretty flowers inspired me to go home and create!

What inspires you to create?

Go ahead and share your creations with us on social media #AmazingCastingProducts.

Thanks for visiting! I invite you to stop over to my blog "What is Creativity"
at http://chuy-creativity.blogspot.com to see more of my creations. Maria Soto

• • • • • • • • • • • • • • • • •

Don't forget to subscribe to our blog on the right side bar:
Twitter at AmazingCrafting | Facebook at AmazingMoldPutty | YouTube at AmazingMoldPutty

Thursday, January 29

Celebrating Mardi Gras at #Cre8time... Embellished Resin Shot Glasses by Tanya Ruffin


Embellished shot glass filled with Lemonhead Vodka {see recipe below}. 

If you know anything about Mardi Gras, two things come to mind... Beads and drinking. Now I'm not advocating drinking, but if you want to get in the Mardi Gras mood this will definitely help you! 

is actually food safe?

Sure is! That means I can put a layer of resin in the bottom of a glass and it still be safe to drink out of!


Start with some tall shot glasses. I found mine in a three pack at the Dollar store.


I took a few beads of green, purple and gold (you know, the colors of Mardi Gras) and placed in the bottom 1/3 of the glass. I wanted to leave enough space in the glass to actually have a shot! Mix a small amount of clear resin according to directions and let resin sit about 15 minutes for the bubbles rise to the top. Then slowly pour over my beads. 

Let cure and you are ready to laissez les bon temps rouler! 

That is "let the good time roll" for all you non–Louisianians! 


Other ideas... charms, dried flowers, candied hearts, shells, etc...

For a variation on this technique, see my tutorial on making Souvenir Glasses.


• • • • • • • • • • • • • •

Lemonhead Vodka Tutorial

This depends on how sweet you want your vodka. I like mine sweet!

Ingredients: 

  • 2 C of vodka (tip - use a good grade vodka) 
  • 1/4 cup to 1 cup of Lemonheads (depends on how sweet you want your vodka) 
Instructions:

  • Put vodka into a mason jar or a jar that closes tightly. 
  • Add Lemonheads. 
  • Let sit for at least 3 days. 
  • Shake it up and then strain through a fine strainer. 
  • ENJOY! 
• • • • • • • • • • • • • •

What kind of baubles will you embed in resin?


Craft Your Own Way! ~ Tanya

Tanya Ruffin with Create Studios

Please visit my site to see more of my inspiring creations at www.tanyaRuffin.com


• • • • • • • • • • • • • •

Don't forget to subscribe to our blog on the right side bar:
Twitter at AmazingCrafting | Facebook at AmazingMoldPutty | YouTube at AmazingMoldPutty

Wednesday, October 22

Celebrating Dia de los Muertos at #Cre8time! Festive Wreath Tutorial by Aimée Wheaton

Well it's that time of year again, time for spooky things, orange, purple, black and of course sugar skulls! This project came together browsing Michael's for inspiration. I found these card stock Sugar Skull die cuts and wondering if I could mold it, that kind of sparked the rest of the wreath! I've never made a wreath so this is new to me but it was very fun and easy to make!

If you can't find a wreath you want to hang, make one!!! The possibilities are endless and you can do so much with Amazing Crafting Products!!


First I must introduce my helpers, my daughter Lorelei and my crazy tuxie Zooey. We pulled out the fabric to cut and she immediately thought she'd get on all of them and have a nice little nap. It was cute! Loved having Lorelei help me, she cut most of the fabric and tied a lot onto the wreath frame.


Now onto the project!! So we start with the fabric and cut strips of all 4 types of fabric, long enough to go around the wreath and tie in a knot.


We started with a pattern and then filled in the white spots with whatever we had left. There is really no rhyme or reason to it, whatever you like best! I'm sure I could have added a lot more to it to make it fluffy but knew I was going to add embellishments as well. While Lorelei was tying the fabric on I was making the molds with Amazing Mold Putty {CLICK HERE to view mixing/preparation}.


I really wasn't sure how well this card stock would mold and thought I would test it out. I tried to make it on the thinner side so it wouldn't be too heavy for the wreath. 


I also thought I wanted to add the word "BOO" but then changed my mind on that because it's usually not associated with sugar skulls but rather with ghosts. I may use them for another project.


Pretty impressive for paper!! The mold turned out great!


This is the stage the wreath is at right now. We've weaved in these sparkly floral embellishments into the fabric and I secured them down with a hot glue gun.


Right now I only have the metallic powders from Alumilite, so I thought I'd try my mineral makeup to color the mold. These are eyeshadows! I painted them into the mold like I would do the powders and then poured the Amazing Casting Resin on the top of it. It worked like a charm!


The painted mold, very pretty!


I sprinkled in silver glitter in the letter molds. Then I mixed up a batch of Amazing Casting Resin and poured into the molds {CLICK HERE to view mixing/preparation}. Next time I would paint the letter molds with a powder first, the resin made bald spots in the glitter as you can see in this photo.


Let them cure and then demold.


I love the subtle colors of the skull!! I then took a fine point black Sharpie and highlighted the different areas with it.


You know how I pretty much have wire in every project, well this one is no different! I used purple, orange and black glass beads and strong onto the thin wire for some extra bling.


Next I weaved them into the fabric and wreath
and bent it a bit for some movement.


I decided the project needed some more embellishments and decided to throw in some vintage buttons with a hot glue gun. I then glued down the sugar skull, the glitter embellishments and the rest of the buttons around the wreath.


Beads and button.


Bottom of the wreath.


Blingy side!


Here it is! What do you think? I love the mix of colors in this piece. This was a fun project to make and you can get your kids to help! I will probably make a Christmas wreath as well. I think I'm going to let Lorelei take it to school to decorate her classroom, her teacher wanted some decorations. This is a smaller wreath but could easily be duplicated into a bigger design. I wanted to have more with the Amazing Casting Resin on this piece, but I think the Sugar Skull sets it off nicely. I should probably make a Boo wreath as I have the letters molded as well. Hope you enjoyed this project :)

Let's see what you can create
with your variety of items,


Feel free to stop by my FB page to see the latest with me. 

To see more of my work please visit my blog "Creative Flutters"
and also at the Aimée Wheaton Art and Design website.

Till next time! Xoxo Aimée

 • • • • • • • • • • • • • •

Don't forget to subscribe to our blog on the right side bar:
Twitter at AmazingCrafting | Facebook at AmazingMoldPutty | YouTube at AmazingMoldPutty
Related Posts Plugin for WordPress, Blogger...