Showing posts with label bling. Show all posts

Friday, February 24

Dress up your #Cre8time... Bejeweled Hair Clip by Aimée Wheaton


Hi all! Aimée here today to share this little sweet piece created from broken costume jewelry. I thought I'd mold it to see how the Amazing Mold Putty would do and it didn't fail!! Check out the details below!


I was bummed when this broke, but I kept it to use for molds. I'm sure I'll use the pieces for other projects.


I mixed two equal parts of Amazing Mold Putty and formed it around the gem {CLICK HERE to view mixing/preparation}. The photo on right shows the awesome detail it picked up. I love how it caught all the facets of the gems.


Next, I took some cotton swabs and colored in each individual gem with some Alumidust. I chose copper, bright blue and deep purple.


Detail of all the different shades.


I mixed equal parts of the quick curing Amazing Casting Resin {CLICK HERE to view mixing/preparation}. It cures in no time!! I demolded and below is what you see :)

Add some hot glue and add it to an alligator clip and it's done! 


This would be great for customizing outfits with matching accessories!


I also wanted to share this amazing casting of pony beads on a piece of yarn. I love how amazing the Amazing Mold Putty is!!!

Let's see what you can create
with your broken treasures,
Amazing Mold Putty
and Amazing Casting Resin!

Feel free to stop by my FB page to see the latest with me.

To see more of my work please visit my new blog "Life Glitter Makeup"
and also at the Aimée Wheaton Art and Design website.

Till next time! Xoxo Aimée

• • • • • • • • • • • • • • • • •

Don't forget to subscribe to our blog on the right side bar:
Twitter at AmazingCasting | Facebook at AmazingMoldPutty | YouTube at AmazingMoldPutty

Thursday, December 31

Ring in the New Year with #Cre8time Recycling... by Maria Soto


Hi there! I decided to make a new bracelet to wear for the New Year's party. I had these empty duck tape rolls and decided to use one to make a quick and easy resin bangle. 


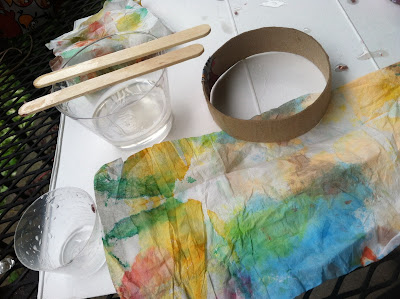
Now sometimes when I paint, I keep napkins handy to clean the brushes or spills. I'm very clumsy so it happens a lot. As I was working, I noticed all the pretty colors so I decided to use these decoupage a bangle... but instead of using glue, I used the Amazing Clear Cast Resin to add the napkins I used to clean up my paints.


It was so easy, I cut the empty roll in half. I gathered my supplies and went on to mix a small amount of Amazing Clear Cast Resin


Amazing Clear Cast Resin has easy to follow instructions on the box or CLICK HERE to view mixing/preparation. I mixed a small amount of resin and applied it to the outside of the empty roll a little bit at a time using the mixing stick, then applied sections of painted paper towels.


Once I was done covering the outside with the colored paper towel, I added a bit more Amazing Clear Cast Resin over all the tissue and let it dry overnight. I used a mold to hold the resin covered bangle and to make sure it would catch any excess resin.


It's all done and ready to wear! Now you can either do the same process to the inside of the bangle –or just paint it and then seal it with more resin.


I'm so ready to wear this for our New Year's party. Amazing Clear Cast Resin is one of my favorite crafting products... it can be used in so many different ways – not only to be used in mold making.

How do you use resin?
Any fun and creative ways?
Please do share with us by leaving a comment below.

Looking forwards to creating outside the box
in the coming year... Happy New Year to all!

Thanks for visiting! I invite you to stop over to my blog, "What is Creativityat http://chuy-creativity.blogspot.com to see more of my creations. Maria Soto

• • • • • • • • • • • • • • • • •

Don't forget to subscribe to our blog on the right side bar:
Twitter at AmazingCasting | Facebook at AmazingMoldPutty | YouTube at AmazingMoldPutty

Thursday, November 19

Twinkle, Twinkle Little Star... #Cre8time Resin Suncatchers by Bridget Cordero


As everyone prepares for Thanksgiving I'm still having a hard time letting go of summer and the warm, sunny weather. So to keep the sun shining through I created these cute sun catchers using Amazing Remelt, Amazing Clear Cast Resin and some bling.


To get started I found two metal cookie cutters, a star and a moon and melted some Amazing Remelt in the microwave. It takes about 2 minutes to melt one container – but this will also depend on your microwave. I normally start off at 1 minute and go from there.


Once liquefied I placed the cookie cutters into the
dish and put it in the freezer to harden.


When the Amazing Remelt was completely hardened I removed the cookie cutters and the center Remelt pieces. The negative voids will be my mold for the Amazing Clear Cast Resin.


I laid a piece of deli paper under my mold and sprayed it with mold release. I then made up a batch of Amazing Clear Cast Resin and poured it into the mold {CLICK HERE to view mixing/preparation}. As it was curing I sprinkled glitter, micro beads and shaped glitter into the resin.


After they cured about 24 hours, I popped them from the molds and decorated the tops of them with bling and eyelashes on the moons. Then I drilled a hole and laced with thread to hang them.


What cookie cutter shapes will you
transform into suncatchers?

I appreciate you checking out my project! If you’d like
to see more of my creations, please stop by my YouTube Channel

• • • • • • • • •

Don't forget to subscribe to our blog on the right side bar:
Twitter at AmazingCasting | Facebook at AmazingMoldPutty | YouTube at AmazingMoldPutty

Tuesday, October 13

#Cre8time Inspired... Easy Peasy Box Decor by Aimée Wheaton


This simple project came together super fast! It makes a great gift idea or an embellishment to a gift that will be treasured for a long time. This will have lots of glitter and shine for a long time to come! I made this for my daughter, it will match her room and she can hold her little trinkets in it. This wooden box was purchased for $1.99 at a craft store – it's a card holder box for playing cards but can be used in other ways.

Here's what you'll need to create this look:
  • Wooden craft box
  • Masking Fluid
  • Watercolors
  • 1 sheet of water color paper to catch all the extra water
  • brush
  • water
  • Amazing Clear Cast Resin
  • Glitter
  • Flat back craft gems


Using masking fluid, draw desired design
onto wooden box and let dry.


Paint over the masking fluid and then take it off when
completely dry. Now you're ready to add the resin!


Look how shimmery it is!!


Simple with a big impact!! Amazing Clear Cast Resin makes a nice finishing touch on any of your projects. Look for more amazing ways to use this resin by searching in the side bar!

Show us what you embellish!

Feel free to stop by my FB page to see the latest with me.
To see more of my work please visit my new blog "Life Glitter Makeup"
and also at the Aimée Wheaton Art and Design website.

Till next time! Xoxo Aimée

• • • • • • • • • • • • • •

Don't forget to subscribe to our blog on the right side bar:
Twitter at AmazingCasting | Facebook at AmazingMoldPutty | YouTube at AmazingMoldPutty

Wednesday, August 7

Design some DIY Doggie Bling... AMAZING Inspiration by Isabel Villarreal


If you have a family dog or cat, you know how much fun they are to spoil and shower with gifts. I have two dogs and foster a third, so I know how easy it is to spend tons of money in an effort to show everyone who'll listen that my pets (and by default, me) have great taste, style and flair. And there's nothing like a collar charm or personalized tag to add pizzazz. Trust me, I have spent countless dollars on every kind of tag and charm that's ever been made only to have them lost. With Amazing Crafting Products you can make beautiful and inexpensive tags and charms to show off your pet's personality.


I started with a metal tag that I got as a memento for participating in a 5k run. It has engraving on the front, but the back of the tag was nice and smooth and made for a great base. Amazing Mold Putty is super easy to use and it's also the perfect solution for making duplicates. Once you have a mold you can use it countless times. I used Amazing Casting Resin to make the White tag (it dries a solid White color) and Amazing Clear Cast Resin mixed with Alumilite Silver Metallic Powder to make the Silver tag. Once they were cast I cut the backs off of some novelty buttons, cut some colored craft paper and letters from a magazine to make these adorable personalized tags. As a final step, I used Amazing Clear Cast Resin as a top coat to seal the layers.

The best part? The tags are not metal - they're resin, so they're very light and as a bonus there's no loud jingling. Just fun, flashy bling for your pet!

What kind of bling will you create for your furry friend?

I'd love to see what you create! Please upload and share your creations to the NEW
user GALLERY on the Amazing Mold Putty Website for all the world to see.

Isabel Villarreal

.................................

Don't miss a single post!
Please subscribe to our blog via email on the right side bar:
Twitter at @AmazingCrafting | Facebook at AmazingMoldPutty | YouTube at AmazingMoldPutty

Tuesday, June 18

AMAZING One-of-a-Kind Altered Phone Case...
by Guest Designer Jess B.

I've seen many versions of people who bling out their phone cases – and suggesting all types of adhesives to tack down their rhinestones and embellishments. 


What better way to make sure they stick but with Amazing Clear Cast Resin???


I bought the phone case from Marshall's for $4.99.


I prepped the phone case by using rubbing alcohol to remove all debris.


As it dried I started creating a heart embellishment using a Amazing Casting ResinRed Alumilite Dye, a heart-shaped cookie cutter and clear box tape.


I prepared and mixed Amazing Casting Resin
according to the easy-to-follow instructions.


Then I added about 3 drops of Red Alumilite Dye to part "A" of the resin; stirred completely; then combined with part "B". After stirring both parts together, I poured the resin into the heart cookie cutter. For full instructions on mixing Amazing Casting Resin, please CLICK HERE.


The resin heart cures in about 15 minutes...


Love the red vibrancy !


Now to add some bling. I used Ranger's Glossy Accents
to adhere all the embellishments in place.


My daughter lost one of her earrings. So I just clipped off the post
and added it to the center of the heart... and BAM! Total cuteness!!!


I let it sit for a little while for all the adhesive to dry completely. Then I added blue painters tape around edge of the phone cover to protect the edges and to make a retaining wall for for the Amazing Clear Cast Resin.


I mixed up a batch of for the Amazing Clear Cast Resin following the instructions; stirring completely and giving the resin a few minutes to rest and let bubbles dissipate. Please CLICK HERE to view how-to on mixing and preparing Amazing Clear Cast Resin.


I poured the Amazing Clear Cast Resin, covered and let it cure for 24 hours. 


I also added glitter on the sides of the case for that extra glitz.


After all was done - I was so excited to snap on my new case... then come to realize it wasn't my size. Ugh! Another day in the life of Jess B. – LOL! It will make a great gift!

So go ahead... have fun and create
your own one-of-a-kind phone case!


To see more of my work, please CLICK HERE to visit my blog "thatzuneek".

Thanks for stopping by! 


.................................
__________________________________________

Use this COUPON to shop at the Amazing Mold Putty
website HERE and receive 25% OFF your purchase.
Please use coupon code " summerhaus " {no quotations}.
Coupon expires June 30, 2013.
__________________________________________
.................................

Thanks for stopping by and have a great day!

Don't forget to subscribe to our blog on the right side bar:
Twitter at AmazingCrafting | Facebook at AmazingMoldPutty | YouTube at AmazingMoldPutty

Wednesday, May 8

"HOT" White Jewelry Statement AMAZING Inspiration from Guest Designer Jess B.


Hello Everyone! It's Jess B. bringing you some inspiration today. I tell you this design team is on a roll with fantastic inspirations. I usually receive emails from Send-Trend to keep up with the new styles for the summer... When I came across this necklace and it screamed, "Amazing Casting Resin!"


I try to find jewelry pieces that make a statement, yet are clean
and classy enough that it will be worn again and again.

Here is my DIY
"Hot White Jewelry Statement"


I love hexagon shapes and love white! When wearing white, my loving children always find a way to have one hand on me somewhere which we all know what happens. True story - I found a small hand print of Cheetos stains on my lower back. Of course no one said anything to me all day. Go figure.


I prepared and mixed Amazing Casting Resin according to the easy to follow instructions. I poured the resin into the molds to cast my hexagons and jewels. For full instructions on mixing Amazing Casting Resin, please CLICK HERE.

The resin cures in about 15 minutes...


I painted my Amazing Casting Resin hexagons with a Krylon Gold Leafing Pen.


I found this awesome Mini Micro Drill Bit Set on Amazon.


I hand drilled each and every hole.


Pretty cool!


I adorned the necklace with beads and bling from my stash.


I also made a bracelet. No earrings needed for these big statement pieces
– but certainly would be fun, too!

What jewelry are you going add to your collection?


If this has inspired you to create your own statement jewelry using Amazing Crafting Products, please leave a comment and your link here. I would love to see how your creations came out! To see more of my work, please CLICK HERE to visit my blog "thatzuneek".

Thanks for stopping by! 


Don't forget to subscribe to our blog on the right side bar:
Twitter at AmazingCrafting | Facebook at AmazingMoldPutty | YouTube at AmazingMoldPutty
Related Posts Plugin for WordPress, Blogger...