Showing posts with label 12 Days of Home Decor. Show all posts

Monday, January 2

Happy #Cre8time New Years... AMAZING DIY Resin Art by Lyn Gill


HAPPY NEW YEAR!!! Hi everyone – Lyn Gill here again with some AMAZING resin inspiration. This time I'm sharing my first try with resin painting/pouring... and I love it!!! The base is just a piece of Foam Board, but it's the perfect thing to practice on.

Using just 16 drams of Amazing Clear Cast Resin (8 drams of part "A" + 8 of part "B") in the measuring cup... I followed the simple instructions that you can see HERE. After mixing I divided it into into 5 different cups and colored each one separately with a little Alumilite Dye and Alumidust in different colors; then poured them each (except for the white pearl), back into the larger mixing cup without re-stirring. 

Then I poured the whole mixing cup onto a foam board at one time and allowed it to settle – tilting the board when needed to get the resin to flow around to cover the board. Then I dropped little drops of the white pearl resin (Amazing Clear Cast Resin + Pearl Alumidust) in various areas of the board and let it cure over night. 

**A TIP** If you try this, please be sure to cover your work surface with waxed paper or some other protection as this can be a messy project.

The results are stunning! 
I'm crazy about this technique and will definitely try more! 


Gorgeous right?!! It was so much fun and I love the randomness of the finished piece... no two will ever be the same! There's much more to come in the New Year – I promise!

Do you have any crafty New Years resolutions?

Well than you so much for joining me again here at Amazing Casting Products – Hope you have an Amazing New Year!... Till Next Time! Lyn

As usual, you can find more of my work on my blog LynzCraftz
or on YouTube LynzCraftz, or my Facebook page LynzCraftz.

• • • • • • • • • • • • • • • • •

Don't forget to subscribe to our blog on the right side bar:
Twitter at AmazingCasting | Facebook at AmazingMoldPutty | YouTube at AmazingMoldPutty

Friday, December 11

Happy Little #Cre8time Shower Curtain Hooks...
by Bridget Cordero #12DaysofHomeDecor


Have you ever had one of your decorative shower curtain hooks break and you don't want to buy a whole new pack? Well I'm going to show you how you can make a new one using a few Amazing Casting Products!


You will need the broken hook, some Amazing Mold Putty, Amazing Casting Resin and acrylic paint to turn this broken piece into a new piece.


Using the Amazing Mold Putty I made a mold of the unbroken frog. 


Once the mold putty was cured, I stirred up some Amazing Casting Resin and poured it in the mold and waited a few minutes and set the hook in place on the back. After the resin cured I popped it out and painted it.


The finished hooks!


Can you tell the repaired
hook from the originals??

If you would like to see more please check
out my how-to video by clicking HERE.

Thanks for stopping by!
If you’d like to see more of my creations,
please stop by my YouTube Channel

• • • • • • • • •

Don't forget to subscribe to our blog on the right side bar:
Twitter at AmazingCasting | Facebook at AmazingMoldPutty | YouTube at AmazingMoldPutty

Thursday, December 10

#Cre8time Custom Artifacts... The Hunter's Knife by Lyn Gill #12DaysofHomeDecor


Hi Lyn here! Are you getting ready for the holiday's? Well I have been and I have a little home decor project to share with you today. I was inspired by my love of nature and all things ancient.


It all started with this broken Native American spear head tip I had found years ago. I knew Amazing Mold Putty would be the perfect to mold it! So I formed the putty around the spear head and quickly stood it up on it's end so that it would form a flat bottom. That way I wouldn't need to support it when I poured in the Amazing Clear Cast Resin.


I mixed some of the Alumilite Brown Dye to the Amazing Clear Cast Resin then poured and waited... LOL – waiting is the hardest part for me! When it was set I formed a handle around the cured blade using Super Sculpey and then I baked it. The Amazing Casting Resin and Amazing Clear Cast do well at Polymer Clay baking temps (around 275ºF). I added little acrylic paint along with a few embellishments and it was finished.

What broken items have you used
to fix, repair or re-use?

I want to thank you for taking the time to stop by today
and sharing in this fun 12 Days of Home Decor with us.

Till Next Time! ~ Lyn 
You can find me on YouTube at LynzCraftz or on my blog LynzCraftz.

• • • • • • • • • • • • 

Don't forget to subscribe to our blog on the right side bar:
Twitter at AmazingCasting | Facebook at AmazingMoldPutty | YouTube at AmazingMoldPutty

Wednesday, December 9

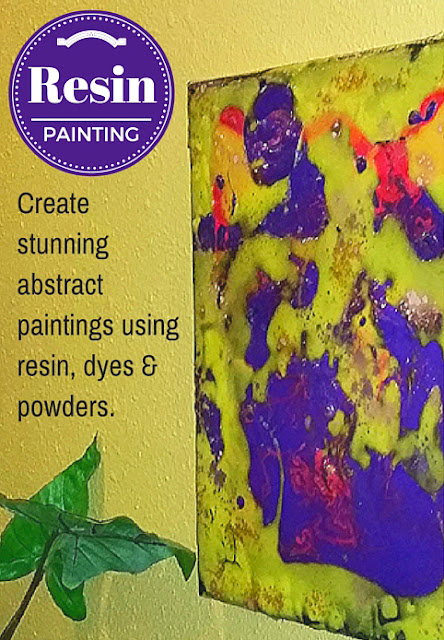
AMAZING #Cre8time Resin Painting with Tanya Ruffin #12DaysofHomeDecor


Tanya here with a fun project using resin to create stunning abstract paintings on a prepped canvas with a few AMAZING supplies...


I started off with a 12" x 12" canvas painted black.

Using Amazing Casting Resin, I first mixed red Alumilite Dye and poured onto the canvas. CLICK HERE to view mixing/preparation.

**A TIP** Place your canvas on plastic, or in my case I used a plastic box for storing scrapbook paper. The cured resin peels right off the top!

I then mixed another batch of resin with red dye and then violet dye. I finished up with yellow dye mix. Before the resin cures, I sprinkle some Alumidust in various colors over the surface.


The yellow resin mix hasn't cured yet.


When it cures you can use a wet paper towel to wipe off
the Alumidust that didn't stick. Most of it stays put!


I love this look. And can you imagine how amazing this would be if I marbleized it? Hmmm... maybe that is my next post!

What color combinations will you
use to match your home decor?

Now go out there and Craft Your Own Way!


Please visit my site to see more of my inspiring creations at www.tanyaRuffin.com

• • • • • • • • • • • • • • • • •

Don't forget to subscribe to our blog on the right side bar:
Twitter at AmazingCasting | Facebook at AmazingMoldPutty | YouTube at AmazingMoldPutty

Tuesday, December 8

Light Up your AMAZING Space... #12DaysofHomeDecor #ACPthrowback


Hello Amazing Crafters! For day nine of our 12 Days of Amazing Home Decor we revisit an #ACPthrowback project by amazing creative Isabel Villarreal – who has repurposed an old fabric lampshade with some decorative tissue and Amazing Clear Cast Resin.


Sometimes you just need some dramatic lighting... this handmade paper lampshade adds just the right amount of drama to any room during the day and when lit at night.

CLICK HERE to jump to
Isie's full how-to.

Want to see more of what Isie is up to?
Follow her on her blog here!

• • • • • • •

Share your creations using Amazing Casting Products for
our next #ACPthrowback Third Thursday on December 17.


Post them to our Facebook page, or tag us on Instagram, Pinterest, and on Twitter to be featured here on our blog. We'll be looking for your projects with the hashtag #AmazingCastingProducts.

• • • • • • •

Don't forget to subscribe to our blog on the right side bar:
Twitter at AmazingCasting | Facebook at AmazingMoldPutty | YouTube at AmazingMoldPutty

Monday, December 7

It's Wine o'Clock Somewhere... by Brenda Burfeind #12DaysofHomeDecor


Good day and thanks for stopping in to see another installation for our 12 days of Home Decor. Brenda here from Creativity is a State of Mind and today I am going to show you how to use Amazing Mold Rubber to recreate a lightweight version of a heavy object.


Most of you know I am a wine snob. Well, not really – I just love wine and everything that goes with it. I recently started a job at a wine store where we carry only local wines. Who knew that South Dakota had wineries??! Yes, in fact we have over 20 wineries all across the state.

Well as I said, I love wine and everything that goes with it and that includes these fabulous flattened wine bottles. My only concern is that they are made out of real glass wine bottles and am always afraid of dropping them and breaking. Imagine the mess those glass shards would make?


You can even use them as cheese platters or hang them on the wall. In fact, I have one that functions as both... yet I am afraid to use it as it could break. I have always been intrigued on how they are made and did a bit of research. You need a kiln, of which I do NOT have {if you do have one, there is a great tutorial here on ehow.com}; nor do I think my hubby would let me get one as my house has already been overtaken with my crafties.


So, instead I decided to make my own faux flattened bottle. I started out by finding something long enough for my existing flattened bottle to fit in with no avail. I did however find a plastic lid, so I built my mold box up using duct tape. I added two layers of tape around the entire lid to serve as side walls.


Here is a close up shot of the mold box.


Now I know I would need a lot of the Amazing Mold Rubber to cover this big of a project, so I cut up some of my previous molds that I will no longer be using to use as filler. That's the beauty of mold rubber, it will attach itself to itself when building up or creating another mold. I just chunked it up and placed it around my bottle.
Usually you would need to hot glue your item down, but because the bottle is so heavy I know it won't float up. Then I mixed up my batch of Amazing Mold Rubber – you can see mixing instructions HERE in this video.


Here is the backside of my mold. Some of the chunks floated up, or were a bit higher than the pour. No worries though, it won't have any effect on the mold itself.


Once demolded, you can see that the mold rubber ran under a little – but no worries there either. Just snip the excess mold rubber skin off and keep in a safe place for future use.


Look how nice this shape took!


Now I wasn't sure of how much resin it would take so I filled my mold with water to get a general idea of how much resin to mix up. By using Amazing Clear Cast resin my faux flattened bottle will also be FOOD SAFE! Not only will it become a nice home decor piece, but you can use it to entertain as well!


Once I got an estimated measurement of how much resin I would need, I mixed up a batch of  Amazing Clear Cast Resin with the Alumilite Violet Dye {you can see mixing instructions in a video HERE}.


I wanted to be able to hang my faux flattened bottle so I shaped some plain wire in a "C" shaped form and placed it into my resin to cure. I used a paintbrush handle to keep it from sinking to the bottom of my resin. Once the Amazing Clear Cast Resin cured I added some beads to the top with wire to jazz it up a bit.


Now for the fun part, you can use a chalk pen to write on the bottle and it will wipe right off. You could personalize your bottles any way you want. Write a special sentiment when gifting?


I took the bottle to work and am using it for a display piece.


I plan on gifting this to a friend and here is the box I put together for her. All local goodies and few extras. Remember, if at all possible, shop local!


Now I have a lightweight faux glass flattened bottle...
and do not have to worry about it breaking.

How fun was this? I hope you've enjoyed my tutorial
today and would love if you left me some comments.

What heavy or breakable object
would you recreate in resin?

Thanks for stopping by and until next time...
It's Wine O'clock somewhere! ~ Brenda

Visit my blog, Creativity is a State of Mind to see some more of my creations.

• • • • • • • • • • • • • •

Don't forget to subscribe to our blog on the right side bar:
Twitter at AmazingCasting | Facebook at AmazingMoldPutty | YouTube at AmazingMoldPutty

Sunday, December 6

#Cre8time Blossoms with Fabulous FAUX Mini Vases #12DaysofHomeDecor #ACPthrowback


Hello Amazing Crafters! For day seven of our 12 Days of Amazing Home Decor we revisit an #ACPthrowback project by creative Lynne Suprock – creating some fabulous faux mini vases. This project is perfect for displaying little vases around the house holding bits of seasonal greenery, fresh clipped flower buds, or for making favors for a wedding.


Grab those crystal vases or glasses in your china display
and mold them into fabulous faux bud vases.


With Amazing Casting Resin you can transform the crystal shape into fabulous faux milk glass... or with the addition of paint/dyes a custom look to match your AMAZING home decor.

CLICK HERE to jump to
Lynne's full how-to.

Want to see more of what Lynne is up to?
Follow her on her blog "Simply Pretty Stuff"!

• • • • • • •

Share your creations using Amazing Casting Products for
our next #ACPthrowback Third Thursday on December 17.


Post them to our Facebook page, or tag us on Instagram, Pinterest, and on Twitter to be featured here on our blog. We'll be looking for your projects with the hashtag #AmazingCastingProducts.

• • • • • • •

Don't forget to subscribe to our blog on the right side bar:
Twitter at AmazingCasting | Facebook at AmazingMoldPutty | YouTube at AmazingMoldPutty

Saturday, December 5

It was a Winter to #Cre8time Remember... #12DaysofHomeDecor #ACPthrowback


Hello Amazing Crafters... welcome to day five of our 12 Days of Amazing Home Decor! Today we revisit an #ACPthrowback project by Amazing Creative Brenda Burfeind. With winter fast approaching, today's project may inspire you to look at a snow day in a whole new Cre8time way!


After an ice storm, that lasted for days with power outages and downed branches... she found some beauty in the icy stillness that remained. Brenda captured photos of the winter wonderland and wanted to remember this in a special way – not just with pictures winding up in a photo album. 


With a little help from her husband, Amazing Mold PuttyAmazing Clear Cast Resin, and some glittery goodness from her scrapbooking stash, she made a beautiful plaque to commemorate the event that her family can reminisce for years to come.


A moment in time encapsulated upon a slice
of a branch from the tree from which it fell.


CLICK HERE to jump to
Brenda's full how-to.

Want to see more of what Brenda is up to?
Follow her on her blog "Creativity is a State of Mind"!

• • • • • • •

Share your creations using Amazing Casting Products for
our next #ACPthrowback Third Thursday on December 17.

Post them to our Facebook page, or tag us on Instagram, Pinterest, and on Twitter to be featured here on our blog. We'll be looking for your projects with the hashtag #AmazingCastingProducts.

• • • • • • •

Don't forget to subscribe to our blog on the right side bar:
Twitter at AmazingCasting | Facebook at AmazingMoldPutty | YouTube at AmazingMoldPutty

Friday, December 4

Dress the Walls with a little #Cre8time Recycling... by Melissa Johnson #12daysofHomeDecor


Hi everyone! Today I wanted to share with you a mixed media wall hanging I've created as a gift for my sister in law (shh... don't tell her!)


To begin, I started with an old piece of barnwood that a friend passed along to me. I lightly painted it with turquoise acrylic paint, then sanded it a bit to smooth it out and distress the paint.


I set the board aside and began working with some bottle caps and vintage images. I placed the images inside of the bottlecaps, and poured Amazing Clear Cast Resin inside of each one.


I dug through my stash and found a picture of a vintage girl and added her to the board, along with the bottlecaps.


I finished off the entire project by adding a fun little phrase to the girl, a vintage style button, and some twine. Here it is all finished and ready to be gifted!


How do you dress up your walls?

Make something that makes you happy :) ~ Melissa Johnson
For more of my mixed media projects, please visit my blog.

• • • • • • • • • • • • • •

Don't forget to subscribe to our blog on the right side bar:
Twitter at AmazingCasting | Facebook at AmazingMoldPutty | YouTube at AmazingMoldPutty
Related Posts Plugin for WordPress, Blogger...