Showing posts with label painting with resin. Show all posts

Monday, January 2

Happy #Cre8time New Years... AMAZING DIY Resin Art by Lyn Gill


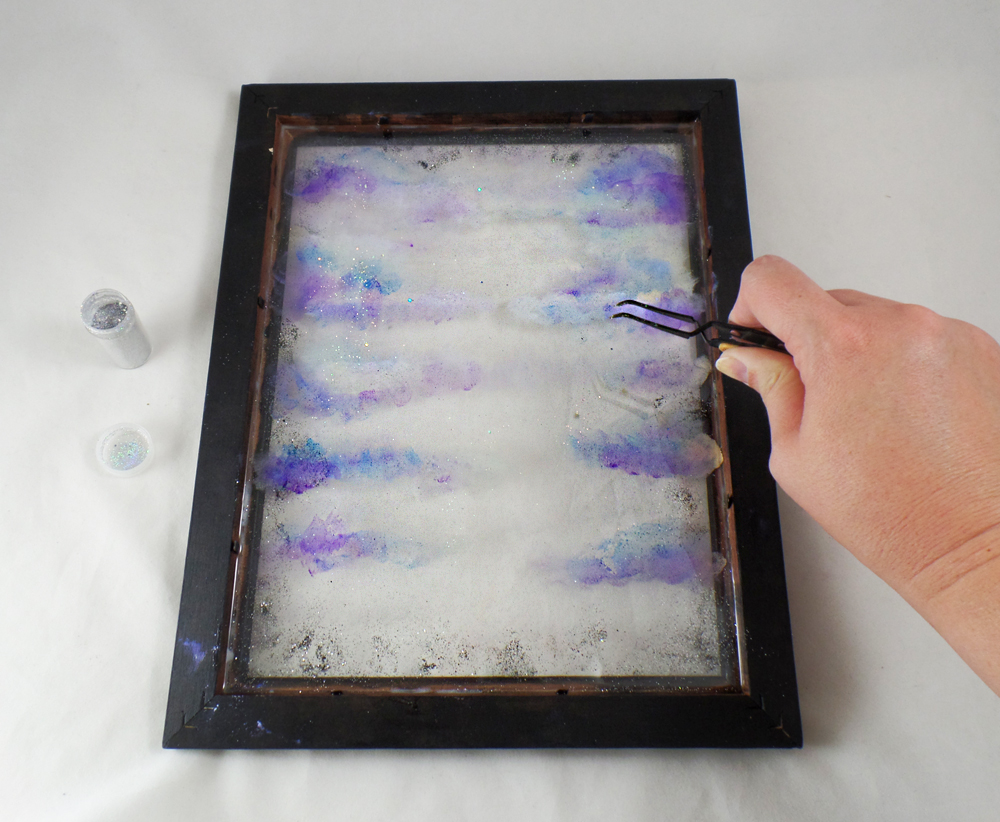
HAPPY NEW YEAR!!! Hi everyone – Lyn Gill here again with some AMAZING resin inspiration. This time I'm sharing my first try with resin painting/pouring... and I love it!!! The base is just a piece of Foam Board, but it's the perfect thing to practice on.

Using just 16 drams of Amazing Clear Cast Resin (8 drams of part "A" + 8 of part "B") in the measuring cup... I followed the simple instructions that you can see HERE. After mixing I divided it into into 5 different cups and colored each one separately with a little Alumilite Dye and Alumidust in different colors; then poured them each (except for the white pearl), back into the larger mixing cup without re-stirring. 

Then I poured the whole mixing cup onto a foam board at one time and allowed it to settle – tilting the board when needed to get the resin to flow around to cover the board. Then I dropped little drops of the white pearl resin (Amazing Clear Cast Resin + Pearl Alumidust) in various areas of the board and let it cure over night. 

**A TIP** If you try this, please be sure to cover your work surface with waxed paper or some other protection as this can be a messy project.

The results are stunning! 
I'm crazy about this technique and will definitely try more! 


Gorgeous right?!! It was so much fun and I love the randomness of the finished piece... no two will ever be the same! There's much more to come in the New Year – I promise!

Do you have any crafty New Years resolutions?

Well than you so much for joining me again here at Amazing Casting Products – Hope you have an Amazing New Year!... Till Next Time! Lyn

As usual, you can find more of my work on my blog LynzCraftz
or on YouTube LynzCraftz, or my Facebook page LynzCraftz.

• • • • • • • • • • • • • • • • •

Don't forget to subscribe to our blog on the right side bar:
Twitter at AmazingCasting | Facebook at AmazingMoldPutty | YouTube at AmazingMoldPutty

Tuesday, November 29

#Cre8time Finishing Touches... AMAZING Inspiration by Lara Hjorthoy


Hey Friends! Lara here to share a little inspiration on how I'm using Amazing Clear Cast Resin today! I'm putting the finishing touches on my Mars Attacks, Alien lady – while I work on creating my second sculpt for Penumbra Gallery's, movie-themed extravaganza this March... in Portugal! I'm adding eyelashes and high gloss to her eyes!

I've added the Clear Cast resin to her eyes. I prepared a small batch and let it sit for a bit to get thicker, then dolloped a smidge into her eyes... and let that sit and cure. Now her eyes are glistening and bright – which is lovely for an Alien about to take part in destroying the world! 

What finishing touches do you

Stay Inspired Friends! ~ Lara

Check out my website at www.larahjorthoy.com and YourToyCreation.etsy.com. You can follow my day to day creations at Facebook and Instagram, look for YourToy Creations!

• • • • • • • • • • • • • •

Don't forget to subscribe to our blog on the right side bar:
Twitter at AmazingCasting | Facebook at AmazingMoldPutty | YouTube at AmazingMoldPutty

Thursday, October 20

#Cre8time Pocket Art... Upcycled Dollar Store Mirror by Tanya Ruffin


Resin Embellished Compact


I started off with a Dollar Tree compact... and it actually came with a large hand mirror, so it was cheaper than a dollar!

This is a fairly quick and cheap way to jazz up a compact. I plan on doing a similar effect with the large mirror and this was my successful test!


Open the mirror up and lay it flat (mirror side down) on a non stick surface. Pour some Amazing Clear Cast Resin on the surface making sure that it doesn't drip off the edge. CLICK HERE to view mixing/preparation.


Gather your powders. I chose several colors of Alumidust.


Sprinkle several colors of Alumidust. I placed a small amount on the end of a craft stick and tapped the stick till the powder lightly fell onto the surface.


Using a stick ( I had a chop stick), I swirled
the powders to make a faux marbled look. 


Let cure. Keep checking to make sure the resin doesn't drip
into the hinge. If it does, you can clean up with a craft knife.


My mold is made from the face of an egret cameo pressed into a ball of Amazing Mold Putty. I dusted the inside of the design with more Alumidust. I tinted my Amazing Casting Resin (is opaque white, not clear) with yellow dye and poured. Love how the relief POPs!


I embellished with some stringed beads using E6000. I dripped a little Amazing Clear Cast Resin to further secure the beads and to finish the look. This will keep the beads from getting knocked off inside a purse!


TADA! This dollar store find jazzed up looks so amazing!

How would you customize your
pocket mirror into ART?

Go Craft Your Own Way!
Tanya


Please visit my site to see more of my inspiring
creations at www.tanyaRuffin.com

• • • • • • • • • • • • • • • • •

Today we are hopping along with the artists of the Designer Crafts Connection who has taken on the challenge of creating with Amazing Casting Products.


For this challenge, Amazing Casting Products provided each of the Designer Craft Connection designers with Amazing Mold Putty and Amazing Clear Cast Resin. You want to pop over to the beginning of the bloghop HERE where you can enter to win what you see in the photo above... an Amazing Clear Cast Resin and a 3lb. kit of Amazing Mold Putty {which is 1 1/2 lbs of each part of this magical goodness}. An artist's dream PRIZE!!!

• • • • • • • • • • • • • • • • •

Don't forget to subscribe to our blog on the right side bar:
Twitter at AmazingCasting | Facebook at AmazingMoldPutty | YouTube at AmazingMoldPutty

Friday, September 2

#Cre8time Explorations... Amazing Resin Painted Galaxies by Lara Hjorthoy


Hi Friends! Lara here with a "How-To" project this week – something a wee bit different! I decided with all these great frames I've been collecting... I needed to put some of them to use!

I love skies, and galaxies and stars! I often paint these scenes and they're beautiful when I do. To my delight Amazing Casting Products has all these beautiful colored dyes and one of my favourite products, the Alumilite Pearlescent Powder. So, I decided this week to try CASTING my own galaxies!


I first started out with a small 5" x 7" frame that I spray painted in a lovely semi-flat black. Then attached the piece of glass to the inside of the frame with superglue. That I allowed to set overnight just to make sure there would be no weird reaction with the resin.


I added to 6 different cups a tiny amount of black, blue, violet, yellow, green and white dyes as well as a tiny amount of the pearlescent powder to each cup.

I mixed up a batch of Amazing Clear Cast Resin and after allowing the bubbles to settle for a bit, I poured a small amount of the resin to each cup – mixing each again, very thoroughly! The Pearlescent is so-o-o-o-o beautiful in all the colors! It adds just the right amount of sparkle, or in this case, STARS!!!


Upside down, right after pouring!

I poured each color separately into the frame, allowing them to mix together a bit. I used a popsicle stick to push around the resin colors that I wanted to shape a bit more. Then sat back and allowed this to cure! Here in Vancouver, the curing time wasn't long, and I was able to see the results within 4 hours.

I flipped the piece over and boy was I surprised! The pearlescent powder had settled ever so on the glass that the resin was poured onto, and I ended up achieving a crazy sparkly effect! It's gorgeous!


Since this was so reflective and hard to capture in a photo, here's a little video capturing the full sparkly effect! If you have trouble viewing video, please CLICK HERE.

Now to do larger galaxies!!!! I can't wait to make more of these... as it was so easy to make. What a dramatic piece of art to add to your wall!


Hope you enjoyed this little How-To this week!

What out of this world resin
paintings would you create???

Stay Inspired ~ Lara

Check out my website at www.larahjorthoy.com and YourToyCreation.etsy.com. You can follow my day to day creations at Facebook and Instagram, look for YourToy Creations!

• • • • • • • • • • • • • •

Don't forget to subscribe to our blog on the right side bar:
Twitter at AmazingCasting | Facebook at AmazingMoldPutty | YouTube at AmazingMoldPutty

Wednesday, December 9

AMAZING #Cre8time Resin Painting with Tanya Ruffin #12DaysofHomeDecor


Tanya here with a fun project using resin to create stunning abstract paintings on a prepped canvas with a few AMAZING supplies...


I started off with a 12" x 12" canvas painted black.

Using Amazing Casting Resin, I first mixed red Alumilite Dye and poured onto the canvas. CLICK HERE to view mixing/preparation.

**A TIP** Place your canvas on plastic, or in my case I used a plastic box for storing scrapbook paper. The cured resin peels right off the top!

I then mixed another batch of resin with red dye and then violet dye. I finished up with yellow dye mix. Before the resin cures, I sprinkle some Alumidust in various colors over the surface.


The yellow resin mix hasn't cured yet.


When it cures you can use a wet paper towel to wipe off
the Alumidust that didn't stick. Most of it stays put!


I love this look. And can you imagine how amazing this would be if I marbleized it? Hmmm... maybe that is my next post!

What color combinations will you
use to match your home decor?

Now go out there and Craft Your Own Way!


Please visit my site to see more of my inspiring creations at www.tanyaRuffin.com

• • • • • • • • • • • • • • • • •

Don't forget to subscribe to our blog on the right side bar:
Twitter at AmazingCasting | Facebook at AmazingMoldPutty | YouTube at AmazingMoldPutty

Wednesday, August 19

#Cre8time Resin Play Frames Dreams of Halloween... by Tracy Alden


Hello! Tracy with another home decor creation using Amazing Casting Products! I am getting a early start on Halloween crafting inspiration by reading books on vintage Halloween crafts and poems. I saw the lovely postcards of the late 1800s and I thought why not put a modern spin on it?

Supplies:


I started with removing the glass and back panel of an old 8x10 photo frame. I scrubbed the frame clean and painted the back and front of the frame with 2 coats of Multi Surface Chalk Paint. I let the paint dry overnight.


I cleaned the glass panel and put it back into the frame. I glued the glass in place to make sure it wouldn't shift while I worked on it and so resin wouldn't leak around the edges later. I was careful to have a solid line of glue all the way around the frame and let it dry completely.


Using a stipple pattern, I applied a coat of Liquitex Gloss Varnish to the edges of the glass. Before the varnish dried I sprinkled on black and crystal glitter. The glitter will add a wonderful shimmer to the piece later on.


Using a cosmetic sponge I stippled on blue, purple, white, and wheat acrylic paints in broken puffy lines to mimic the look of stormy clouds. I wasn't worried about it being perfect as this was just the start of the layers of colors I would apply.


Once the paint was dry I applied a thin layer of Liquitex Gloss Varnish,
then rubbed on blue and purple Alumidust and let dry.


I mixed up some Amazing Clear Cast Resin, making up 3 of the mini measuring cups (that come with the resin kit) to coat the entire back surface of the painted glass panel.


Before the Amazing Clear Cast Resin cured I sprinkled some silver halo glitter on it, to give the illusion of twinkling stars. I then let the resin layer cure to firm state, about 4 hours in warm weather.


Using acrylic paint I painted simple circle to be the moon
in the scene I was creating. I let the paint dry completely.


I mixed up a mini cup of Amazing Clear Cast Resin with a few drops of Blue Alumilite Dye, pouring that resin in the outer edge of the glass. I then mixed up another batch of resin with Purple Alumilite Dye, pouring that right inside the blue ring of resin. The next batch of resin was mixed with a very small amount of Purple Alumilite Dye and some Pearlescent Alumilite Metallic Powder and poured inside the two other resin rings as seen in the photo.


I let the resin rest for a few minutes, giving it a chance to level and blend a little. I then dragged a stir stick back and forth gently the mix the colors. I picked up the frame carefully, tilting slightly back and forth to make sure all the resin colors had a nice color blur. I let the resin set for 30 minutes.


I sprinkled on some crystal glitter and Pearlescent Alumilite Metallic Powder on top of the resin. Since I did not over-saturate the the resin with dye, it was slightly transparent, allowing this final layer of glitter to be seen from the front of the glass. I let the resin cure competently.


Before I put the back panel back onto the frame I put a layer of Aluminium Foil on the now cured resin. The foil will make the resin colors pop more and the glitter reflect light better.


With the back panel on I flipped over the frame to see the scene I had created. I felt the clouds needed some extra detail so I stippled on more acrylic paint lightly over the cloud portions only and let dry.


I added one final coat of Amazing Clear Cast Resin 
to seal the piece and let it cure completely.


With all the layers or resin and paint, it has a subtle
luminosity and play of light perfect for Halloween decor!


I glued on some twigs to mimic the look of old trees
and small paper sentiment to finish the piece!

What AMAZING arts and crafts can you create?


Visit my blog Art Resurrected for more craft tutorials!

Until next time, safe travels! ~ Tracy

• • • • • • • • • • • • • • • • •

Don't forget to subscribe to our blog on the right side bar:
Twitter at AmazingCrafting | Facebook at AmazingMoldPutty | YouTube at AmazingMoldPutty
Related Posts Plugin for WordPress, Blogger...